When you use Blender for the first time, one of the first tools you will notice is the 3D cursor, which is different from the traditional mouse cursor in that it is used in the 3D viewport specifically.
The 3D cursor is used for many different functions in Blender, including adding objects, acting as the pivot point for rotation and scale, adjusting the view of the viewport camera, and transporting objects or object origins to new positions.
Many functions within Blender 3D rely on the 3D cursor, it’s positioning, and rotation values. Therefore, the better you become at using the free di cursor, the more comfortable you will be regarding 3D modeling in Blender.
What Is The 3D Cursor?
In 99% of applications, you work with a single cursor, which is the mouse cursor. This is also true, to an extent, in Blender, as we use the mouse cursor to access the various panels and buttons throughout the blender interface.
However, when working in the 3D viewport, we will also be introduced to a second cursor known as the 3D cursor.
By default, this 3D cursor will be at the center of the world’s origin when you start a new project in Blender.
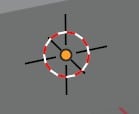
The appearance of our cursor is very different from a traditional mouse cursor. It is a circle made from red and white sections. It also has a black reticle that extrudes out from the cursor’s top, bottom, left, and right sides.
The 3D cursor is a tool controlled within the 3D viewport. Therefore, before using the 3D cursor itself, we need to learn how to position the cursor within this 3D space.
If we want to be able to move our cursor, we first of all need to activate the cursor tool from our tool shelf. If you cannot see your tool shelf, press the T key while your mouse cursor is in the 3D viewport.
The second option in the tool shelf will be for the 3D cursor, and the icon will look like the cursor itself. Select it, and the tool highlights blue, which will indicate that the cursor tool is enabled.
If you now left-click anywhere within the 3D viewport itself, except any of the menu buttons, then the 3D cursor will snap to the mouse cursor’s position where you clicked.
Alternatively, you can click and drag using your mouse cursor to reposition your 3D cursor anywhere within the 3D viewport.
If you want a more accurate method of manipulating the location of your cursor, then press the end key on your keyboard while your cursor is within the 3D viewport.
This will open up the side panel on the right-hand side of your viewports editor. Next, select a few tabs on the side of your side panel. This will open up some new options, including the ability to manipulate the location and rotation of your 3D cursor.
You can type numerical values to position your cursor on the X, Y, & Z axes. For example, to place your cursor by a value of two on the Z-axis, click the numerical value for Z and type 2.
Adding Objects At The Position Of The Cursor
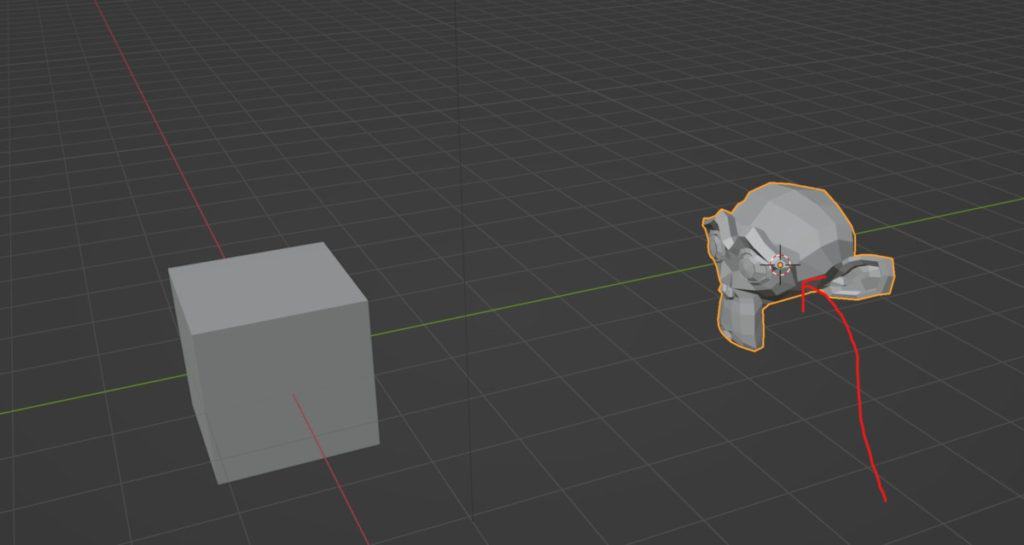
The most fundamental means of using a 3D cursor within our viewport is to define the location of where new objects are going to be added.
Whenever an object is added to our scene, it would always be positioned wherever the 3D cursor is found.
For Example, suppose we set the coordinates of the 3D cursor to be (3,2.1) and then add a new object. That object would be positioned at those coordinates.
The image below is an example of this where we move the 3D cursor to a new location and then add a new object by pressing Shift + A to open our add menu and then select an object from this menu.
If you want to learn more about Blender you can check out our course on Skillshare by clicking the link here and get 1 month free to the entire Skillshare library.
The Cursor Properties
Using the cursor, we can add our objects to the surface of other objects by using a tool known as surface projection.
When we activate our 3D cursor tool active from the tool shelf, we can look up at the top of our 3D viewports, where we will see some of the properties of the current tool.

We all have three options with the cursor: a boolean option for the surface projection, the orientation, and the drag menu options.
If the surface projects option is switched on, then clicking your cursor onto an object will stick the cursor to the surface of that object.
By contrast, if we switched off this option and then left-clicked onto an object surface, the 3D cursor would be positioned inside of that object rather than on its surface.
The next option here is the ability to define the orientation, which is set to none by default. When set to none, positioning our 3D cursor anywhere within our few ports will not affect the rotation values of the cursor.
If we were to open up the menu for our orientation, we would have a few options to work with. The view option, for example, will rotate our 3D cursor whenever we reposition it using the left mouse button based on the rotation of our view within our viewport.
If we chose the transform option, then the 3D cursor would use the current transform settings.
And if we were to use the geometry orientation, then whenever we would snap our cursor to the surface of an object, the rotation of the cursor would match the rotation of that surface.
Adjusting Your View To The 3D Cursor And Centering To The World Origin
We can do more with the 3D cursor than just positioning it to add new objects to our scene. We can also use the cursor to adjust our view in the viewport and even center our view back to the world origin.
First, let’s look at how we can focus the view on the 3D cursor specifically. One method of locking our view to the 3D cursor is to use the lock to cursor function found within the side panel.
Open up the side panel by pressing the N key on your keyboard. If not already open, go to the view tab in the list.
You will find the view lock menu under the view settings, not the 3D cursor settings. One of the options here will be a tick box allowing you to lock the view to the location of the 3D cursor.
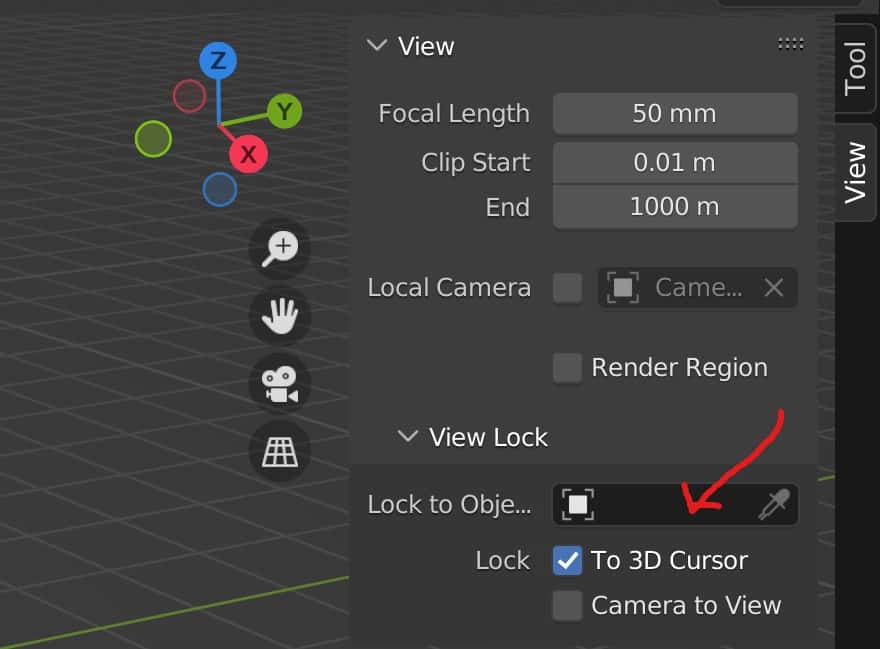
The view from within your 3D viewport will snap to that position when this option is enabled. The 3D cursor is then located at the center of the viewport.
When you orbit or zoom from within the viewport, it will be using a 3D cursor as the point of reference.
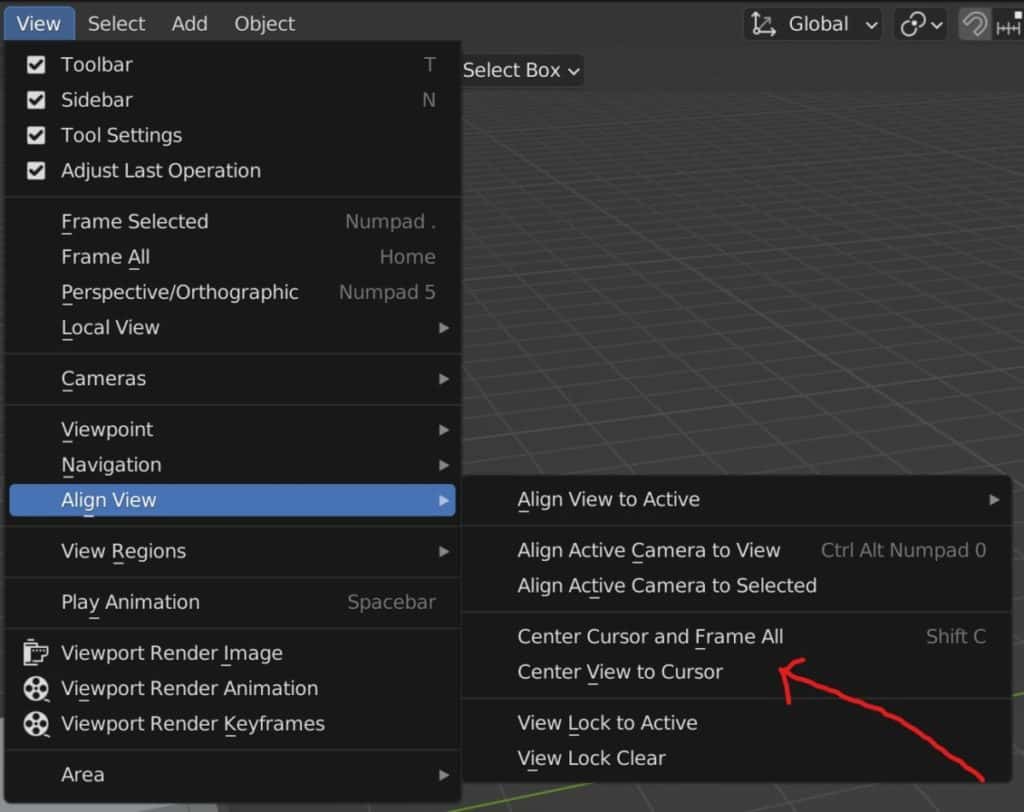
An alternative method is to use the ‘Center view to cursor’ option found in the view menu. You can locate the view menu in the header bar of the 3D viewport. Click to open it up and select align view from the menu.
This opens up another sub-menu from which we will have the option to center the view to the 3D cursor. Left-click this option, and then Blender will snap the view to the cursor, similarly to the ‘View to cursor’ option within the side panel.
If we want to snap our view back to the center of the world origin, then we can start by positioning the 3D cursor to that coordinate. The center of the world origin is 0,0,0. So if you’re free, the cursor is not found at those coordinates. You can open up the side panel, go to the view menu, and then change your 3D cursor coordinates.
Then you can use the view to curse at all from the view menu to snap your view to the center of the world origin, where your 3D cursor will now be.
There is a slightly faster way of doing this:
- Go to your view menu.
- Go to Align view.
- Choose the option to ‘Center the cursor and view all.’
This will reset the 3D cursor back to the center of the world origin without you having to type in the values manually, and it will also snap your view to that location.
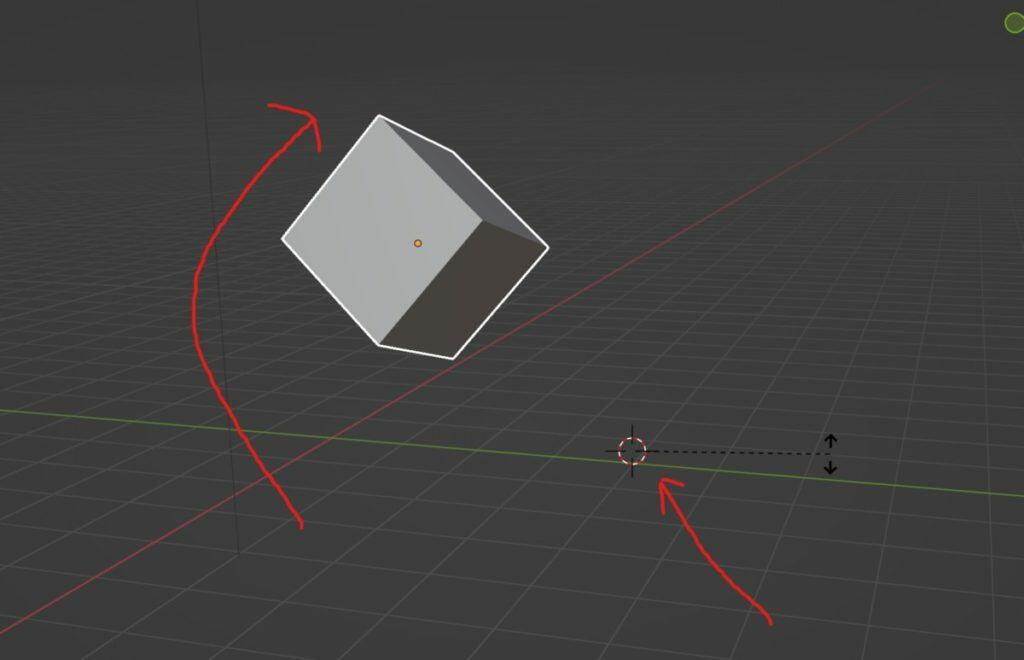
Using The 3D Cursor As A Pivot Point For Your Transforms
A slightly more advanced method of using the 3D cursor is determining it as the pivot point for your transforms.
When working with location, the pivot point does not hold that much bearing as the location values will typically follow the three axes as standard.
However, if you are working with rotation or scale, then the positioning of your pivot points changes the behavior of these two transforms.
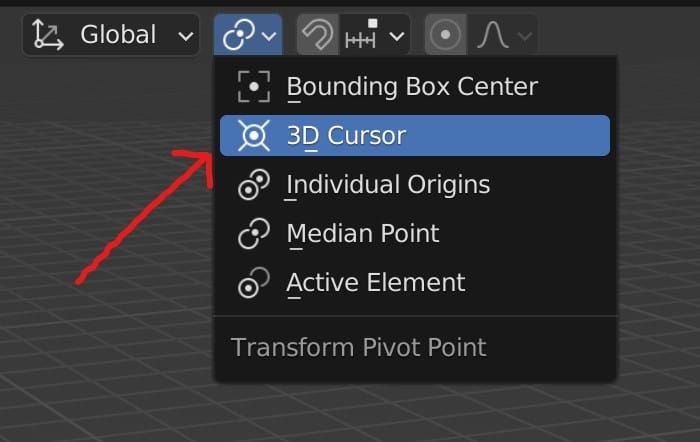
By default, an object will use its object origin as its pivot point. But we can change this by going to the pivot point menu located in the top center of our 3D viewports header.
If we open up this menu, we can see the option to change our pivot point to the 3D cursor. So left click to select this.
Now, if we were to attempt any rotation for our selected geometry, it would begin to orbit around the location of the 3D cursor. If the cursor is not in the same position as the origin of that object, then the behavior of the rotation will change significantly.
The same applies to adjusting the scale transform and is affected in much the same way. By manipulating the pivot point to use the 3D cursor, we can change how our objects scale.
The effects of these transforms are even more noticeable when we use the selection of multiple objects simultaneously.
Below is an example of using the pivot point to rotate UV spheres around a central position.
Making The 3D Cursor Invisible And Restoring It When Not In Sight
Occasionally the 3D cursor can get in the way, especially if you are in the modeling stage of your project rather than the creation and positioning stage.
The 3D cursor is an overlay in Blender, and overlays can be hidden from view. Go to the overlays menu located in the top right-hand side of the 3D viewport, as seen below.
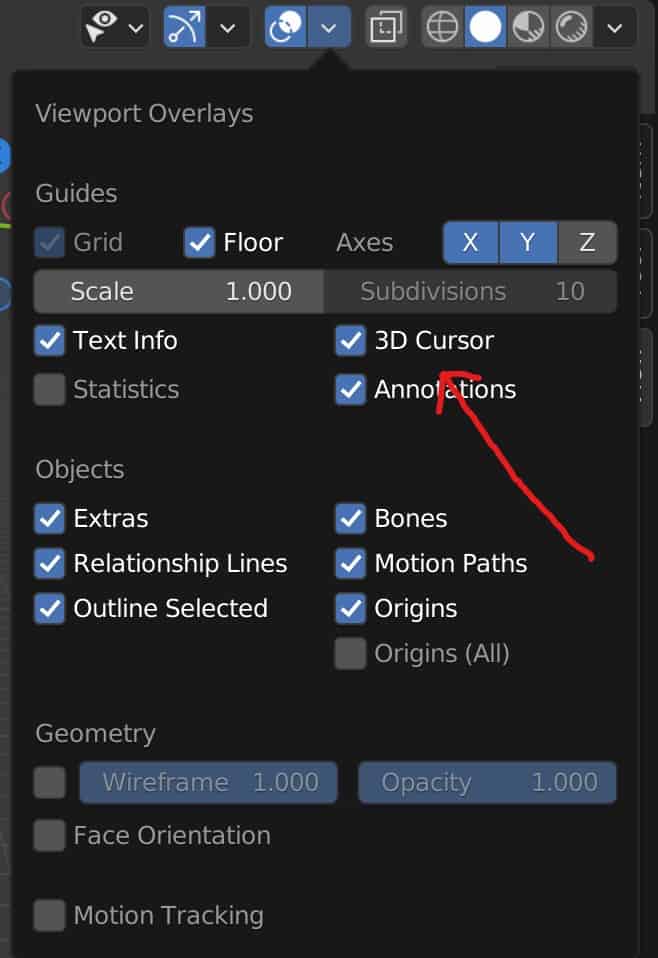
The overlays menu is an extensive list divided up into smaller sections, the first of which is for the guide settings. Within the guide settings, you will have the ability to determine the view of your 3D cursor, which by default, will be ticked.
If you untick this box, your cursor will no longer be visible within the 3D viewport. This can also be a useful troubleshoot if you find that the cursor is no longer visible, but you don’t think you intentionally disabled its view.
If you cannot see your 3D cursor, but you have checked the overlays menu to ensure that it is enabled, then it’s likely that the coordinates of the 3D cursor are not visible within your viewport. The quickest solution is to go to the side panel and reset the location values of your 3D cursor from there.
Thanks For Reading The Article
We appreciate you taking the time to read through the article and we hope that you have been able to locate the information that you were looking for. Below we have compiled a list of additional topics that are available for you to view and learn more about Blender.
-
Texture Painting in Blender: A How-To
Comprehensive guide to texture painting for vibrant Blender models.
-
Efficient UV Packing: Blender Techniques
Strategies for packing UVs efficiently to maximize texture space in Blender.
-
Seams & Islands: Blender UV Mapping
Efficiently managing seams and islands for optimal UV mapping in Blender.