One of the most valuable learning tools that you are going to be able to use in Blender is the Bullion’s Hall or Boolean modifier, which has the ability to use one object to cut a custom shape into another.
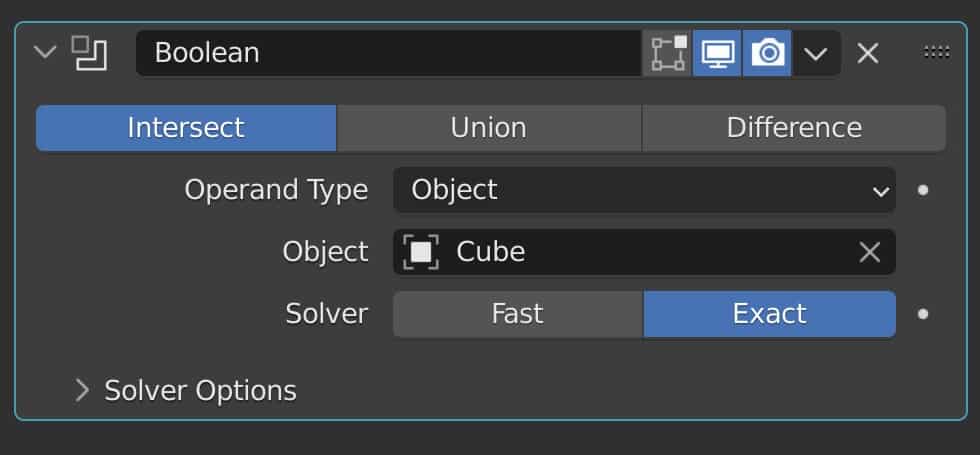
The Boolean modifier can be used to create a new object from existing objects in one of three ways. It can use the ‘Union’ option to combine two objects together. It can use the ‘Intersect’ option to leave behind only the geometry that intersects between two objects. And it can use the ‘Difference’ option to use the Boolean as a means of cutting a hole in the original model.
If you can master the Boolean modifier, then you can learn to create objects of almost any shape that you want by using the shape of one object to create a new form with another.
This is going to be a complete guide in the various ways that we can use the Boolean modifier and also alternative options as well such as the bool tool.
What Is A Boolean?
The term boolean represents an operation where you can only have one or two values. These two values can be true or false. They can be yes or no. They can be one and two, et cetera. In Blender, the use of a Boolean is slightly different.
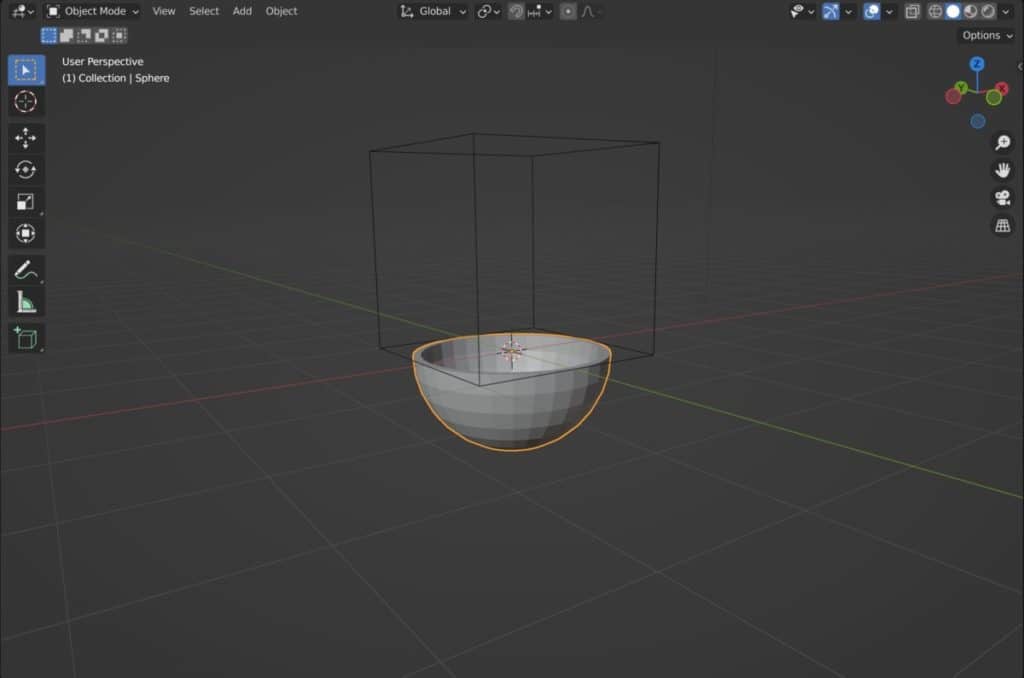
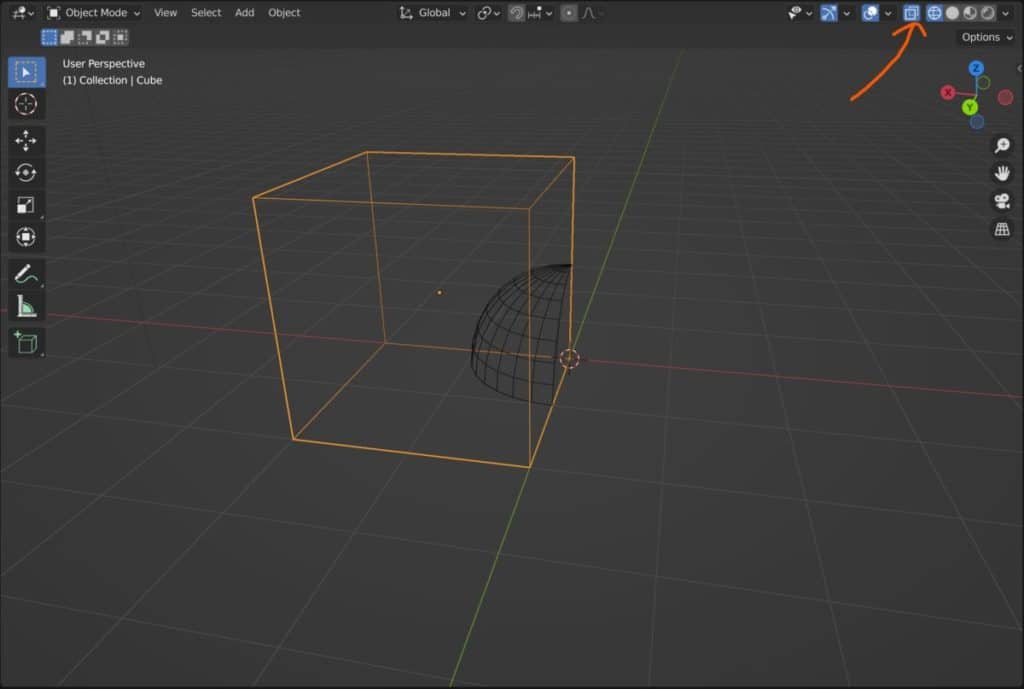
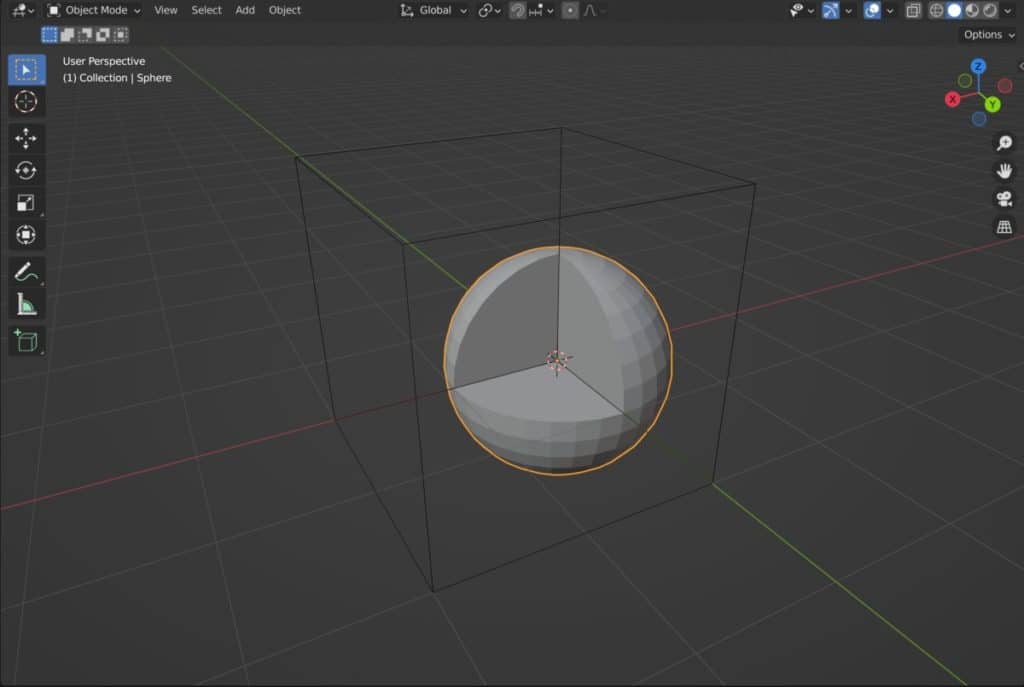
In Blender, a boolean is an object that is used to cut a shape into another object. For example, if we had a cube object and then we had a UV sphere, we could use the UV sphere to create a new shape from the cube.
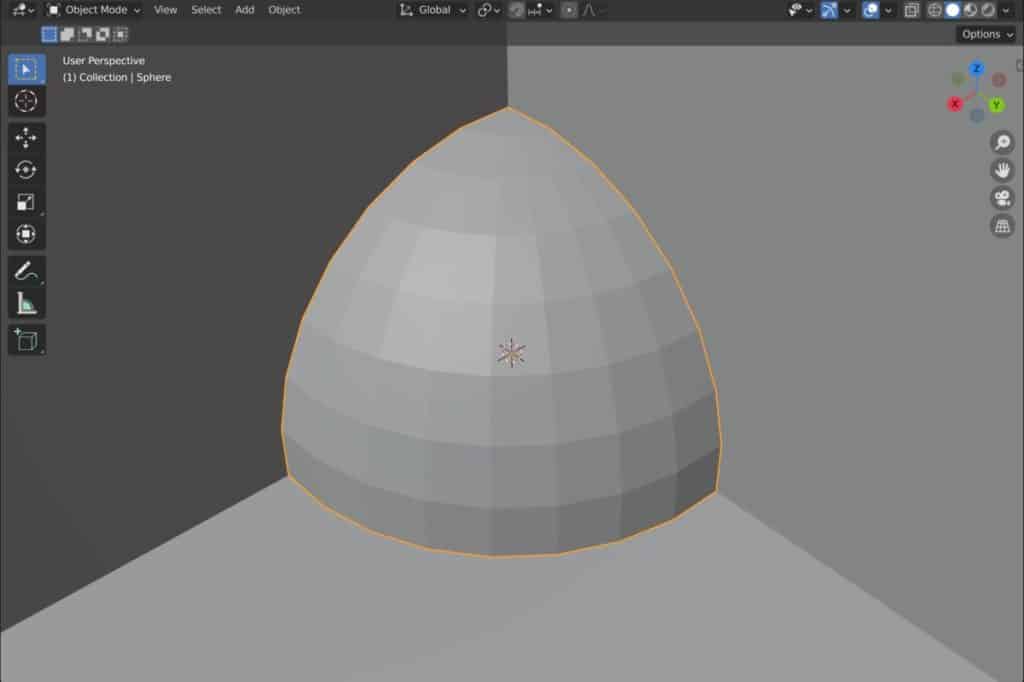
We could also do the opposite by using the cube objects as a Boolean to cut through our UV sphere. Below is an example where we use our cube object to cut through the top of our UV sphere, leaving behind a bowl object from the lower half of the sphere.
The primary method of creating a Boolean in Blender is to use the Boolean modifier. The reason why we are primarily using a modifier for this type of tool is that it generally needs to be procedural so we can edit the bullion in real-time before we apply the modifier.
How To Use The Boolean Tool In Blender 3D?
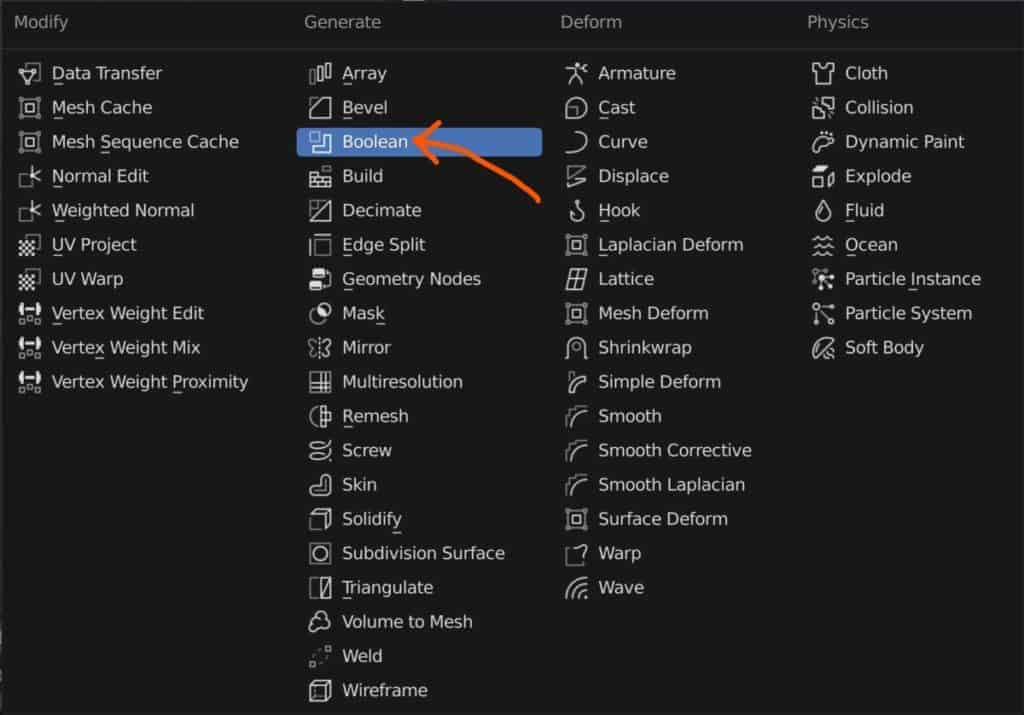
To use the Boolean modifier in Blender, first select the object that you wish to apply a Boolean to. Then go to the properties panel and go to the modifiers tab. The icon for the modifies tab would appear as a wrench, so select that tab to enter the modifies tab.

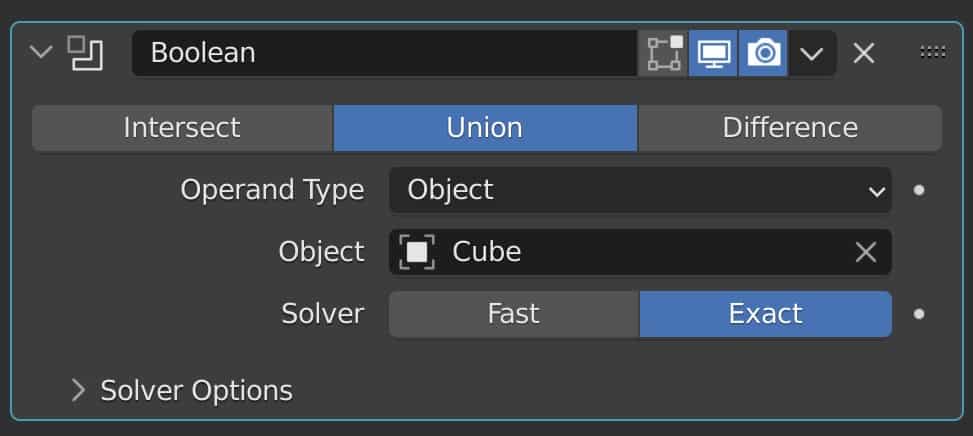
Click on the Add modifier option to bring up the modifiers menu under the generate list. In this menu, you will find the Boolean modifier. Select it and added that Boolean modifier to your main object.
While the result of the boolean modifier can be very complex. The actual use of it is simple and there are not many controls to learn here.
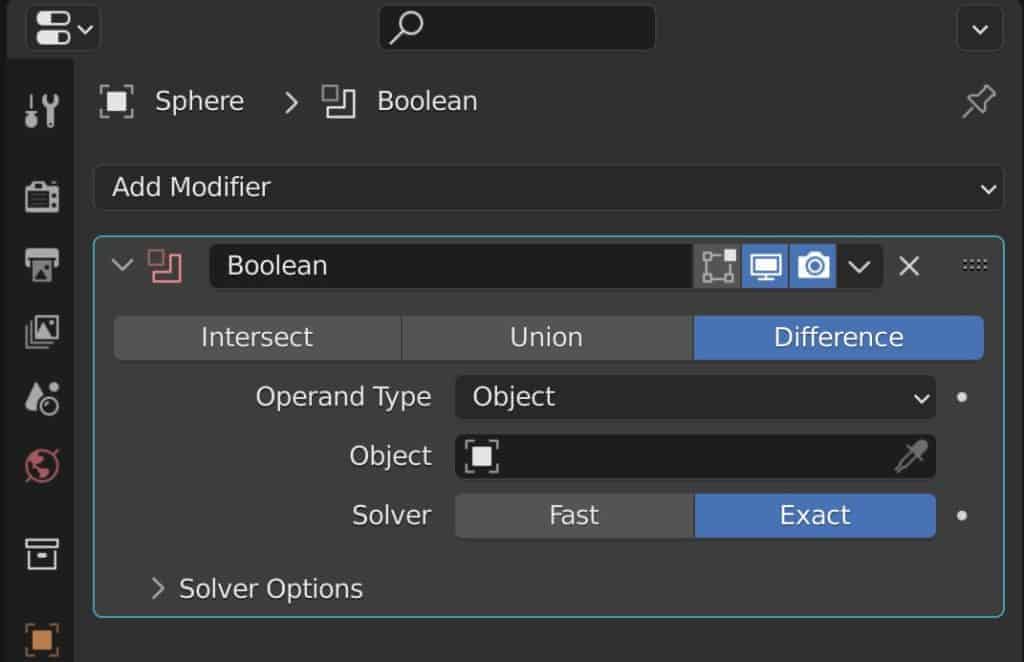
The modifier is split between one of three methods which we will be covering next. Each of these methods will change the way the Boolean affects the main object, but before you do that, you’re going to need to add a second object to address the Boolean.
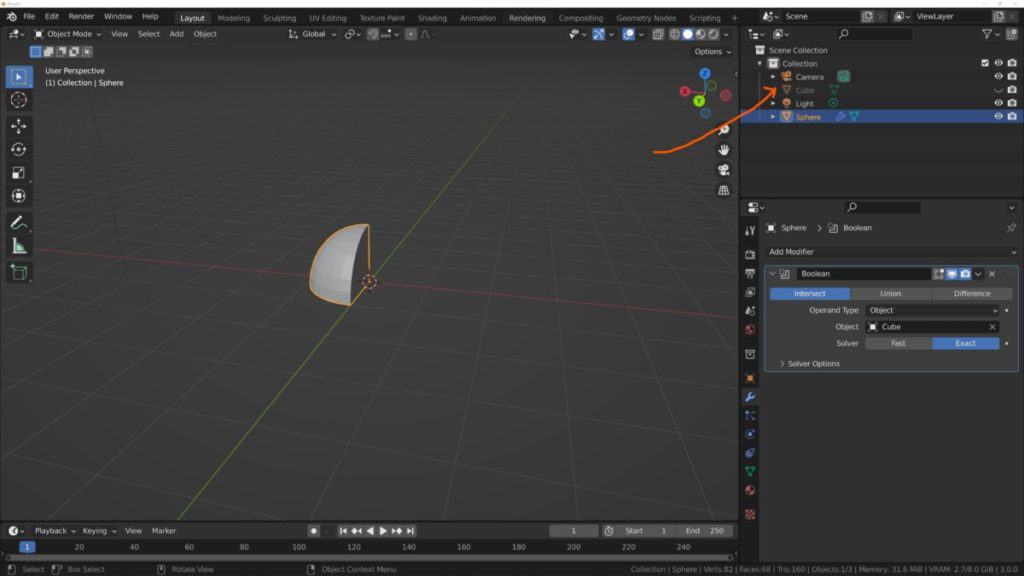
In our example, we are going to be taking our cube object and we’re going to be using it as the Boolean to cut into our UV sphere. Note that the Boolean object itself is not going to require the Boolean modifier, only the main objects will require this.
When To Use Each Type Of Boolean?
As we just mentioned, there are three different forms of bullying in Blender, and each of them calculates the Boolean modifier in different ways. These three methods are the Intersect method, the Union method, and the difference method. So let’s take a look at how each of these will affect our main object.
The Intersect Method
The first of our three methods is going to be the Intersect method. When using this type of boolean, the modifier is going to find all the geometry that overlaps and is going to maintain the geometry that is overlapping.
For our example, we need to first of all position the cube over our UV sphere. If the Boolean object is not interacting with our main object in any way, then the Intersect method is simply not going to work because there is no geometry that is overlapping.
Once our putting object is positioned over our main object, we will need to go to the Boolean modifier and set the modifier to intersect. At the moment nothing is going to change because our Boolean object has not been assigned to the modifier.
In the modifier itself, you will be able to define the object that is going to be used for the boolean. You can left-click in the blank space and then choose your cube object or whatever you want to use as the Boolean from the list.
You can also select the eyedropper icon and then hover your cursor over the object that you want to use as your boolean left click and it will sign that object as the Boolean object.
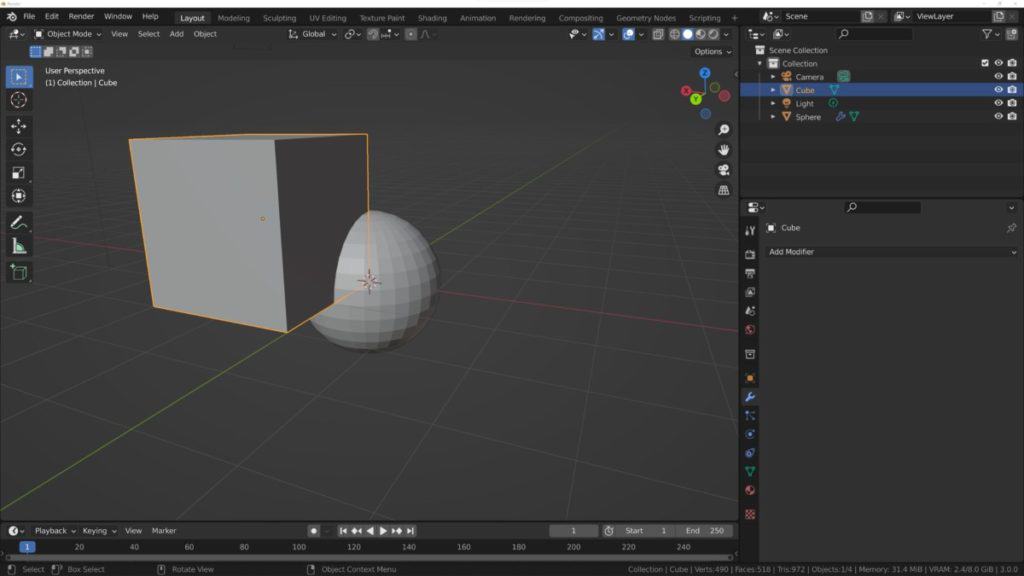
Once you assigned a cube or the target object as your bullion, you will notice that the main object disappears. This is because the rest of the model that is not overlapping the Boolean will be deleted as a result of the effect of the Boolean modifier.
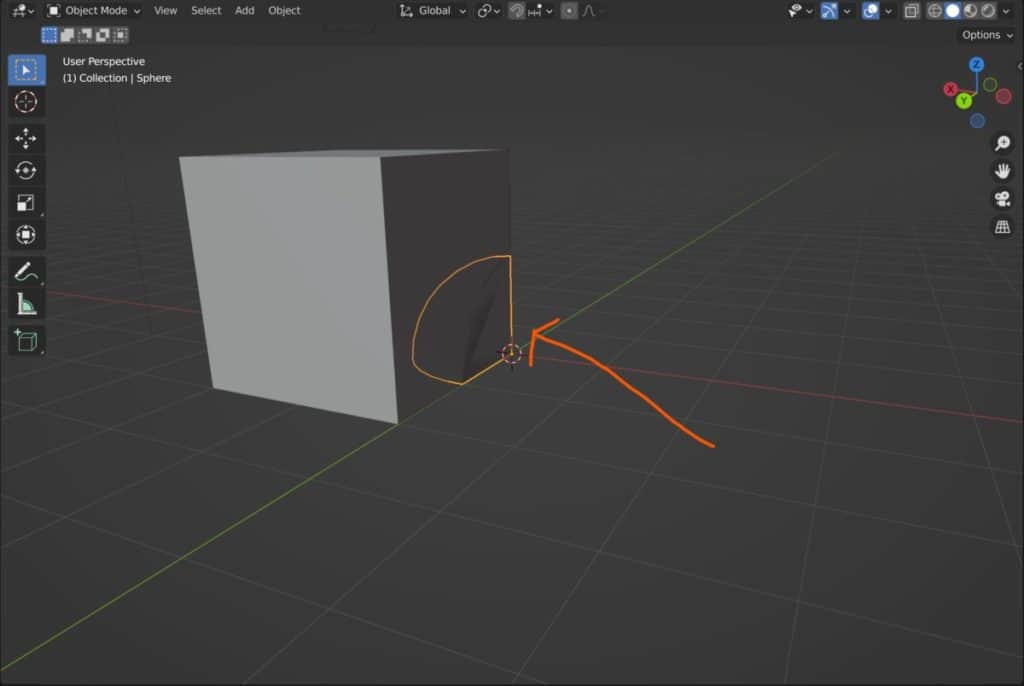
If you look at the bullying itself, however, you will notice that there is some weird shading going on at the area where the Boolean was overlapping the main object. If you zoom inside of your boolean object, you will find the geometry of your original model.
A key issue that we have here and what will also be an issue for both of the other methods as well is the Boolean object actually gets in the way of what we can view as the result of the modifier. So what we need to do is we need to hide the geometry of the Boolean objects.
There are two ways to do this. The first method is going to be to just hide our boolean model from the 3D viewport. You can do this by selecting your Boolean object and then press the H key on your keyboard to hide it from view.
Alternatively, you can also go to the outliner panel, locate the Boolean model, and then click on the icon next to that Boolean model’s name. This will do the same thing and hide the objects from view.
When you do this, you will then be able to see all of the geometry that has been leftover as a result of the Intersect method of the Boolean modifier. However, this does present a new issue as since the Boolean object has now been hidden from view, we can no longer select and move the Boolean objects.
We need another solution that would allow us to both view our results, as well as view the boolean so that we can move it.
That solution exists in the form of the wireframe view, now in the 3D viewport you can go up to the top corner of the few ports and you can switch your shading method. By default, it will be set to solid view and you can change this to any other view such as the wireframe view.
But what if you still wanted to see the full geometry of the main model and you only wanted to apply the wireframe to the Boolean? This is also possible. Go to the properties panel with the Boolean object selected and then locate the Object Properties tab. It should look like a yellow square.
Then go down to the section labeled as viewport display and open it up. Amongst these settings, you will find the ‘Display As’ setting, which is currently set to texture. Select textured and it will open up a small menu. Then select wireframe from this menu.

Your boolean objects will now appear as a wireframe, allowing you to few the result while also moving your brilliant objects when required.
If you grab the Boolean objects and begin moving them around, you will see that different parts of the main objects will appear into view as they will now be intersecting the Boolean model.
The Union Method
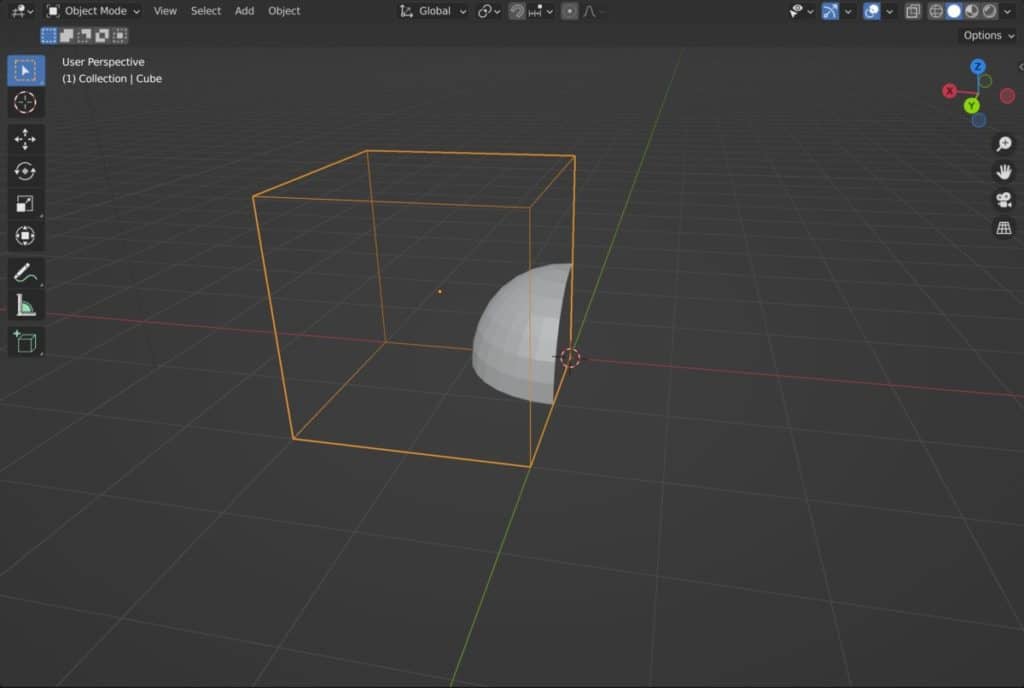
The second of the free Boolean methods for the Boolean modifier is the Union method. When using the Union method, we are going to be taking the geometry base of the Boolean model, and effectively adding it to the structure of the original model.
The Union method is in many ways the complete opposite of the Intersect method, with the intersects method. The geometry that is maintained is the geometry that overlaps. However, in the case of the Union method, it is the geometry that overlaps which gets deleted and the rest of the geometry is maintained. Not only is it maintained but it is also connected as a result of the Boolean modifier.
Another thing that you may have noticed here is that the cube has reappeared. But actually, it’s still set to its wireframe shading for the geometry of the boolean, however, that geometry has now been added to the base model, and that’s what we are able to see in the viewport.

While the geometry that does not overlap is joined to the base model, the rest of the geometry inside is deleted.
So if we were to zoom inside of our new objects, we would be able to see that our cube has cut away from our UV sphere and we are able to actually see in between both of our models. In other words, the inside of our object remains hollow.
The Difference Method
The final of the free Boolean methods is the difference method, which is probably going to be the most common method that you are likely to use in blender.
Of the three methods, the difference method is probably the one that you would expect from the Boolean modifier. With the difference method, we use our Boolean object to cut a shape into the main object.
In the example of our Cube and UV sphere, we can set the boolean modifier to the difference method, and when we do this the cube will cut away one corner of our UV sphere.
So the geometry of the main model that overlaps the Boolean is deleted, but unlike the Union methods, the geometry from the actual boolean is not added to the main object. This is purely a matter of subtraction.
As such, it is probably the easiest method of the three to use, and the most common as well. Difference can be used in a variety of different use cases. For example, you could use the difference method to engrave text onto an object.
How Do You Make A Boolean Permanent In Blender?
When you are happy with the effects of your bullion modifier, you will then want to make the effect permanent.
You can do this by going to the modifier in the modifiers tab and clicking on the little down arrow. This will open a context menu and the first option.

In this context menu, we will be able to apply the modifier. Applying a modifier does not work in edit mode, so make sure that you switch to object mode before you go to apply your Boolean modifier.
Also, keep in mind that if you have any other modifiers in the modifier stack you will need to apply them from top-down. Otherwise, you risk making changes to the effect of the modifier as you apply them.
It is recommended, however, to not apply the Boolean modifier until you are in the process of exporting your model in which the actual geometry will need to be finalized. If you are just creating your models for the sake of rendering a scene or an animation, then you may just want to keep the modifiers active so that you can always go back and edit them. That’s the beauty of a procedural workflow.
Why Is My Boolean Modifier Not Working?
Sometimes your boolean modifier may not work the way that you expect it to. So let’s take a look at a couple of the factors that can occur when the Boolean modifier is used incorrectly.
The most common issue when using the Boolean modifier is the appearance of shading artifacts. When you are using the smooth shading option for your objects then Blender is going to smooth over the lighting on each individual face of your model, making it look more natural.
However, the effectiveness of smooth shading is dependent on the geometry itself, and so when using the Boolean modifier which directly affects the topology of your model. Then the appearance of artifacts is likely in the case where the geometry itself is not proper.
An example of this is where the boolean is used and it overlaps geometry directly, so you have two vertices that are effectively being merged as a result of the Boolean. As these two vertices lie on top of each other, it creates issues with the topology, and because they are so close together we get shading artifacts on our model.
If the issue relates to shading artifacts forming on your model, then a solution is to enable auto smooth on the main object by going to the Object data tab > Normals > Ticking the auto smooth box
How To Cut Holes Into Our Model Using A Boolean?
One of the things that you may want to use the Boolean modifier for, but may not know how is to cut actual holes into your main model. With each of the three different Boolean methods, we are able to recreate our main structure. But we’re not quite able to cut holes directly into them.
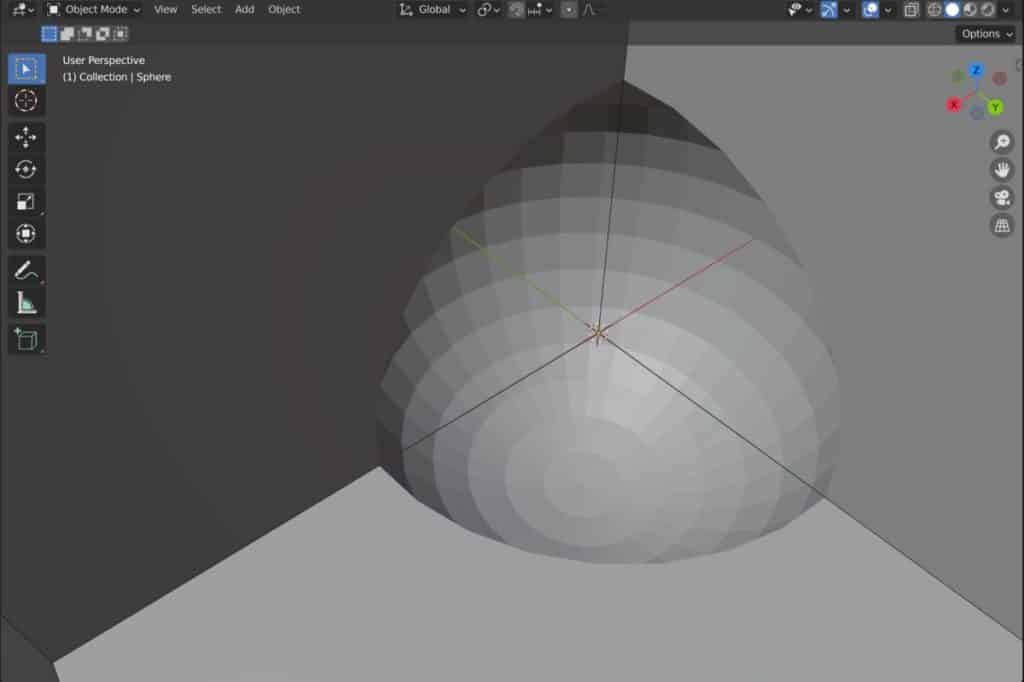
Of the three methods, the difference method gets us closest, but when we cut into our object, we still end up with a closed surface as a result of the Boolean shape.
The solution to this, though, is surprisingly simple. We just need to give the main object some thickness so that the Boolean will read that thickness and cut a hole into the model based on that value.
Thickness to any object can be added in the form of the Solidify modifier. Go back to the modifiers tab for the main object and then go to the add modifiers menu. and select solidify from the list.
Remember that the boolean has to be able to read the thickness value of your objects in order to cut the hole. That means that your solidify modifier has to come first in the modifier stack.
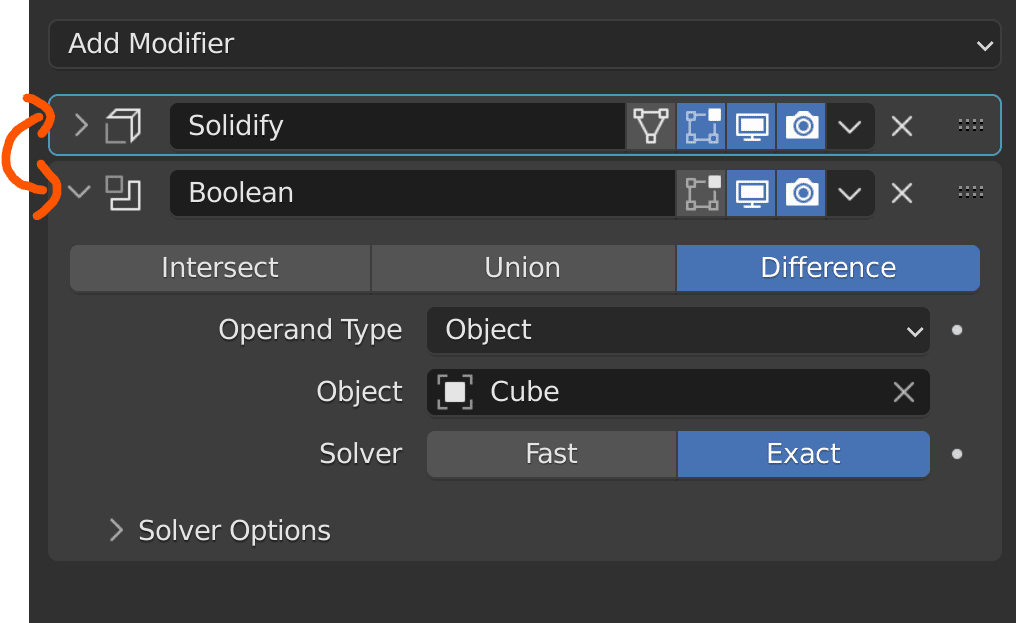
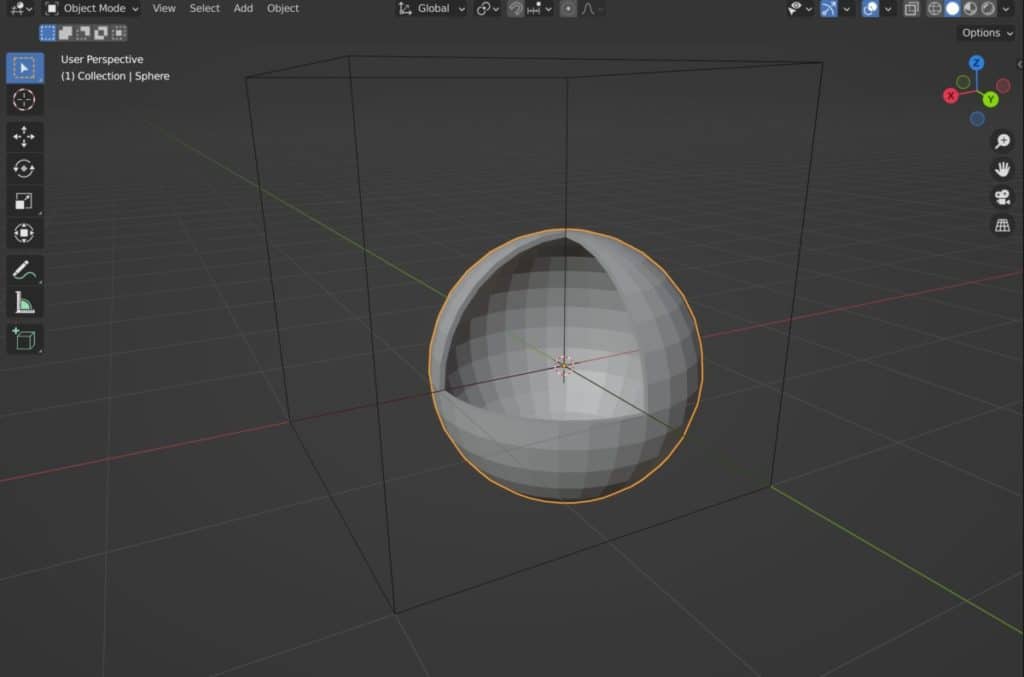
So grab your solidify modifier and drag it above your Boolean modifier. In our example, as soon as we do this, then our object changes and we can now view a hole into our UV sphere. We can also see the thickness that has been added with the Solidifier modifier.
Thanks For Reading The Article
We appreciate you taking the time to read through the article and we hope that you have been able to locate the information that you were looking for. Below we have compiled a list of additional topics that are available for you to view and learn more about Blender.
- The Best Method For Improving Your Skills In Blender Is…
- Getting Rid Of Dark Spots On Your Texture
- What Does The Mark Crease Option Do To Our Geometry?
- The Difference Between Eevee And Cycles
- The Main Features Of The Blender Software
-
Custom Normals: Blender Hard Surface Tip
Enhancing hard surface models with custom normals for realism.
-
Align Perfectly with Blender’s Snap Tools
Aligning objects perfectly with Blender’s advanced Snap tools.