The core feature to creating any animation, both in Blender and in any other 3D modeling application, is to assign keyframes to note the change in specific values and display these changes in the form of an animation in your viewport.
Depending on where those elements are stored within the Blender UI, there are many ways to add keyframes to your various elements. Transforms can be keyframes using the keyframe menu, while properties in the properties panel can be keyframes using the diamond dot. But there is a way to animate almost anything in Blender automatically using the record tool.
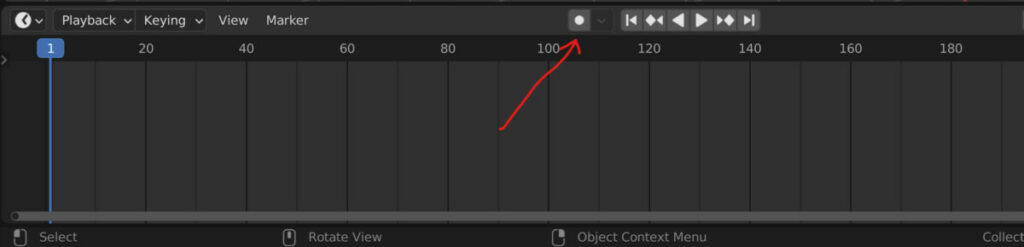
The recording tool allows us to add keyframes to any value we want to animate in real time without needing to access the keyframe menu or any hotkeys. It can be located directly next to the playback controls in the header bar of the timeline.
There are scenarios where using the recording tool can be valuable to your workflow, but it is also a tool you can often forget is turned on and will not always want it to be.
Where To Access The Auto Key Tool?
The auto key tool can only be accessed in the timeline panel. It is found in the timeline header directly next to the playback controls used to play, pause, fast forward and rewind.
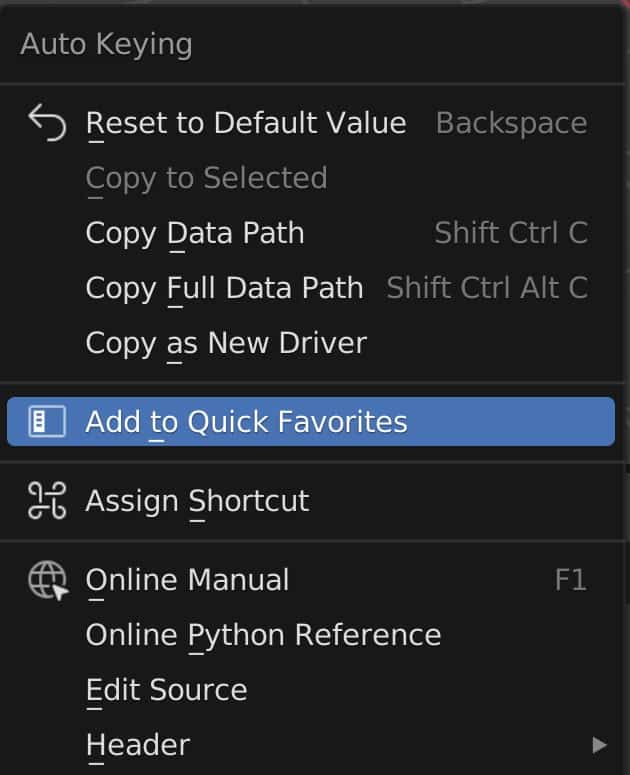
No hotkey is available for the recording tool. If you want to assign a hotkey to the recording tool, hover your mouse over the button and press the right mouse to open the tool context menu.
From here, you can choose the assign shortcut option. You would then be prompted to type in your new hotkey. Remember that if you choose a hotkey combination that already exists for another element within Blender, you will overwrite that hotkey for the new one.
You can use these to assign your tool if you have additional macro keys or keys on your mouse beside the left and right buttons.
Perhaps a more straightforward method for some is to add the recording tool to the quick favorites. You can do this by accessing the same menu and selecting the assigns a quick favorites option.
The quick favorite is a menu that can be accessed using the Q key, and you can add multiple tools to your quick favorites menu.
How Does The Auto Keying Tool Work?
The idea of the recording tool is to automate the process of adding keyframes to your changeable values.
To add a keyframe, we would usually have to locate the value and then change that value. We can then animate the change by using the I key or one of several other methods for creating a keyframe on that value.
This would also require a start keyframe with the initial value and an end key file with the changed value.
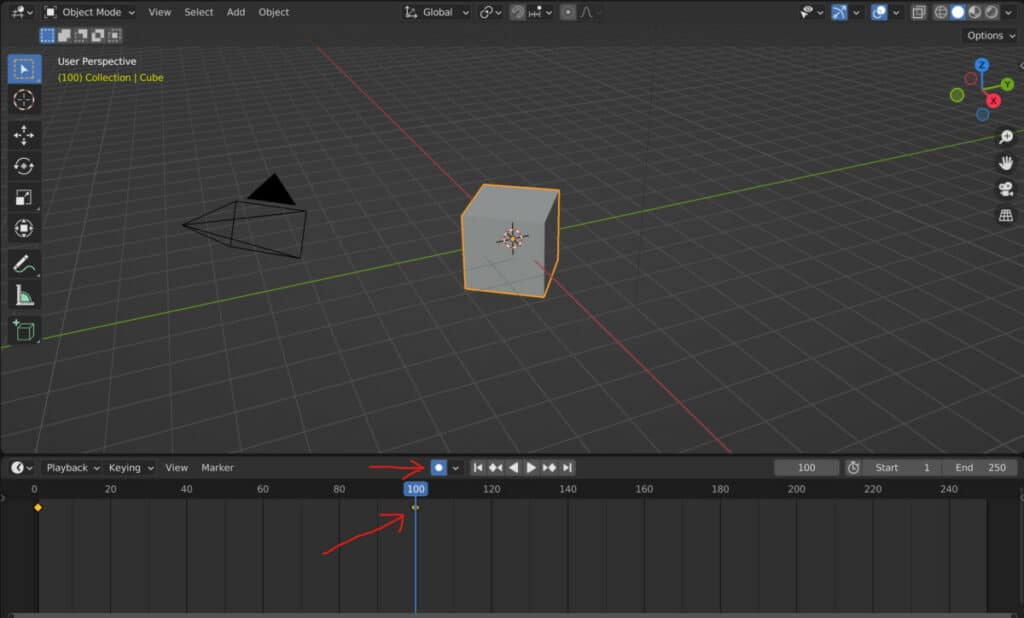
The recording tool mitigates the part of the process where we would have to add the keyframe. It simplifies things so that whenever we change the value on a different frame, a keyframe will be added to that value.
The recording tool is used to locate where specific values have been changed, and it can be tricky to work with your starting keyframe.
For example, let’s say we wanted to animate one of the properties of our material. We would need to add our first keyframe by hovering over the specific value, such as the material roughness, and then pressing the I key to create a keyframe.
Changing a value that does not already have a keyframe will not add one, even if the auto key tool is active. Therefore, adding that first keyframe still requires us to do so manually.
However, now, if we were to move onto a different frame and change the value of that specific parameter, a new keyframe would be added at that point in the timeline.
The Options Of The Auto Keying Menu
Besides the auto key tool, we have a small menu that we can access. This menu will allow us to change how the auto key tool functions.
There are two options that we can choose to start with. The first option which is currently active is the add and replace option. When enabled, whenever we change on a different frame, it adds a new keyframe in that position.
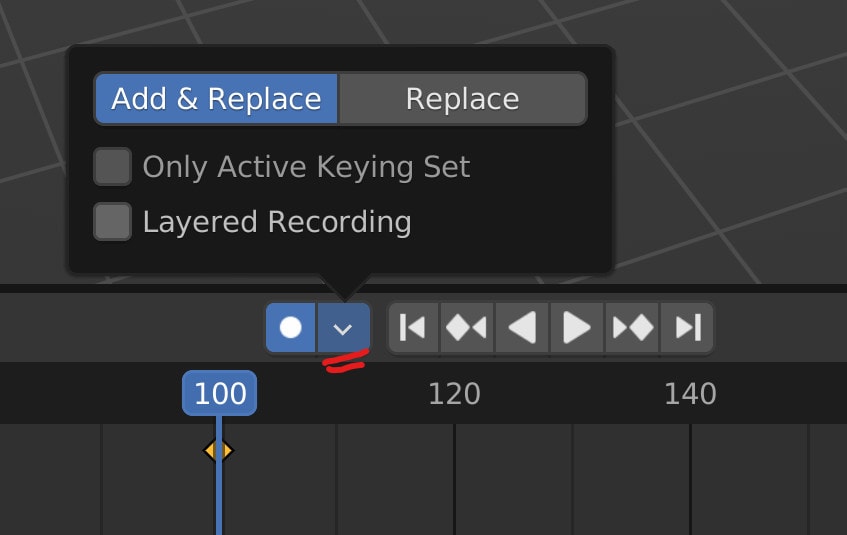
If we were to move to a frame that has a keyframe already in place, and then we changed our value, it would replace the original value.
The alternative option is to use the auto key tool to replace our current keyframes. With this option active, we wouldn’t be able to add keyframes on any frames that did not already have one in place. Here we would have to insert those keyframes manually.
Below, we have two more options in the form of tick boxes. The first of these options allows us only to add auto keys to the currently active keying sets.
When this box is ticked, it will look for the active keying set, which means that if we were to try and add any more keyframes, we would be prevented from doing so. If you were to hover your mouse cursor over the rotation transform and press the I key in the side panel, no keyframe would be added.
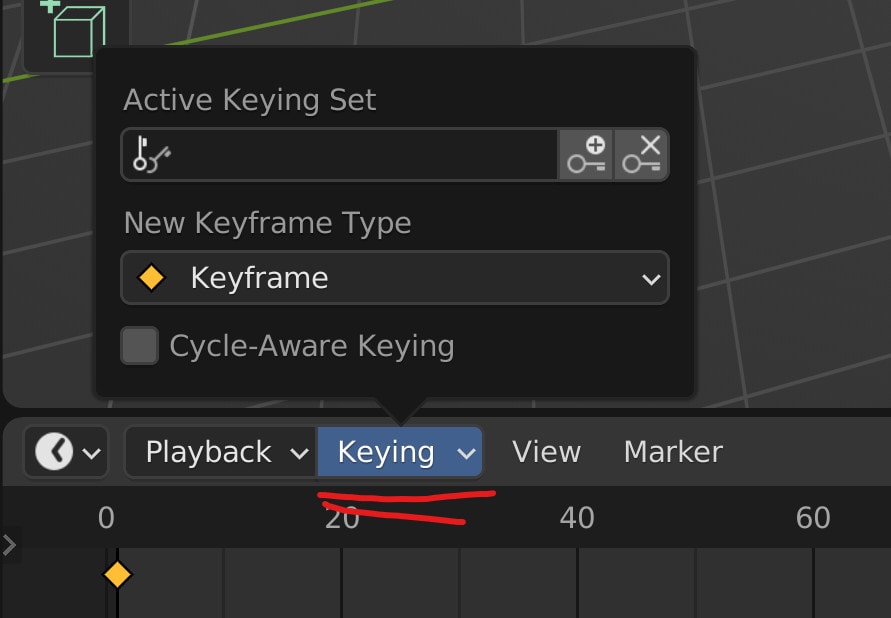
Death for the next step will be to assign an active keying set so that blender knows what we’re trying to animate.
To do this, go to the keying menu in the header bar of the timeline and open it up. The first option within this menu allows you to select an active keying set.
When we typically move our object with the active auto key tool, it will add a keyframe to all the channels of all the transforms. This would include the rotation and scale, even though these values were not changed.
We can use an active keying set to isolate which of these transforms we want to add a keyframe to with the autokey tool.
Left-click on the empty space and choose the property where you want to add a keyframe. In our example, we will limit it to the location of our object.
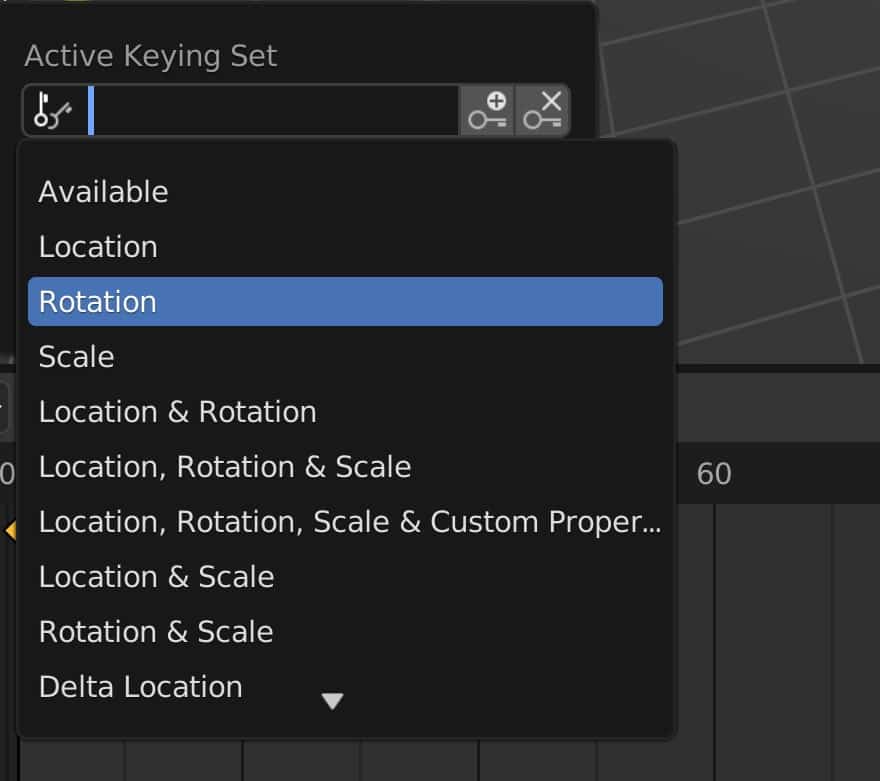
Now when we attempt to move our objects on a new frame, a keyframe will be added, but only to the location of that model.
The final option will use a layered recording system that adds an NLA track to each keyframe that is added. The idea here is to create a non-destructive workflow when creating your keyframes for animation. If you don’t plan on using NLA tracks, you’re better off leaving this box unchecked.
Thanks For Reading
We appreciate you taking the time to read through the article. We hope you found the information you were looking for. If you are interested in learning more about the Blender software, you can check out a few of the articles we have listed below.
- How Do Keyframes Work In Blender
- Using The Timeline To Create Basic Animations
- Using The Dope Sheet To Create Basic Animations
- Converting An Image Sequence Into A Movie File
- How To Change The Frame Rate In Blender