If you are learning about 3D animation, then one of the first animations that you are likely to create is a bouncing ball. There are several youtube tutorials out there that demonstrate how to get you ball to bounce, but the process is often glossed over, as the tools used here provide the foundation for all animations.
To create a bouncing ball, add keyframes to mark each bounce’s high and low points, duplicating the low point for use multiple times. Using the graph editor, we can control the interpolation of the keyframes by manipulating their handles to give us a more natural bounce. We can then add keyframes for the rolling aspect of a ball that rolls off a high surface for a more realistic scene.
Once you understand how to use the various editors, such as the timeline, dope sheet and graph editor, you will then have the tools necessary to create any animations, as you learn to not only create keyframes but also manipulate them using Blenders tools.
Model Your Scene Before Animating
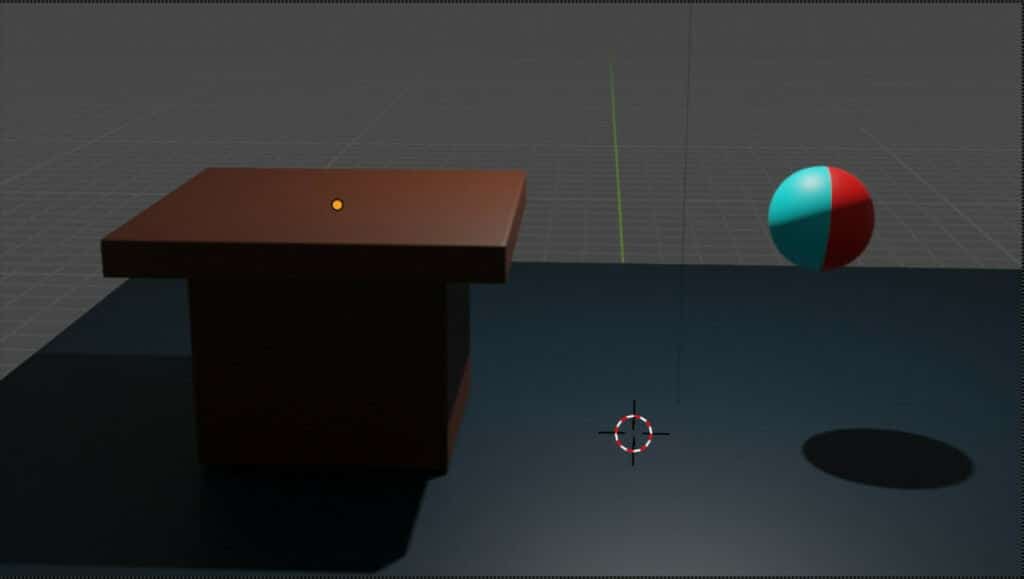
The first step to animating any scene in 3D modeling applications is to model the scene’s objects. For our example, we require a minimum of three objects. These will be the floor that acts as the low surface, a table that acts as the high surface, and the ball itself.
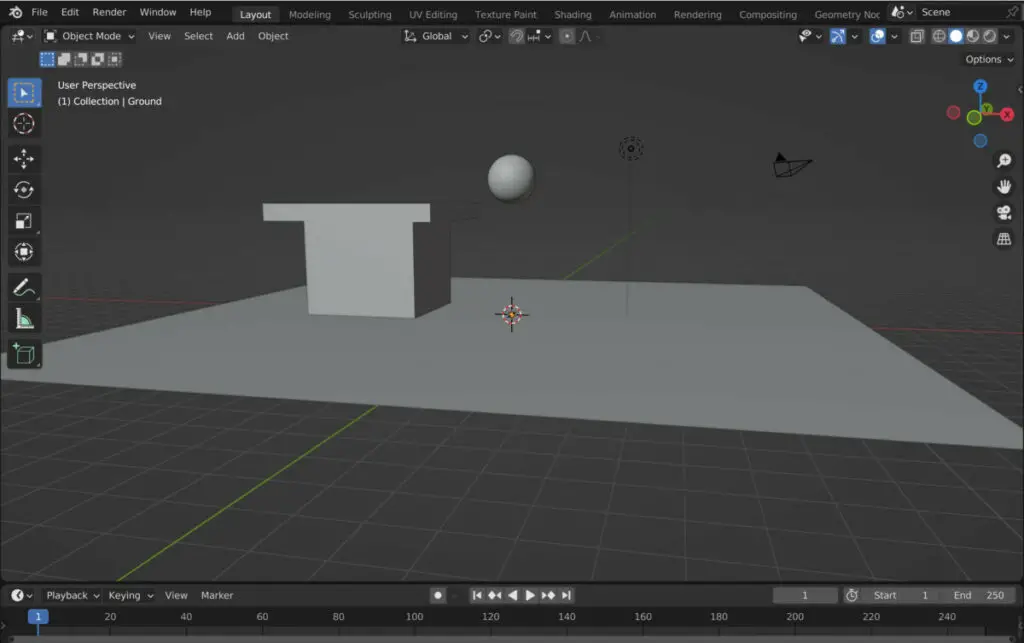
Even though the ball is the only one of the three objects that will be animated, we need the other two objects in place to act as reference points for the ball.
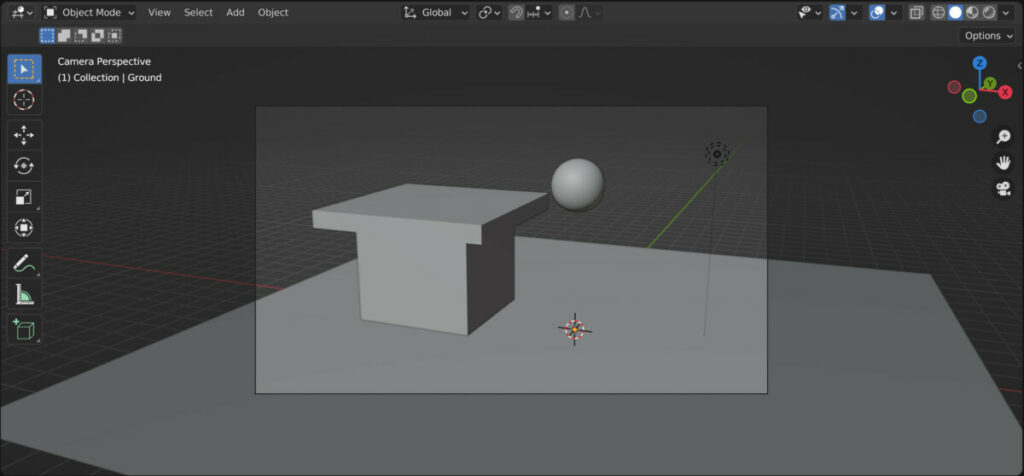
Once you have the objects in place, set up your camera’s positioning so that you can control how the animation will be captured.
Creating The Keyframes Of Your Animation
With the scene set up, you will now look to create the keyframes that will define your animation. We are creating two different animations with a bouncing ball that rolls off the top of a high surface.
It would be far easier just to split the process of each. So we’re going to start with the bouncing aspect of our ball, and then we’re going to make it move along a separate axis.
To visualize what a bouncing ball would look like in our timeline, we need to add keyframes to the location. Keyframes would need to be added for the points at which the ball would hit the lowest heights on the ground plane, and keyframes would be required for the high points when the ball bounces up.
If we think about how a board bounce in the real world, each successive bounce would reach a lower height as gravity takes over until the ball stops bouncing altogether.
On top of that, we know that this animation will involve our object falling from a high surface at the start. If we take all of this into account, we can begin to form how keyframes will be structured.
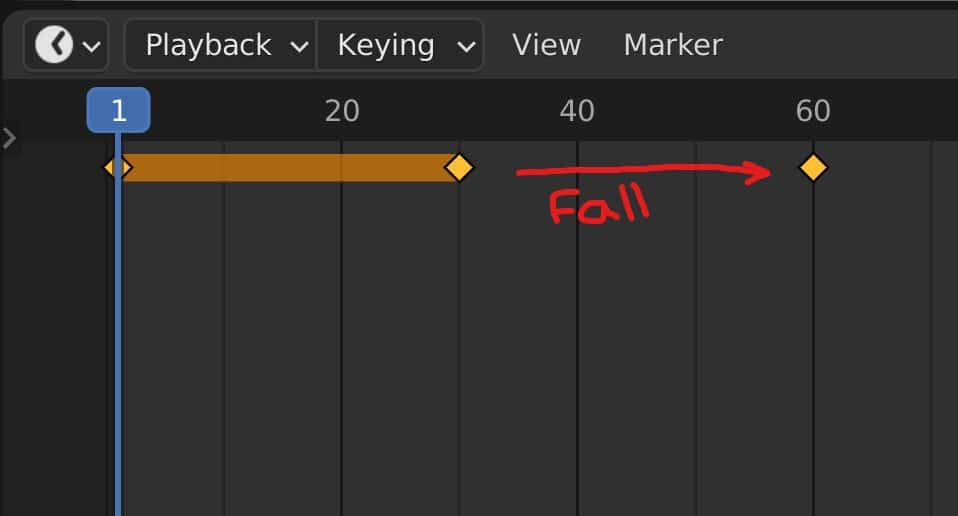
The first keyframe added will be formed as a high point since we’ll be rolling off of our table. Create a keyframe at frame one where the ball is on the level plane for the desk’s surface. It does not need to be sat on the desk to start with. We will deal with that in the second part of the animation, which is the role.
We will also duplicate this frame and position the duplicate keyframe at 30. This gives us a small. In the animation where the ball will eventually roll on the desk and then begin to fall 30 frames into the animation.
From there, the next keyframe will be positioned on the ground plane. Add a new keyframe roughly around frame 60, so the ball falls between frames 30 and 60.
Then we add the next keyframe, which will be for the next high point. Set this one to frame 90. Then we need to add the following low points. This is easy because we can take the previous low points, duplicate them and position them after the second bounce.
The one tip here is not to have it span another 30 frames but to reduce the amount of time it takes for the ball to fall. Keep in mind that each time the ball bounces, it reaches a lower height, which means it will take less time through it to get back down. In our example, we could reduce the time in frames from 30 to about 27.
Repeat this process a couple more times to add a few more bounces. Duplicate the low points and for the high points, reduce the amount of time it takes to complete the bounce to match the reduced height of that bounce.
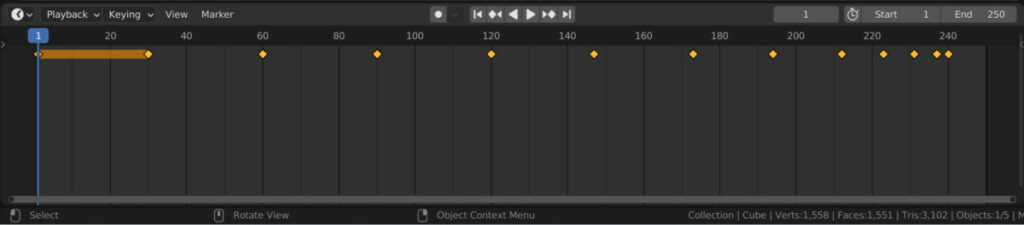
By the end of this point, you should have an animation of a bouncing ball. Each bounce should reduce its maximum height.
As for the roll animation, we’ll wait until we have the bounce animation how we want it before adding in the second part.
The Different Forms Of Interpolation
An issue you will see with the bouncing ball is the speed at which the bounces occur. Each time we reach a keyframe, the animation itself begins to slow. This is true for both the low and high points of our bounce animation.
For the high points, this is fine. gravity takes effect as we need the maximum height, and then it will speed up again as the ball falls to the ground. However, the ball should not slow down before hitting the ground. This is when the speed should be at its fastest.
So why does our animation behave in this way? The reason this is the case is because of the default form of interpolation that is used. Interpolation represents how our keyframes connect. The default form of interpolation is bezier.
The effects of a Bezier have already been described. As we near our keyframe, the animation begins to level out, creating an effect where our animation slows down as we reach that keyframe and again immediately after it.
Changing how our ball behaves would be a quick method of changing the interpolation. We can do this either in the dope sheet or graph editor. The graph editor is the more visual of the two, so we will bring the graph editor into view in our animation workspace.
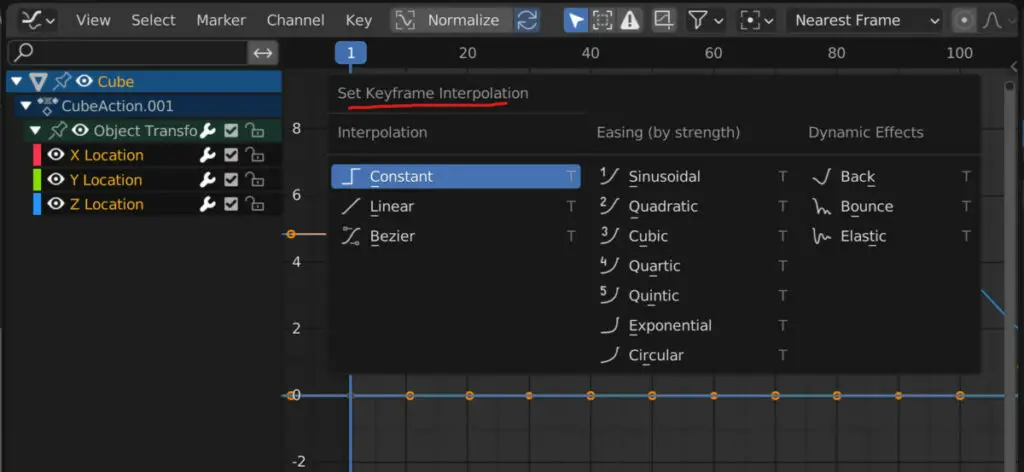
You can change the interpolation method of your active keyframes by pressing the T key to open the interpolation menu. There are many different options to choose from here but to get an idea of how this works, let’s look at the first three.
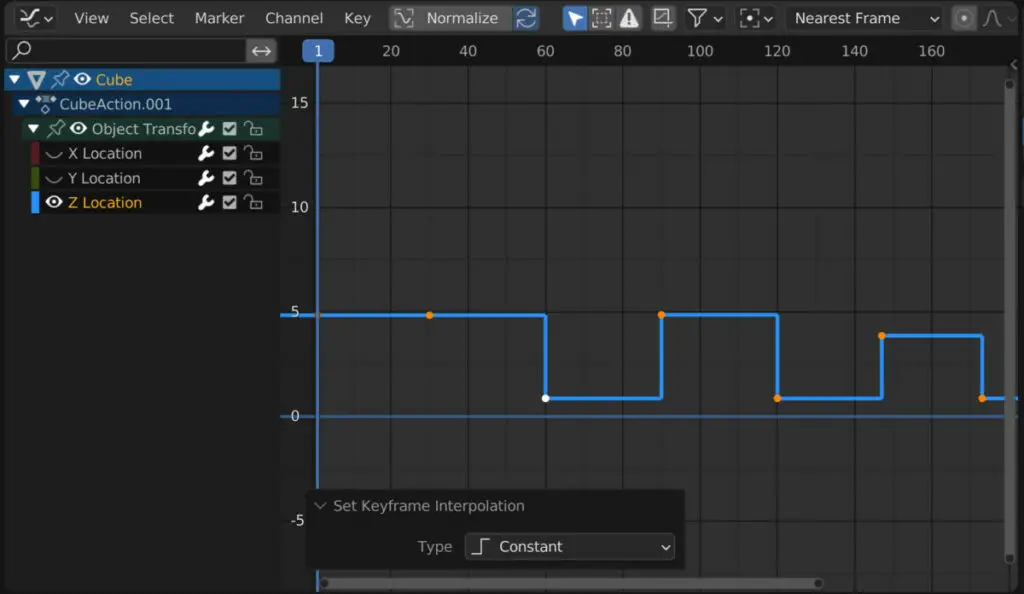
The first of these three methods is Constant interpolation. This will probably be the least used of our different interpolation methods as it ignores changing values between keyframes. If, for example, you have a start point with a value of one and an endpoint with a value of four, then as you play the animation, that value will remain as one until it reaches the keyframe, when it will snap to a value of four.
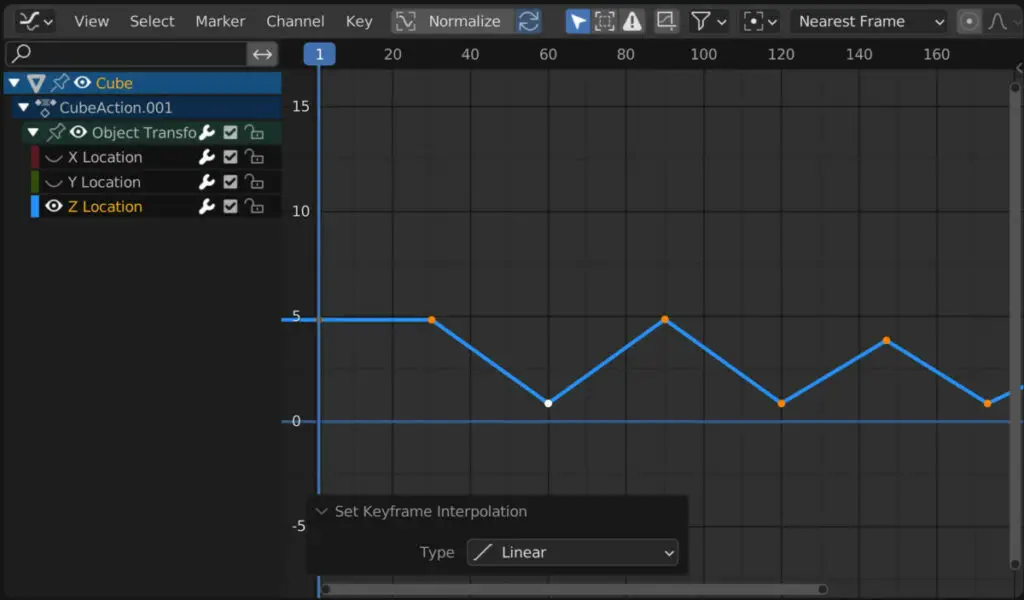
The next of the three methods is Linear interpolation. This one does not apply any falloff as we reach the keyframe. The speed at which the bouncing ball would travel using this form of interpolation would remain constant throughout the animation.
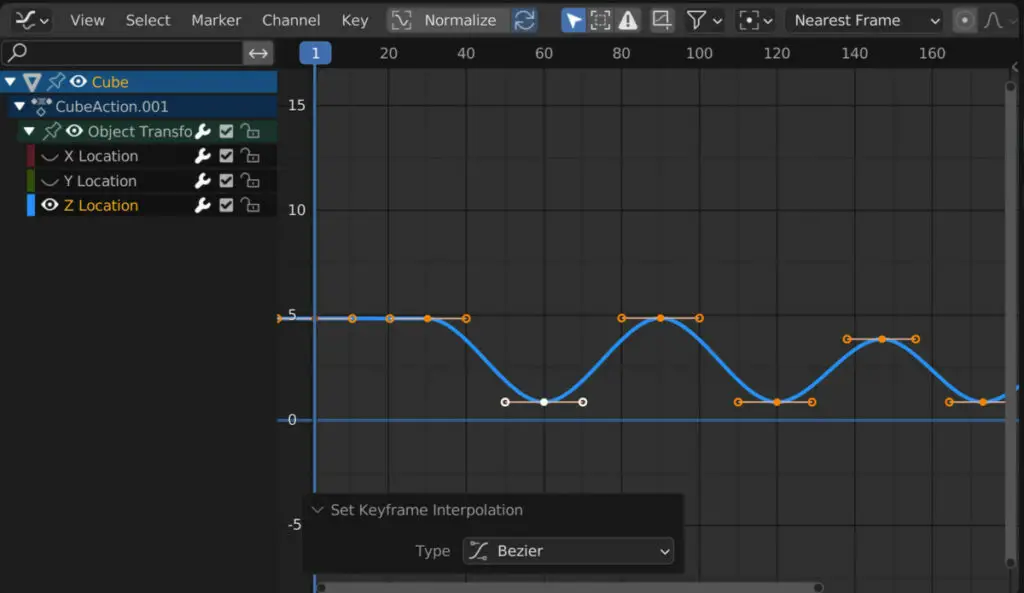
The last of the three is the Bezier interpolation method, the default form of interpolation. When we reach keyframes, the Bezier method will ease our value into that keyframe and then ease it out. This results in a change in the speed of the animation as we reach the keyframes.
So which of these interpolation methods would best suit our bouncing ball? We can immediately rule out the constant method, as we’re not looking for any snapping animation.
The linear method for interpolation is almost perfect for when the ball is bouncing. There is often a concise period where the ball would rest on the floor, so we would need to make slight adjustments to our keyframes on those low points, but this would generally have a much more practical look on our bouncing ball.
On the other hand, the Bezier method is better suited for the high points where gravity affects the ball, causing it to slow down as it reaches that high point. It then begins to speed up as it falls to the floor.
So the best interpolation method will be a combination of the bezier and linear methods. We could change the interpolation of individual Keith aims to use the method we want. However, changing the interpolation of a key found directly in the graph editor will only change their behavior after we have reached that keyframe.
Another method of manipulating our interpolation is manually by manipulating the handles of our keyframes.
Using The Graph Editor
The graph editor is the ideal location for editing your keyframes’ behavior and controlling each frame’s easing and interpolating. For our animation, we want to be able to edit our Z transform.
Fortunately, the graph editor makes it easy to see our Z transform compared to our other values because it’s the only one we would have changed at this point.
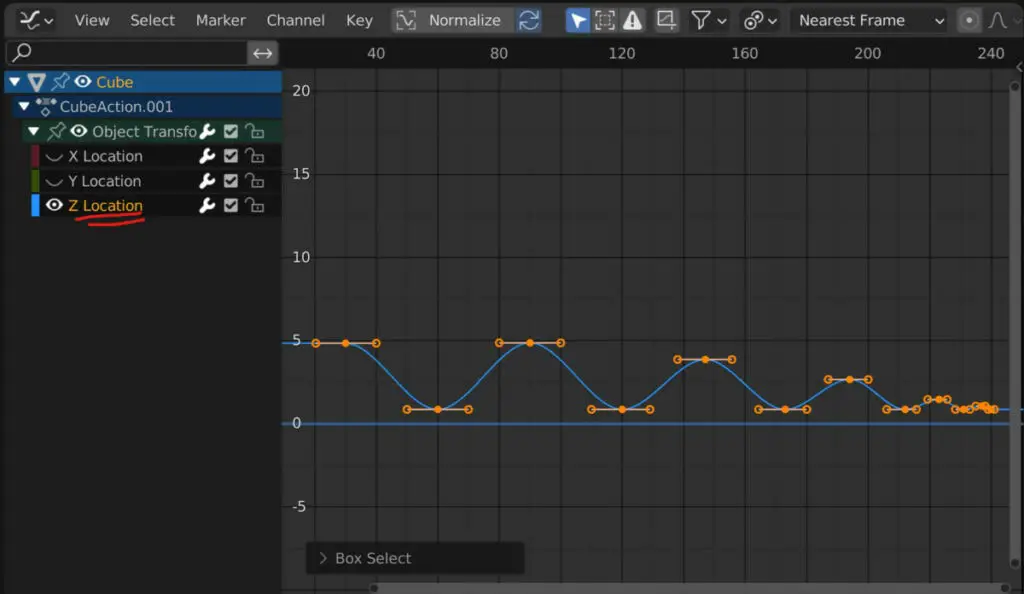
You will be able to see all of the high points of the animation, as well as the low points where the ball bounces.
If we imagine the bouncing ball, it will be at its fastest when it hits the ground, so the falloff at these low points needs to be minimal.
When the ball reaches its maximum height, it begins to slow down until it stops and speeds up again as it falls back to earth. We want the keyframes in the timeline to mimic this, which means reducing the fall-off at the low points and extending it at the high points.
We can left-click to select keyframes in the graph editor and drag the keyframe to change its positioning and value, but all we need to do is control the falloff.
Unless you are using the linear interpolation method, you can select the left and right handles of each keyframe. We can click and drag the handles to control the falloff before and after the keyframe, changing the animation’s behavior how we see fit.
In our bouncing ball example, we want to influence both handles simultaneously, which can be done using the scale tool
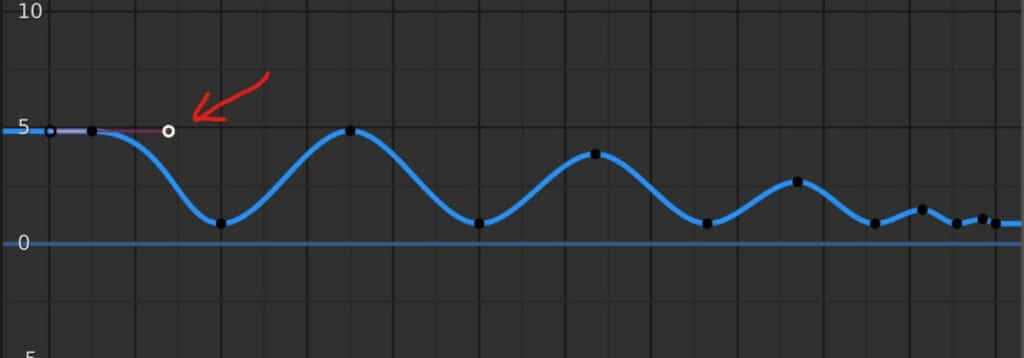
Please select the right handle for the second keyframe and drag it out to increase the falloff. You can lock to the graph editor’s X axis by pressing the X key while moving to keep the keyframe straight.
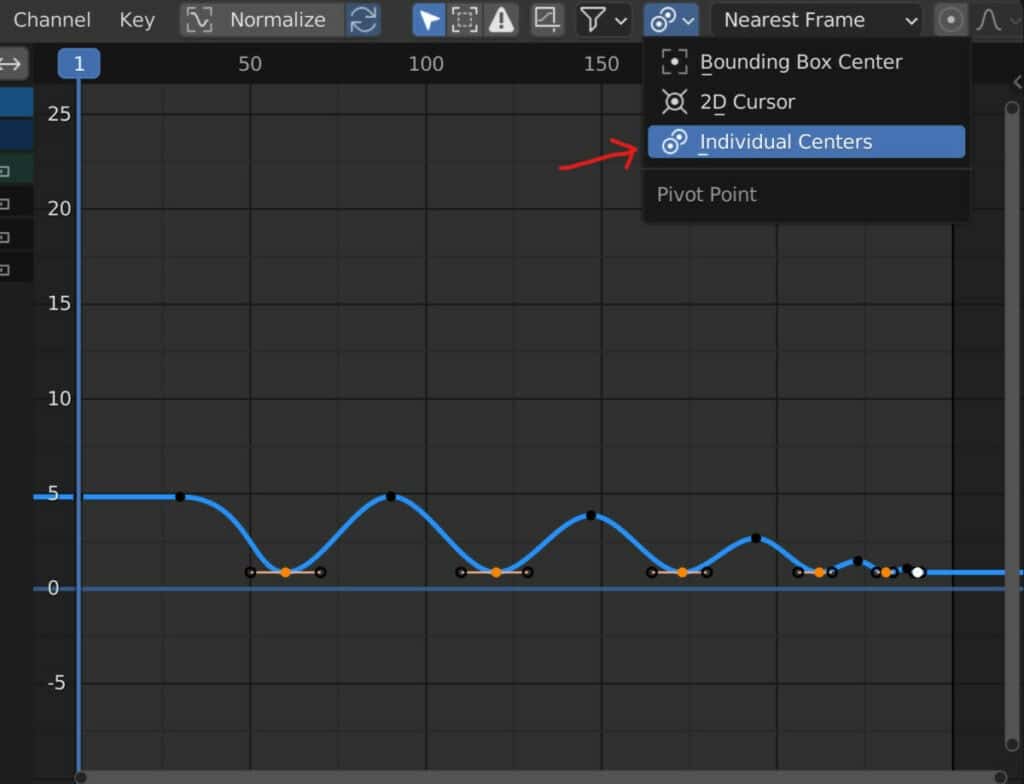
For each of the low points of your animation, select them using the shift key and go to the pivot point menu in the header bar. Change the pivot point to Individual Centers. Press the S key to scale your selected keyframes inward to tighten the falloff.
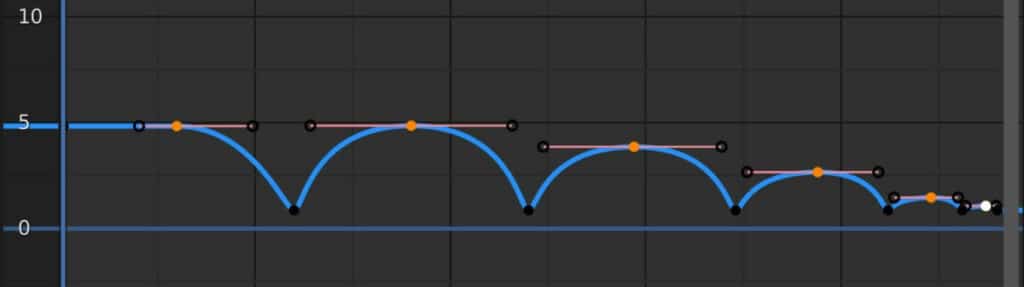
Repeat the process with the high points of your animation except for the first two keyframes. Only this time, scale-out slightly to increase the falloff time and make the slow down of the ball more noticeable.
Scaling Your Points From The Cursor
We can also use the pivot point system to scale from the location of the 2D cursor, which in the graph editor is the frame that we are currently on.
As we preview our animation, the ball is spending a little too much time in the air, so we need to tighten the animation for the ball to bounce faster.
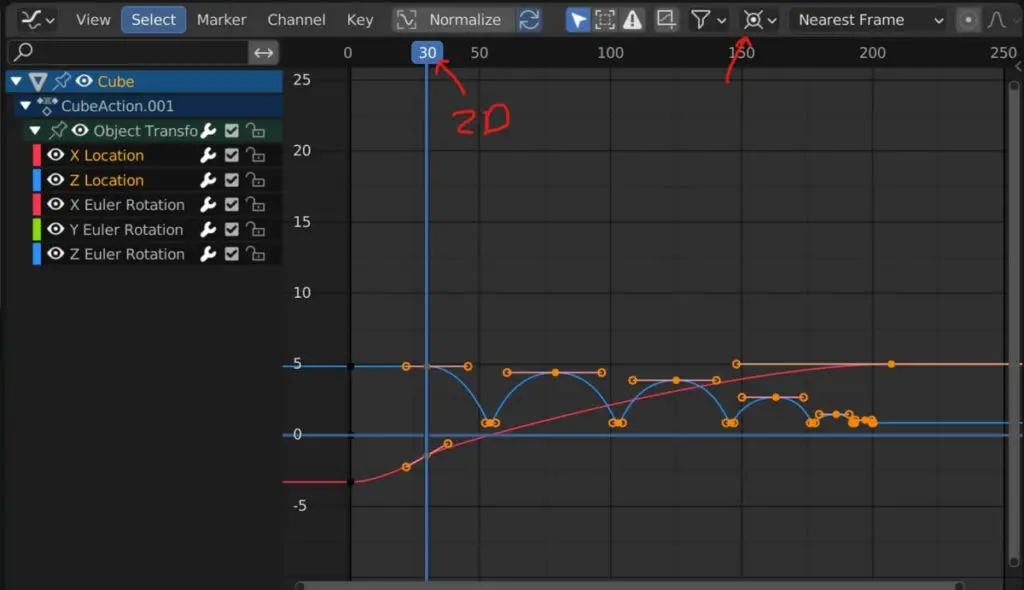
Select the frame where the ball begins to fall, which in our example is the second keyframe. We dont want to choose the first keyframe as we still want that 30 frame period with the ball on the table. Change the pivot point to the 2D cursor and then select every keyframe except the first one. Make sure to select all the keyframes on the three axis.
Scale your selection in and lock to the X axis. This will increase the speed of the bounce but maintain the same rate.
Tip: If you change the frame rate of the animation, you can use this method to correct any unintentional change made to the speed of the animation.
Making The Ball Role Off The Table
The core part of the animation should now be in place allowing us to move onto the roll stage. This is a combination of two transforms. The location transform to move the ball and the rotate transform to create the actual rotation as it moves.
This can also be split into two parts. the chang of location and the change of rotation. First create the change in location in the direction that you want the ball to roll.
For our example the ball will move along the X axis. We want the ball to move along the table first, create a keyframe on frame one for the X Location for the ball on top of the table.
The second keyframe should be at the point where the ball is about to begin falling, as we don’t want the ball to fall through the table.
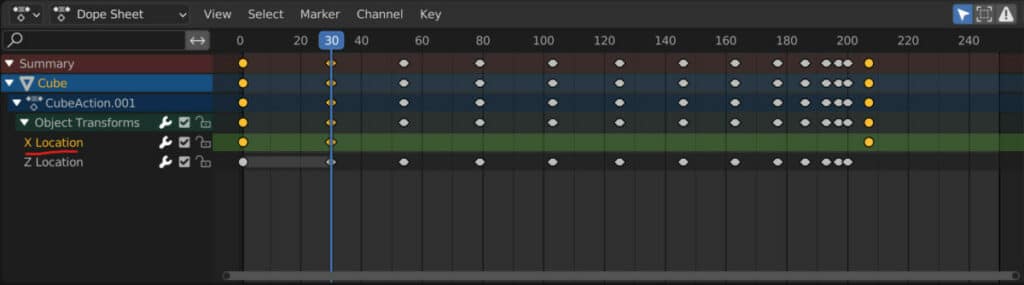
If we take a look at the dope sheet, we will see that not only have we added keyframes to the Z location for the bounce, but also keyframes for the X and Y Location as well. THis will cause an issue with our balls direction, so select all keyframes for the X location after the second and press the X key to delete those keyframes.
We can also do the same with the entire Y channel as the ball wont be moving on the Y axis. Select the Y channel in the hieracry and open the channel menu in the dope sheet, select the delete channel option to remove the Y channel.
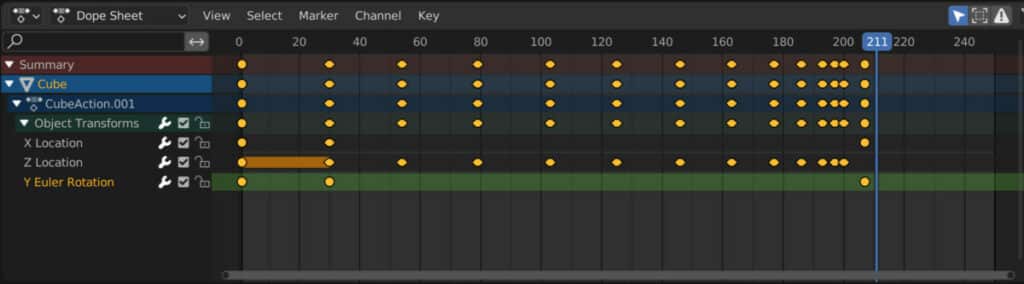
Go to the end of your animation and create a keyframe for where the ball will stop on the X axis. You can add keyframes to select channels by highlighting them in the dope sheet, pressing the I key and then selected channels.
We also recommend adding this keyframe after the final bounce so that the ball finishes with a roll. From there it becomes a matter of just editing the positioning of individual keyframes to try and get the look that she want for your animation.
Then the final part of the process is for the rotation. If the ball is moving in the X axis then we will want it to roll on the Y axis. As the ball moves forward, it rolls and rotates off of the table and continues to rotate as it bounces towards its final location.
For our example, we will rotate it six times on its Y axis from when it starts to fall of the table. We can easily do this by going to the side panel in the view port and using a calculation for the Y rotation. That rotation will be 180 + (360 * 6), as we want the ball to first rotate roughly 180 degrees while on the table. We can then create a keyframe for this rotation and preview it in our viewport.
To easily view this create the materials for your scene so that you will be able to see how your ball rolls using material preview.
From here you have all of the key concepts of your rolling board animation. It then becomes a matter of tweaking the values, which you can do so in the graph editor. Spend some time making this subtle changes to try and get the look that you want.
The only issue you may have would be with the rotation, which doesn’t look very easy to work with in our graph editor because it uses degrees as its value. You can use the normalise feature in the graph editor to bring all of your keyframes within a -, 1 to positive one range. This can make it easier to edit the rotation keyframes in particular.
Thanks For Reading
We appreciate you taking the time to read through the article. We hope you found the information you were looking for. If you are interested in learning more about the Blender software, you can check out a few of the articles we have listed below.
- Beginners Guide To Using The Graph Editor
- Beginners Guide To Using The Dope Sheet
- Beginners Guide To Using The Timeline
- Setting The Output For Our Rendered Animations
- Getting Started With 3D Animation In Blender