If you are not used to working in 3D space, then there are a lot of things that you will need to work on to become habits. One thing that you may find surprisingly complex is the use of the 3D cursor, which is very different from manipulating the traditional 2D mouse cursor used in 99% of applications.
To reposition your 3D cursor back to the center of the world, origin used the hotkey Shift + C. Not only will this censor your cursor back to its original location, but it will also change your view so that you can visualize your entire scene.
The 3D cursor is used for a number of days for different tasks, most notably for the ability to add new objects to your scene. Most 3D artists prefer to add their new models at the center of their world origins and then move those models once completed.
Where Is The World Origin In The 3D Viewport?
The world origin is easy enough to locate in the 3D viewport, so long as we have the overlays turned on. When you open up a new project in Blender, you will always start out with a default cube. This default cube will always be located in the coordinates 0,0,0, meaning can always be found at the center of the world origin.
Even if we were to delete our default cube, it would still be very easy to locate the center of the world’s origin. Within the viewport, you will see green and red lines that will indicate the wire and X axes respectively.
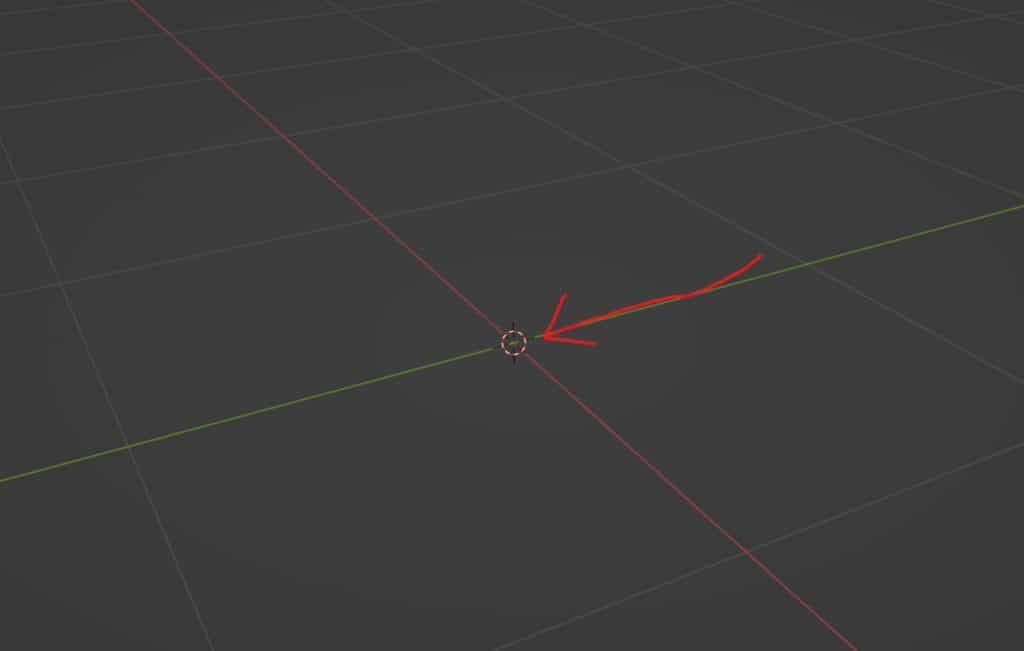
At the point where these two lines connect and crossover is the center of the world origin or the coordinates 0,0,0.
Note that while we can add in the blue line to indicate the Z-axis, it is not enabled by default and only the green and red lines are visible within our overlays when opening a new file in Blender.
How To Center The 3D Cursor To The World Origin?
In the tool shelf, we have the ability to select our cursor, which looks like a circle with red and white lines going around the circle.
When this tool is activated, we can use the left mouse button to reposition the 3D cursor anywhere in our scene.
A common mistake that artists make of varying levels is to accidentally move the 3D cursor to another location.
If you want to restore your 3D cursor back to its original location, which is at the centre of the world origin, there are two methods that we can use to achieve this.
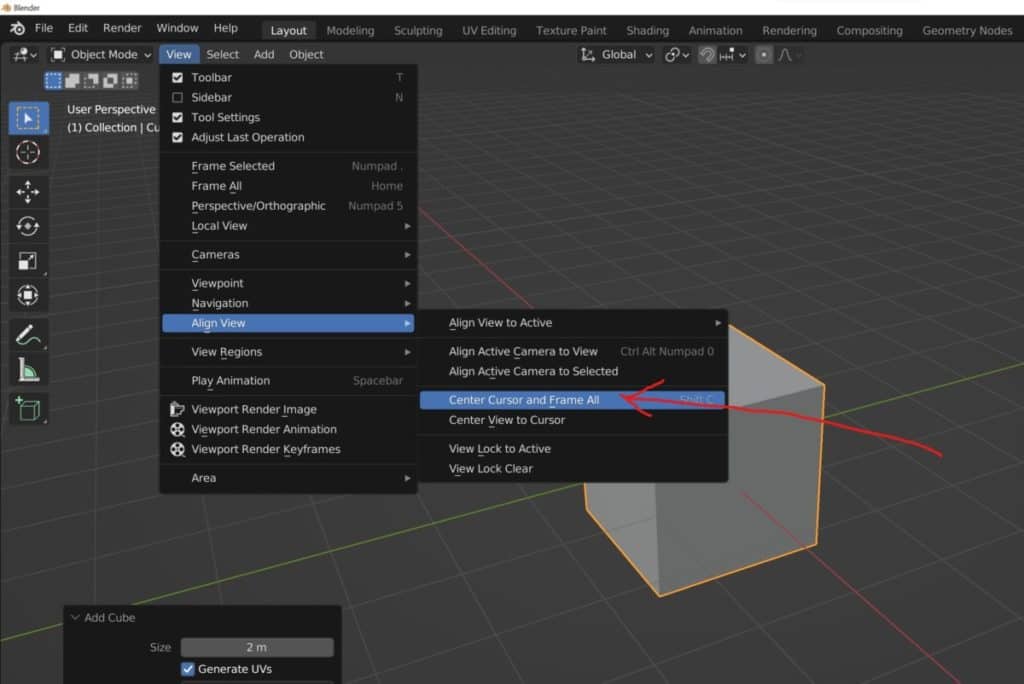
The first method is to center your cursor and view all, which can be done by either going to the few menu located in the 3D viewports header bar, hovering your cursor over the Align View option and then choosing the centre cursor and view all options from this sub menu. Alternatively, you can also use the hot key Shift + C to do the exact same thing.
The second method is to use the side panel to reposition your 3D cursor to a specific location. Press the N key to open up the side panel if it is not already visible.
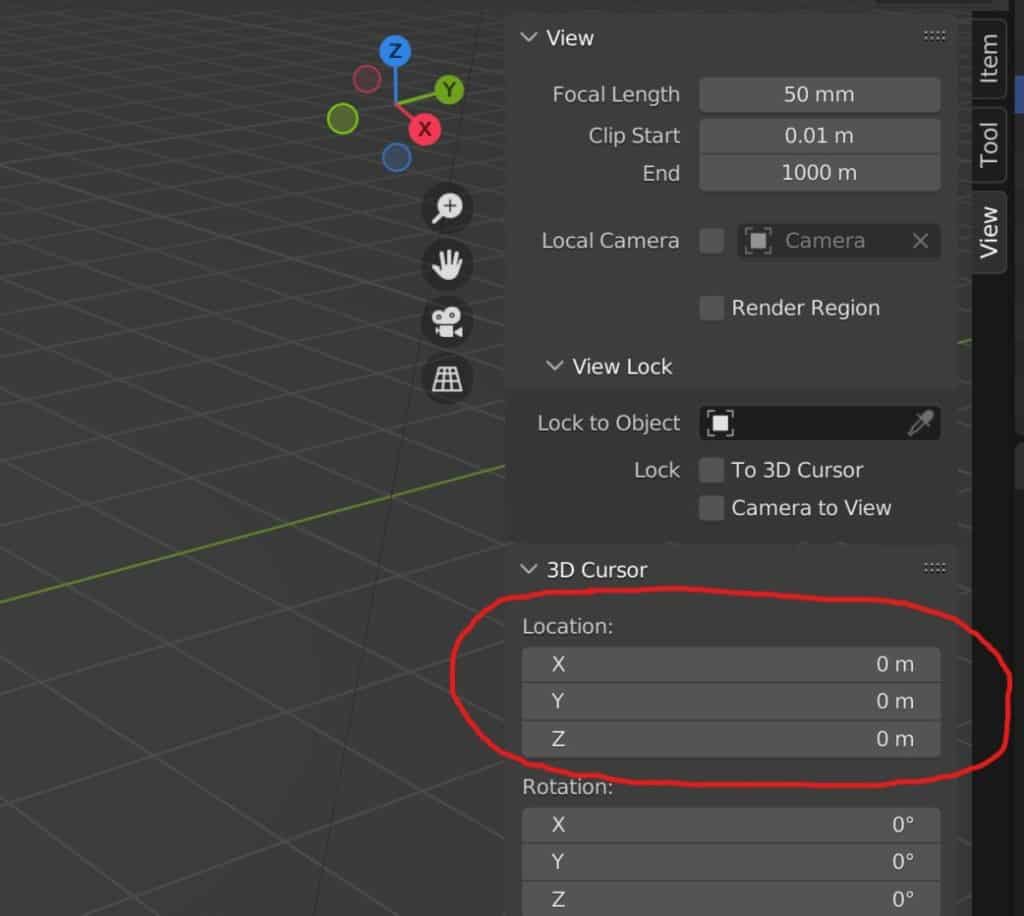
Then select the View tab in the side panel and scroll down until you can see the location values for your 3D cursor. You can re-position the cursor on the X. Y, and Z axes by typing in numerical values in the side panel.
By using the coordinates 0,0,0 on the three axes, you will be able to reposition your 3D cursor to the center of your world origin.
If you want to learn more about Blender you can check out our course on Skillshare by clicking the link here and get 1 month free to the entire Skillshare library.
Moving Objects Back To The World Origin Using The 3D Cursor
There are many reasons why the 3D cursor is one of the more valuable tools that you can learn in Blender. One example of using the 3D cursor is to move objects back to the world origin, or even to a custom location defined by the 3D cursor itself.
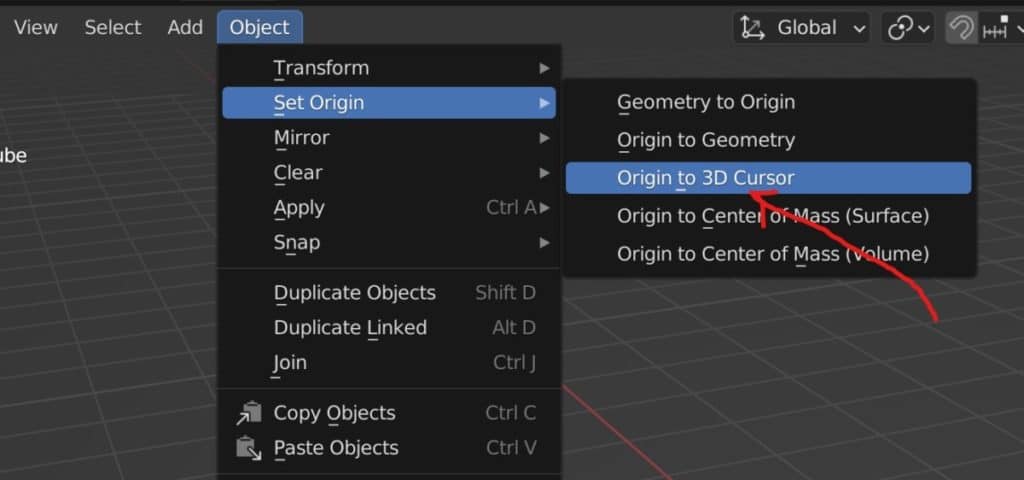
For example, if the 3D cursor was at the center of the world origin, then we could select an object in our viewport and then go to the object menu.
We can then access the origin sub-menu and select origin to cursor, which will position at the origin of the object at the location of the 3D cursor. This will normally be the world origin.
This would allow us to change the way that our objects behave whenever we rotate or scale them, as the object origin would be in a different position to the mesh geometry.
If we wanted to use this method to get the whole object back to the centre of the world origin, then we can do the process above and then return to the origin menu, before selecting geometry to origin from the menu.
Of course, a simpler approach would be to simply select the object itself and then type in the coordinates in the side panel for where you would want to position that object.
When sculpting or texture painting in Blender the best method is to always use a graphics tablet. But these come at many different price points and forms. If you want to get started with sculpting using a graphics tablet then we recommend this as your starting point. It served us well for over 4 years before we upgraded to a more expensive tablet ourselves.
Why Is The 3D Cursor Not Visible In The Viewport?
Occasionally you may find the 3D cursor is not visible within the 3D viewport, and there are a couple of reasons as to why it this could be the case.
The first reason is that you have moved the 3D cursor somewhere that is not visible within the current field of view, and so you may be required to orbit, pan, or zoom your view to locate it.
Go back to your location values of the 3D cursor in your viewports side panel and check to see if the values differ from the world origin. You can reset them back to 0,0,0 to move your cursor back to the center.
If that does not work then you will likely have hidden your 3D cursor from the overlays menu by accident.
To bring your cursor back into view, first, open the viewport overlays menu in the header of the 3D viewport.
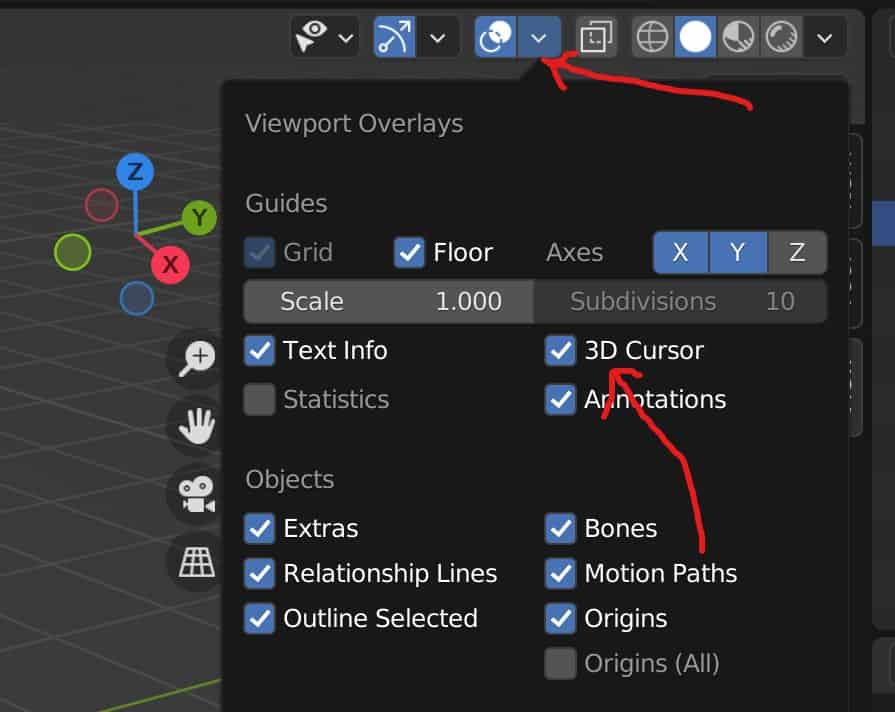
Under guides, you will have the ability to turn on visibility for the 3D cursor if it is currently unticked. So enable this option to view your 3D cursor again.
If the cursor is still not visible and the rest of your guides, like the grid and origin, are also invisible, then click on the button next to the viewport overlays menu to enable your overlays. It should be highlighted blue when active.
Centering Your View Around The 3D Cursor?
Another way to use the 3D cursor is to have it as the focal point of your view, so that when you orbit, pan, and zoom in Blender you are doing so with the cursor as your ‘view’ origin, instead of the center of the world origin.
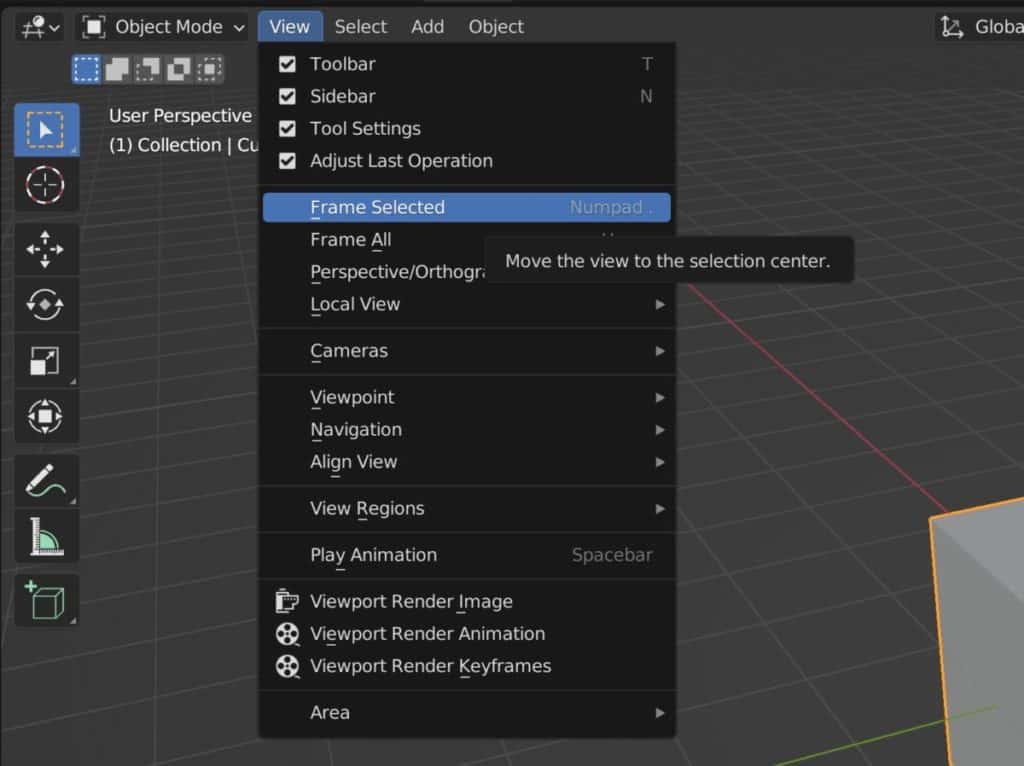
There are two ways to center the view to your 3D cursor. The first method is to go to the view menu in the header bar of the 3D viewport.
From the view menu, locate the align to view object and hover your mouse cursor over it to reveal the menu.
Choose the option labeled ‘center view to cursor’ and then your view will snap its focus to the cursor regardless of where it is located.
The second option is to hard lock your view to the position of the 3D cursor. This can be done by opening up your side panel and then accessing the view tab.
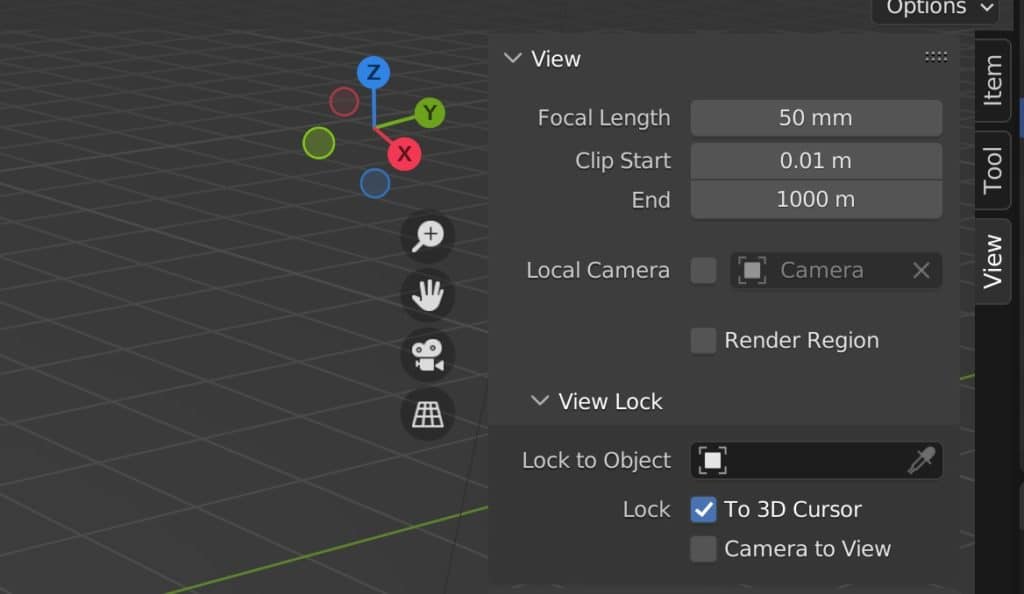
In the view section, we have a sub-menu for view locking. In this menu, we have the ability to lock our view to either the camera object or the 3D cursor. Select the 3D cursor and then Blender will snap to that location.
Centering Your View Around The World Origin?
What if you wanted to center your view to the world origin but did not want your 3D cursor to be positioned there?
Blender always needs to use either an object or an element to act as the point of reference for the viewport camera.
So centering our view to the world origin requires us to have either an object (like a cube) or an element (3D cursor) at that location.
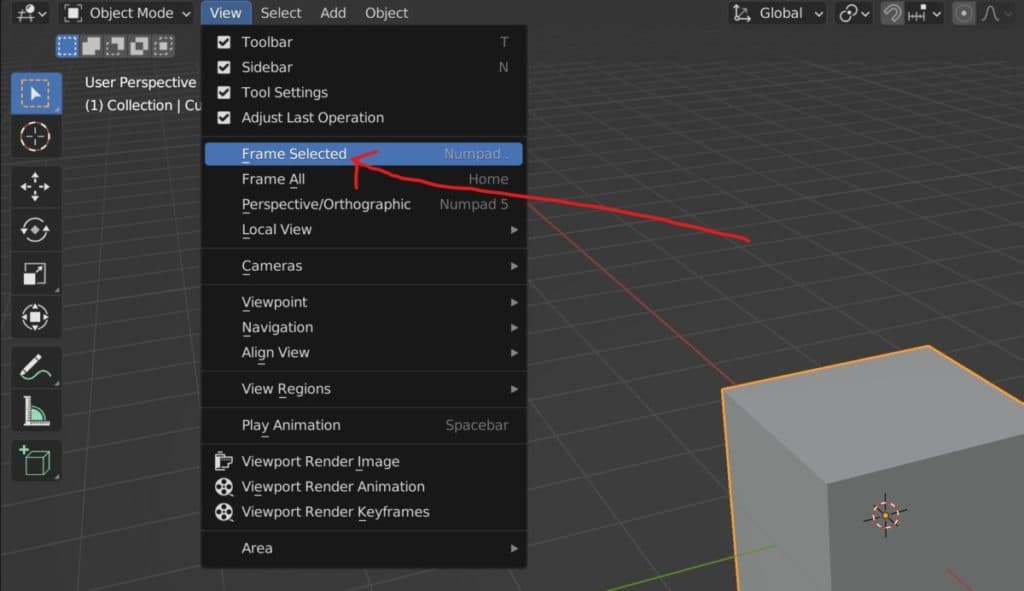
If you don’t want to use a cursor, then use an object instead. Create a new object and then position it at the coordinates 0,0,0. Then you can center your view to the active selection by pressing the period key on your number pad or by going to View>Frame Selected.
Thanks For Reading The Article
We appreciate you taking the time to read through the article and we hope that you found the information that you were looking for. Below we have compiled a list of additional topics that we think you may be interested in reading.
-
Subsurf Modelling: Hard Surfaces in Blender
Achieving high-quality hard surfaces with Subsurf Modelling techniques.
-
Sharp Edges in Blender with Crease Sets
Utilizing crease sets for maintaining sharp edges in subsurf modeling.
-
Bevel & Chamfer: Blender’s Edge Mastery
Mastering the application of bevels and chamfers for sharp edges in Blender.