So let’s set the scene. You are just applying your texture to your model, having successfully created your UV map. You connect the texture to the material and check in the material preview to see if it has been applied correctly. It all seems fine until you see some random dark spots on the model. What are these and how do we get rid of them.
To get rid of dark spots that appear on your texture, first ensure that there is no overlapping geometry either in your UV map or your model, as both can cause this issue. Another issue may be the use of incorrect normals on your geometry, so select the model and use shift + N to recalculate normals.
When we apply a texture we expect it to be mapped out a certain way, so these dark spots are unwelcome artifacts that we need to deal with as soon as we identify them.
Poor Geometry Can Create Poor Texture Application
Perhaps the most common cause of the black spot issue with textures has little to do with the actual texture and more to do with the geometry that the texture is being mapped to.
There are two factors that can influence the creation of black spots on textures mapped to the geometry. The 1st factor is when you have overlapping geometry on your model, either in the form of having two faces overlap or two vertices occupying the same space.
The second factor is when the normals are incorrect. The normal is the direction that your geometry is facing, and dictates the inward and outward side of a vertex, edge, or face.
When we create a UV map using an object with incorrect normals, this can confuse Blender in terms of how the map should be applied to the texture, even if there is no noticeable impact on the UV map in the UV editor it can still create issues like black spots on the model itself.
The Solution To Black Spots Created By Poor Geometry
If you have geometry that is overlapping, then you need to move the geometry around so that this is no longer the case. If you are able to select the right geometry, then you can use the edge slide tool to move your geometry around without losing the shape of the model.
To use the edge slide tool, or vertex slide when working with vertices, select your geometry and then press the G key twice. The vertex or edge will then be restricted in terms of movement based on the current topology.
Alternatively, if the main issue is that you have vertices that are overlapping each other in the same space, then you can use the merge tool instead.
With the merge tool, you can combine your vertices together, eliminating any created black spots and cleaning the area at the same time. Select the geometry of your model and then press the M key to open the merge menu. The merge by distance option will allow you to merge the closest vertices into one.
UV Islands Too Close Together Can Create Artifacts
When using a Uv map it is always possible to overlap your UVs on top of one another, which is a practice that you will always want to avoid unless you require two areas of the mesh to adopt the same pattern.
This by itself though should not cause the black spots to appear, as it simply maps the same texture to both areas. What is a more likely cause is when two islands are positioned too close together.
An island is a selection or part of a model that is separate from the rest. In the UV editor, an island can be created using seams or the smart UV project tool. You can select and control islands independently like you can normal geometry.
When two islands are positioned close together on the UV map, to the point where the vertices are almost making contact, black spots can appear on these areas of the texture.
The Solution To UV islands
The easiest way to fix this is to select the islands in the UV editor and use either the grab or scale tools to reposition the islands further away from each other. Even a little bit of distance can quickly fix the issue.
This problem is most common when using the smart UV project tool to unwrap the model, so the next time you use the tool make sure to create an island margin in the settings before creating the map, to ensure that there is enough space between the islands of the texture.
Transparency On The Texture Can Cause Black Spots
When working with Eevee you may not realize that transparency is off by default. When a transparent texture is used in Eevee without changing the settings the transparent areas of the texture will appear black. Depending on the shape of the model this can create black areas around the model’s surface.
In cycles, transparency is more readily available and so this is not an issue that you will need to be concerned about, but with Eevee, you need to be aware of this when using a texture that has a transparency channel.
The Solution To Black Spots Using Transparent Textures
Depending on the shape of your model, it may simply be a case of editing the UV map so that the model shape matches the texture shape better, and that the IV island does not spill over into the transparent area.
However, if you are going for transparency and simply want to fix the issue with the black area then you can enable transparency for your model by going to your material settings in the properties panel, scrolling down to the settings section, and changing the blend mode to alpha clip.
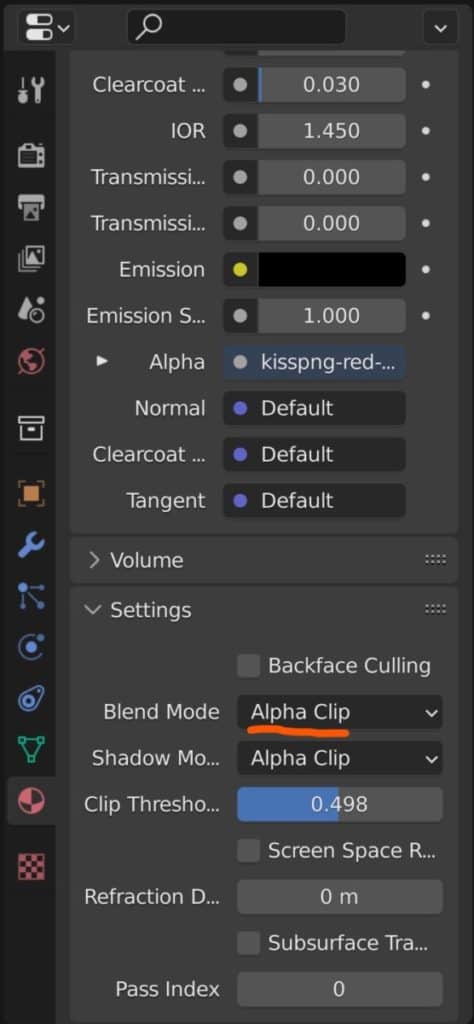
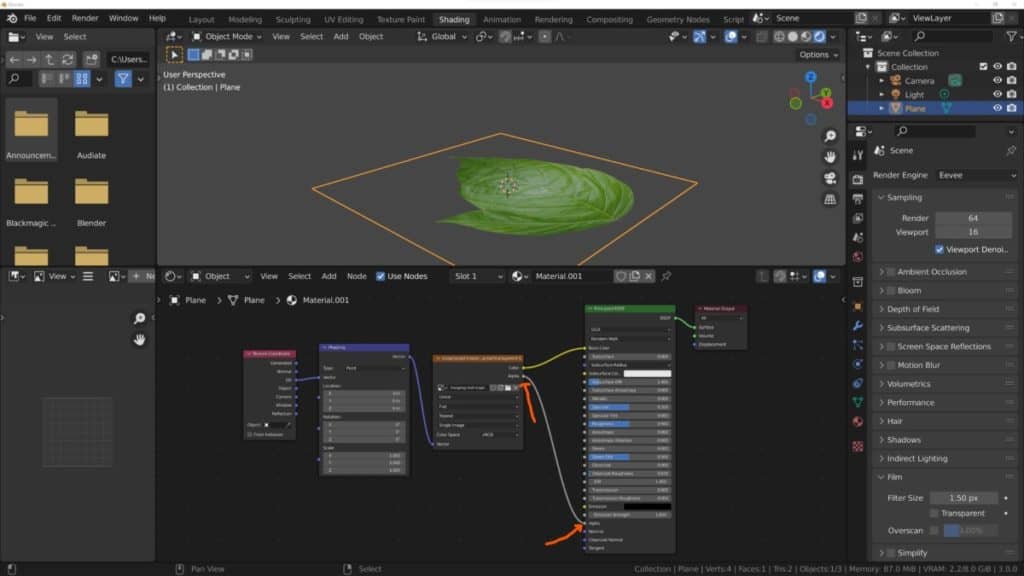
This is not all though, as you also need to use the alpha channel of your texture, which you can do by linking the alpha output from the texture node and connecting it to the alpha input of the principled node, as seen in the example below.
Black Spots Appearing After Using Subdivision Surface
You should look to create your UV map for texturing after you have completed the modeling stage of the project. Creating a UV map and then using tools that drastically alter your model can create artifacts like black spots, such as the subdivision surface modifier.
If you are using the subdivision surface modifier in your project then at the very least you should add the modifier before creating your UV, even if you don’t end up applying the modifier by the end of the project.
If All Else Fails, Change The Texture Coordinate Output On Your Material
If you follow each of the troubleshooting steps above and you still see the black spots, then you can try to reset the application of the map to the texture.
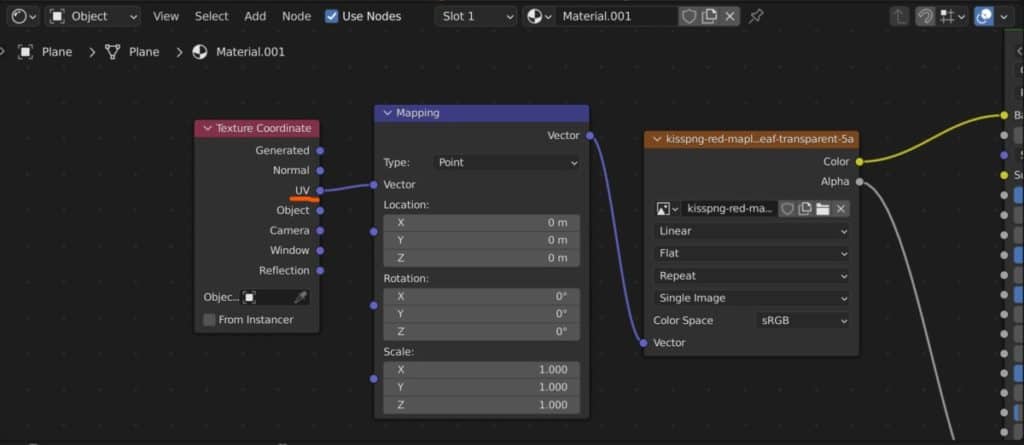
In the shading editor, we have the node tree for the material, and one of the nodes that we have is the texture coordinate node. Without this node, you cannot control how your image texture is applied to the surface of the object.
The list of outputs for the texture coordinate node will include the output for the UV map, which is connected to the mapping node.
Connect the generated output to the mapping node temporarily, which changes the way that the texture is mapped, and then go back to the UV output.
This effectively resets the texture map and gets rid of the black spots on the model. Note that this will only work if you have attempted some of the other solutions listed above, as these solutions are likely to have worked but the changes have not been made to the model.
Many Thanks For Reading Through The Article
We appreciate you taking the time to read through the article. We hope that you have found the information that you were looking for.
- How To Clean Your Object After Using The Boolean Tool?
- The Difference Between Subdivision Surface And Multiresolution
- Using Smooth Shading And The Autosmooth Tool
- What Does Clearcoat Mean In Blender Materials?
- Overlay A Transparent Texture Or Decal In Blender
-
Animation-Ready Hard Surfaces in Blender
Preparing hard surfaces for animation with optimized topology in Blender.
-
Symmetry for Hard Surfaces in Blender
Ensuring symmetrical perfection in hard surface models with Blender.
-
Detail with Shrinkwrap: Blender Modelling
Achieving intricate detailing with Blender’s Shrinkwrap modifier.