One of the most frustrating aspects of being an animator is the time one spends waiting for the animation to render. While a single image can render pretty quickly, the animation is a collection of dozens, if not hundreds, of images rendered one after the other.
What can make the process even more frustrating is when the rendering process is halted when the system crashes or if you need to turn off the device for whatever reason. A workaround to this issue is to render our animation as an image sequence and then convert it to a movie file.
To convert an image sequence to a movie file, open up Blenders VSE and import the image sequence into the timeline. Change the output settings to render as a video file, and select the render animation button. This will take priority over any keyframed animations that you have in the viewport.
If we use an image sequence instead of a movie file, we slightly increase the time it takes to complete the process, but with far less risk than before.
What Is The Difference Between A Movie And An Image Sequence?
A movie file is a single file that players movie clips and can be used in multiple locations and video players depending on the video codec and file container used to store the video.
An example of a typical setup for animation files in Blender is to use the MPEG-4 file container, which has the .mp4 file extension.
The animation can then be encoded using one of the menu video codecs. Our preference is to use H.264, a reliable codec that is widely used and accessible across menu mediums.

By contrast, an image sequence is not a single file but multiple sequential files. These files take the form of single images, each a single animation frame.
The more frames you have, the more images will be added to the image sequence. So if you have a 120-frame animation, then 120 images will be rendered and stored in the output directory.
These images are numbered based on their frame value, so frame one will have the image name 001, frame 34 will be named 034, and so on.
Why Use An Image Sequence Instead Of A Movie File?
Rendering a single image can take anywhere from a second to 10 minutes to beyond. The better your hardware the faster the render, but the time it takes to render depends on the scene.
In Eevee, most projects will see an individual image take only seconds to render, but with cycles, this easily becomes minutes. And if a single image takes a minute to render, how long would it take to complete an animation constructed of 100’s images or frames?
The time it takes is proportional to the number of frames required to render. For an animation, every frame is slightly different and presents its own challenges to the rendering engine, but they will typically take a similar amount of time as each other.
A four-second movie file can take over an hour to complete without using Eevee, which comes with a substantial risk.
Modern releases of Blender have demonstrated improved stability, but the threat of software crashing during the rendering process is always possible.
The worst thing about Blender crashing during a render is that no matter how long you have been waiting for the animation to finish, you will always need to start from the beginning.
The movie file container is precompiled at the start of the rendering process, and as each frame is encoded, it gets stored within the movie files container.
But the file itself is not usable until it is complete, so if the software crashes, the movie file is deleted, and we have to start the whole process again.
This can be incredibly frustrating if you are two hours into a three-hour render. So a solution to this problem is to use an image sequence to render the animation.
Why? Because an image sequence renders and stores frames as independent images. Each frame is rendered and then saved to the output folder. If Blender crashes, all of those already rendered frames have been stored in the folder and are ready to use.

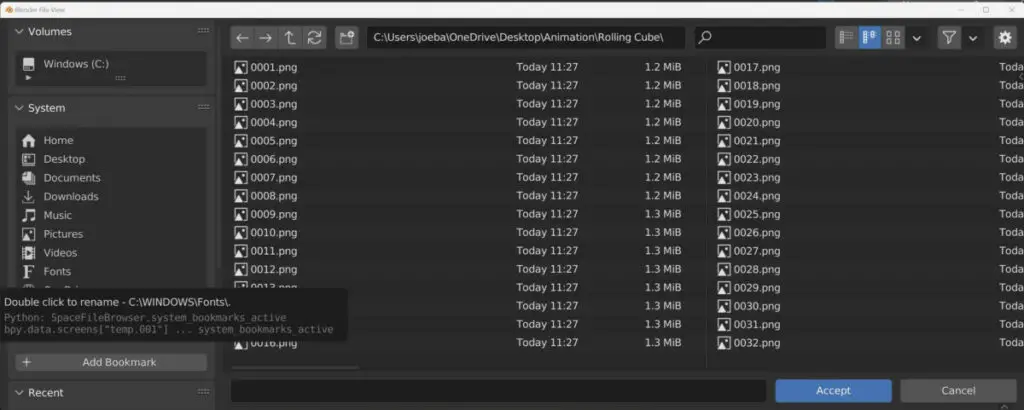
If you decide to render as an image sequence and Blender crashes halfway through the rendering process, reopen your project and set your frame range to start on the first frame not rendered. So if frames 1-40 are found in the file browser, start from frame 41 to continue the process without overlapping frames.
Rendering Our Animation As An Image Sequence
This process can be divided up into a few steps. The first step is to set up your animation to be rendered as an image sequence.
Fortunately, we don’t have to do much to achieve this, as if we go to the output tab in the properties panel, we will see in the output section that we already have the file type set to PNG.
This is perfect for our image sequence, as each frame will be rendered as a PNG image. The only thing that we will need to change is the output location, which is currently set to the temporary folder.
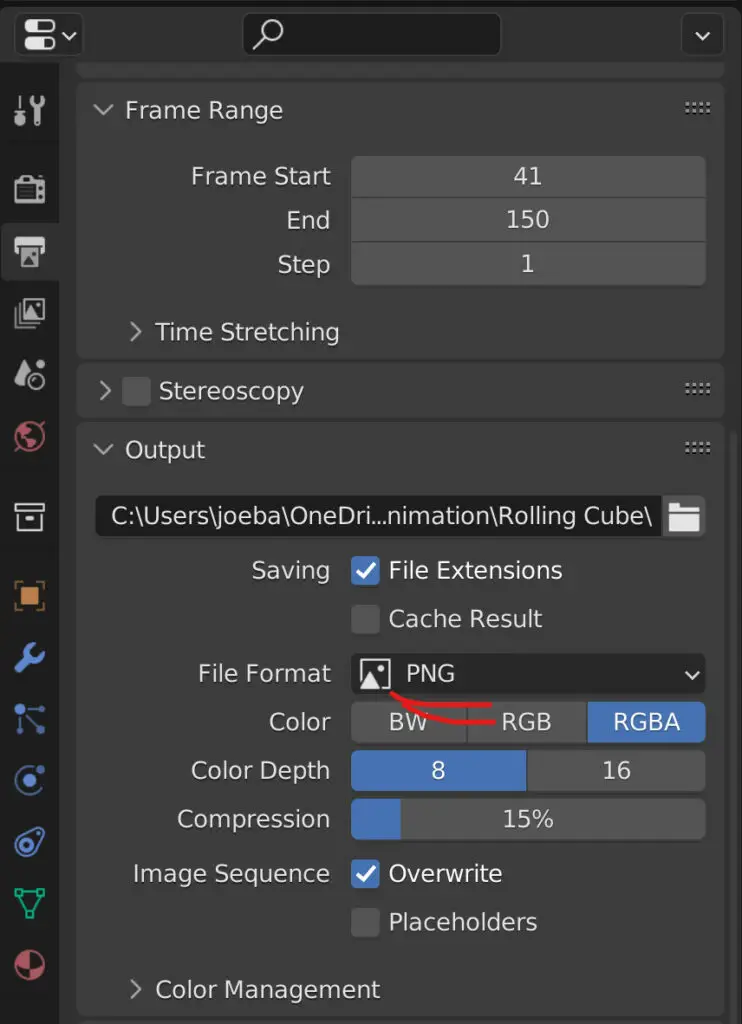
Click on the folder icon to open the file browser and create a folder in an easy-to-reach location. Name this folder what the animation is called so that it’s easy to locate. Then click on the blue accept button wall inside the new folder, which will be the new directory for your outputted animation.
It is essential to ensure that your target destination is an empty folder, especially when doing an image sequence.
Once the output has been assigned, render your animation as usual. The process is identical regardless of the type of file you are outputting to. Each frame will be rendered one by one.
The key difference now is that when Blender crashes, or if it crashes, you can restart from where you left off.
Converting Our Image Sequence To A Movie File
When the image sequence has been completed, go to the folder where you output it your rendered animation too, and she will notice that all of the frames should be listed in sequential order within that folder.
Using an empty folder will be straightforward to navigate as the frames will be the only files within this folder.
The next step is to use Blender’s video sequence editor to import our image sequence, too, so we can look at converting it to a movie file.

For this, we prefer to open up a new project, save your existing file and then open a new project in Blender, but do so using the video editing templates.
This template focuses on the process of video editing and grants you immediate use of the video sequence editor in Blender.
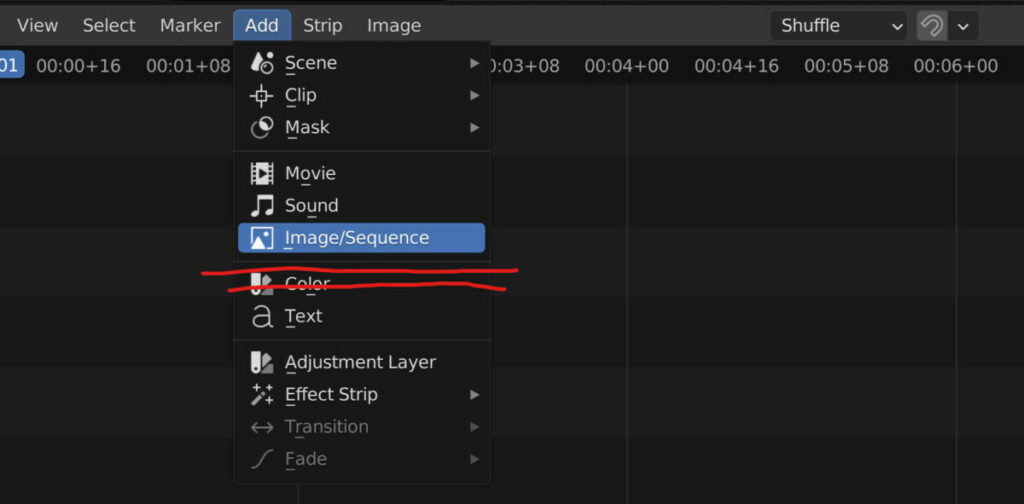
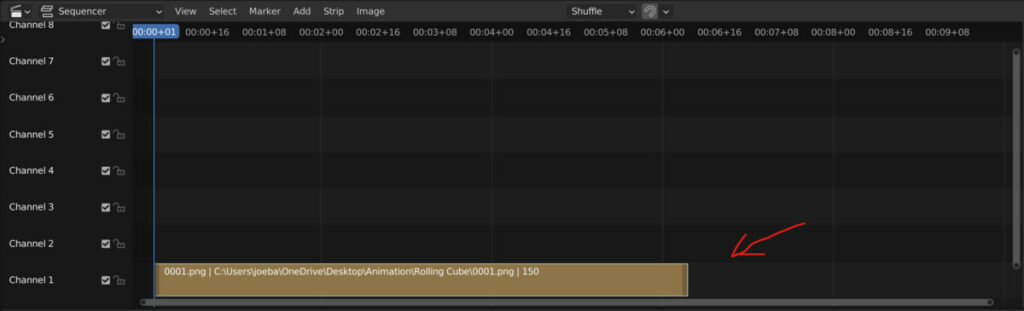
To add your sequence of frames, go to the add menu in the editor. From here, we can add many different elements to our timeline, but the one we want is an image sequence. Then select the option to open the file browser.
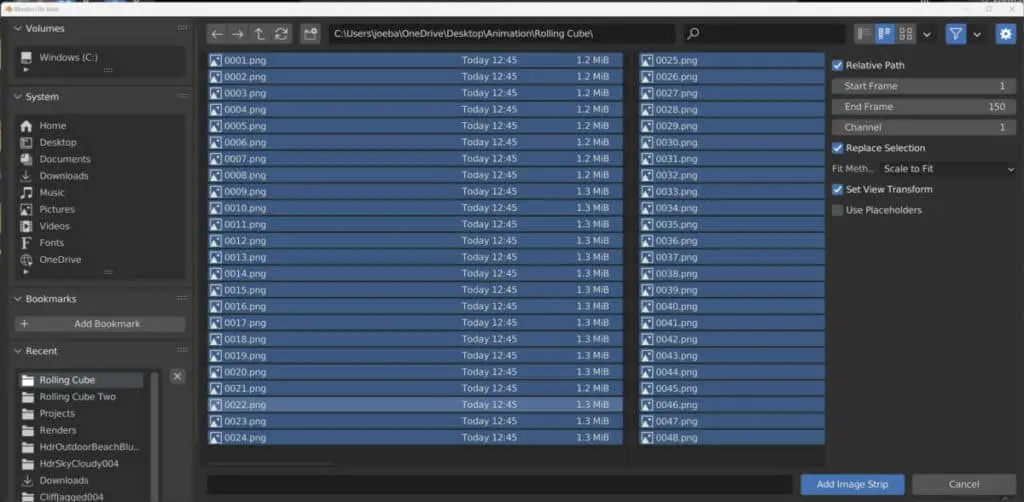
The only files within our folder are frames to our image sequence, so we can easily select them by pressing the A key.
If, for whatever reason, that does not work, select your first frame, then Scroll down to the final frame, hold down shift and select that one. This is another way to ensure that all of our frames are selected.
Before we click on the add image strip button in the corner, go to the options to decide. Included in these options is the ability to assign the start and end frames of the sequence. Make sure to set the end frame to match the final frame number of your image sequence.
If you cannot see these options, click on the gear icon in the top corner, or press the N key to bring up that side panel.
Then select the blue button to import your image sequence and ensure it is positioned correctly in your sequencer. Use the timeline controls to play your image sequence to ensure everything has been imported correctly.
You can use the video sequence editor to edit your content in various ways, such as adding a title at the start or perhaps a watermark logo, but we are here to convert it to a movie file.
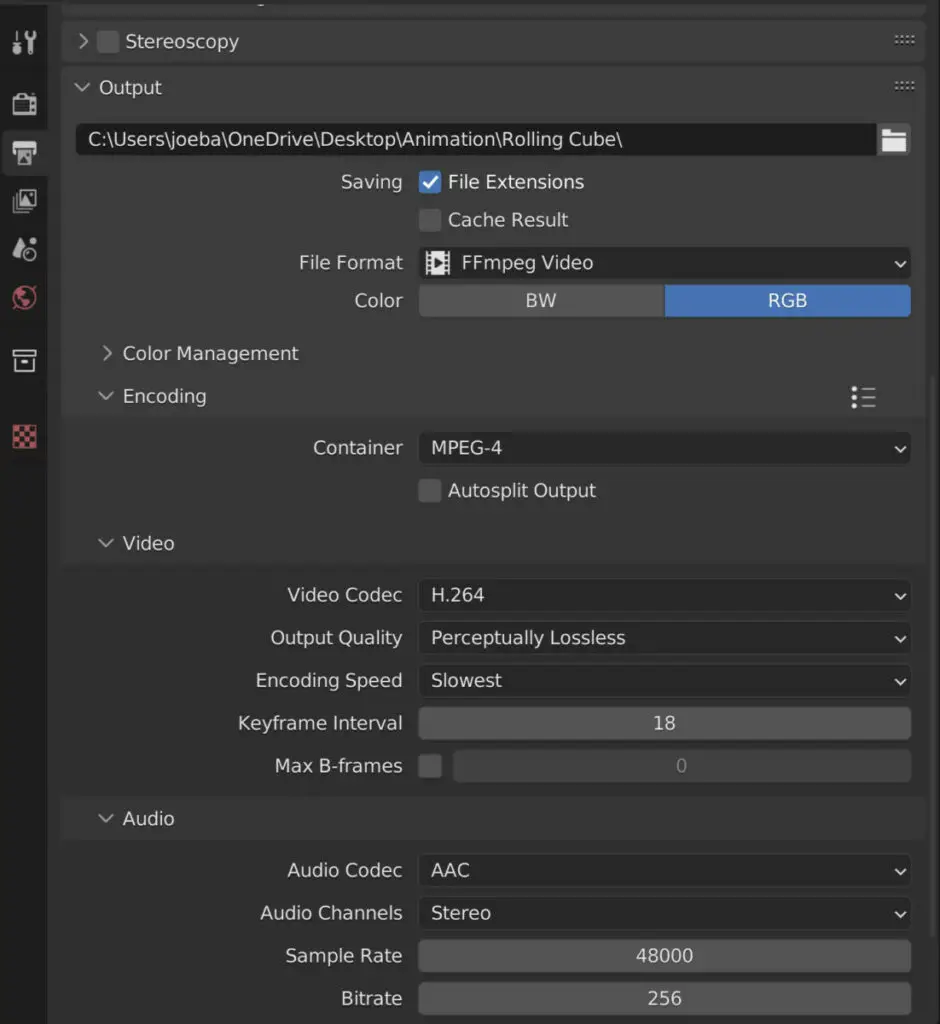
Return to the properties panel and change the file format to a movie-based format. You can choose a new output or keep using the same one as your image sequence.
We recommend changing to the FFmpeg file format, and then using an encoder and video codec to store your movie file.
Our favorite setup is to use the MPEG-4 encoder with the H.264 video codec. Our encoding speed is slowest for best compression results, and the output is perceptually lossless. This results in a high-quality movie file at the expense of requiring more storage space.
When the settings are to your liking, go to the render menu and select render animation. Because we have an image strip in our sequencer, it takes priority over what exists in the 3D viewport.
You might think that because we are rendering out animation again, we need to wait for that animation to render from start to finish and that this method takes twice as long as it just rendering the movie file in the first place.
However, while we’re using the render animation button, we are not strictly rendering a 3D scene. Instead, we are re-rendering an image sequence that is already 95% complete. This process takes the PNG frames of the image sequence and compiles them using a video codec. This compilation is stored inside a container, such as an MP4 file.
As a result, converting our image sequence to a whole movie file will take seconds compared to the minutes or hours it took to render the animation initially.
Thanks For Reading
We appreciate you taking the time to read through the article. We hope you found the information you were looking for. If you are interested in learning more about the Blender software, you can check out a few of the articles we have listed below.
- How To Define The Output Location Of Your Animation
- What Is The Frame Range, And How Does It Affect Your Project
- Controlling The Resolution Of Your Animations And Renders
- Why You Should Change Your Frame Rate Before Adding Keyframes
- Can Blender Import And Export A PNG File