Creating basic materials is really easy in Blender, but creating more complex materials takes a lot of time and work. It can take a lot more when your node setups are poorly organized, as you need to have a solid understanding of the role that each node has for your material.
The following tools allow you to better organize your node setups:
- Node Labels
- Colors
- Rerouting Noodles
- Frames
- Group Nodes
- Snapping
- Node Wrangler AddOn
By using the tools listed above you can make even the most complicated node trees look comparatively simple. Understanding your node setup is just as important as creating it in the first place, as you always need to adjust your materials until the final render.
Why Do You Need To Organise Your Node Trees?
If your node tree for your material only uses a dozen or fewer nodes, then you don’t have to worry too much about organizing your setup as you should be able to comfortably identify which node does what.
However, you can create materials that use as many as 50 nodes and beyond. At this point, you will probably want to use some sort of system to arrange your nodes in an easy-to-read format. Below we have an example of a node setup that does not have any real organization to it (Image 1), and a second example of the exact same material but using several organization tools (image 2).

Now while node-setups can still look a lot more daunting than this, it’s still not an optimal layout and we can make it look a lot better. Don’t worry about recognizing the individual nodes here, as we are more concerned with the overall structure of the tree itself.
You will notice a couple of things, such as the random placement of certain nodes, and noodles going behind nodes that they are not even connected to.
This can be slightly difficult to grasp if you are the one creating the material, but it’s a lot harder to understand when someone else is viewing your work.
And now the same node tree after we do a little bit of housecleaning…

These two images are the exact same material setup, but the second image looks a lot cleaner than the first. If you are thinking there are fewer nodes in the second image, think again. Many of the math nodes that you see in image 1 are stored inside a single group node used to control that section of the node tree.#
Below is the material that this setup actually creates. It is a simple grid texture that can be adjusted in terms of size, detail, and color.

Of course what the texture actually is does not make a difference, as these techniques can be applied to any material.
Adding Labels To Your Nodes
When working with a setup that uses more than one of the same node, it can become confusing to know which node does what. A good practice is to label your individual nodes to be more descriptive of their assigned task. This is perhaps the easiest way of making your node setup more manageable.
Labels can be adding by opening up the side panel. Most editors in Blender have a hidden side panel that houses additional tools and the shader editor is no different. To access the side panel press the N key on your keyboard. The details in the side panel are connected to the selected node, so make sure to select the node that you want to label.
Every node has a title bar at the top, which has an assigned color depending on the category of the node. For example, the shader type has a green color, while the converter type has a cyan blue color for the title.
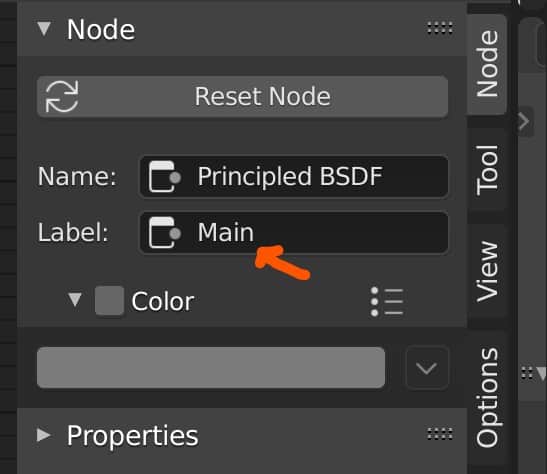
Inside this title is the label of your node. By default the label will be empty in the side panel, so the name of the node itself is used instead.
If you add a label name to the side panel, however, then the name of the selected node will change in the title bar, as you can see below with the Principled Shader.

Assigning Color To The Node Background
All nodes have the same background color to make it easy to view the various parameters found in that node. But having every node look the same can make it difficult to distinguish between the nodes themselves.
There are a couple of reasons why you would want to change the color. One reason is that it can make the node tree easier on the eye. Colors create emotions and the right colors can be used to improve focus and concentration, which in turn promotes understanding.
Another reason is to define a node’s position in the hierarchy. Your node setup can usually be divided into stages. For example, one stage can create the texture pattern while another focuses on the shaders’ material behavior.
You could assign multiple nodes the same color if they are a part of the same stage. Doing this makes it easy to separate your node tree based on these stages. If you have a problem with the texture pattern, then you want to focus on the nodes that are responsible for that. This becomes easier when you color code beforehand.
The color can be changed in the same location as the label in the side panel of the node editor. You first need to tick the box labeled Color and then click on the color bar to choose the new color of the node.

Tip: If you are using the same color for multiple nodes, record your RGB values when creating the color the first time, then use those values for the other nodes so that they are all the same color.
Be careful when choosing the color of your node, as you don’t want the color to make it more difficult to read the settings.
As the text elements in the nodes are white, using darker, more saturated colors work best for the nodes themselves.

By the way, you can also change the color of frames, which is actually an easier method as the frames can also be used to categorize your node set up into sections.
Cleaning Your Mess With The Reroute Node
Perhaps the number one contender for reasons why your node trees look messy is the state of those lines that connect your nodes together. These are referred to as noodles and are crucial for allowing your material to even work. If a node is not connected to the same tree as the material output, then it will have no effect on the material itself.
But how do go about cleaning these noodles, as you can’t get rid of them, can you? Well no, but you can do something called rerouting.
Reroutes are independent sockets that are not connected to a specific node but can act as an input and output for noodles.

There are two scenarios where reroute sockets are useful to use. First, an output can have noodles going to several inputs at the same time, but with the reroute node we can have a single output go to the reroute, and then break off to each of the target nodes from there.
The second use case is to literally redirect the noodle itself so that it looks cleaner. You can for example create a right angle for your noodle using a reroute, which presents a much cleaner look.

To add your reroute socket, go to Add (Menu) > Layout > Reroute or use the hotkey Shift + A To open the same menu. Place your reroute over an existing noodle and the line will highlight. Hit the LMB to attach the reroute to that line.
Storing Sections Of Your Tree In Frames
Changing the color of your nodes is one way of separating your node tree into smaller sections, but a slightly better way of doing this is to position nodes into frames.
A frame is a border that can surround a group of nodes. When you move the frame, then all of the nodes within that frame will be moved as well.
Like nodes, the color of frames can be changed, so each frame that you use can have its own color. In practical terms, it is easier to change the color of the frame than it is to change the color of five nodes.
You can also label your frames too. This can be done the same way that you label your nodes using the side panel, the same for changing the color.

You can use a frame as the border for entire sections of your node setup, and if you label those frames it becomes much easier to view the node tree as a whole.
To add a frame press Shift + A to open the add menu, then go to layout and select frame, before positioning it in your shader editor.

To connect a frame to a node, grab the node and position it inside the frame, which will then expand to surround the node. Moving nodes inside of frames will resize the frame itself.
Combining Nodes Together To Create Group Nodes
Sometimes you may have a set of nodes that all do a similar thing. In our example setup we have a series of math nodes that are used to control our texture’s size on each axis.
As these are all focused on the same task, why not group them all into a single node. A group node effectively adds a new layer to your node setup, hiding the nodes that form the node group and replacing them with a single new node.
To create our node group, first, select all the nodes that you want to be part of this group, then go to Add (Menu) > Group > Make Group or use the hotkey of Control + G.

As soon as you do this you will be taken inside of the group node, where you will see all of the nodes that form the group, plus a group input and a group output node.

If you want to edit any parameters in the main branch, make sure to connect them to the group input node. You can go to the side panel and rename these parameters so that you know exactly what they are used for.
To exit your group node, there will be a button of a curved arrow in the header bar, which will take you back to the main branch. There you will see the group node itself, and any parameters that were exposed.

Keeping It Simple With The Snapping Tool
One more trick to arranging your nodes in a more tasteful manner is to use the snapping tool, a feature that allows you to easily line up with your other nodes or the grid to create a more streamlined node tree.
To enable snapping, click on the button that looks like a magnet in the corner of the header bar. The menu to the side lets you choose how you want to use the snapping tool.

I prefer to just snap to the grid, as it is the easiest method to use. Other forms of snapping have a tendency to be a bit jumpy as your node snaps from one place to the next.
With the snapping tool active all you need to do is grab your nodes and line them up however you wish.

Using The Node Wrangler Add On
Finally, we have the node wrangler add-on, which others a host of impressive features that make working with nodes much more viable. The node wrangler is a tool that can help avoid making a mess of your node setup rather than working as an organizational tool.
Below is a shortlist of a few of the things you can do with the node wrangler add-on…
- Swap out nodes
- Add a principled texture setup
- Merge nodes together using math nodes
- Frame selected nodes
- Delete unused nodes
There are a lot of other things that you can do with the node wrangler add-on. To enable the addon go to Edit > Preferences > Add Ons and type in node wrangler in the search bar. Then click the checkbox to enable it for your project. If you open it up in the preferences panel, you can view a list of all the hotkeys associated to the node wrangler.

Thanks For Reading
We hope that you found the contents of this article to be helpful. Below we have gathered a small list of articles that we believe you may be interested in.
- Using The Node Editor To Create Materials
- Painting Transparency Onto Your Image Texture
- Changing The Color Scheme In Blender
- Downloading The Latest Version Of Blender
- What Does Index Of Refraction Mean In Blender?
-
Efficient UV Packing: Blender Techniques
Strategies for packing UVs efficiently to maximize texture space in Blender.
-
Seams & Islands: Blender UV Mapping
Efficiently managing seams and islands for optimal UV mapping in Blender.
-
Master UV Unwrapping in Blender
Mastering UV unwrapping for detailed texturing in Blender.