One of the main reasons why you may be interested in using an application such as Blender is for 3D and 2D animation. Blender has different suites designed for different tasks and allows you to perform animations in various art styles.
Blender is not the easiest tool to learn or use when creating 3D animations. There is a noticeable learning curve if you are a beginner to animation, But in blenders case, The most difficult stage of the learning process is the earliest phase. Once you grasp how animation works in Blender, You will find it much easier to begin creating animations of almost any kind.
Blender is considered by many to be a rather intimidating tool to use, mainly because new users want to animate with the software. And while one of Blender’s primary purposes is to act as a 3D animation suite, The sheer volume of tools and the way the user interface is constructed can make it challenging to learn animation in Blender.
Comparing Blender To Other Applications For Animation
Blender is one of the most powerful animation tools currently available for free. However, that doesn’t make it the easiest tool to learn.
The thank that Blender has so many features associated with 3D animation is not only a strength but also a weakness.
If working on a single monitor, there isn’t enough space to Position all of the tools related to 3D animation.
For example, we would need the 3D viewport to be visible from several different viewpoints, one of which would need to be through the eyes of our camera. We would also need a timeline to preview our playback controls, the dope sheet to control keyframe positioning, and the graph editor for keyframe behavior.
Add on top of this the need for The properties panel to add things like modifiers and adjust your rendering settings, the outliner panel to select the models in your scene, and even other editors such as the image editor for rendered results. There is a lot of fit on a single screen.
This means whenever you require a specific tool in 3D animation, there is a high possibility that your gains need to go looking for that tool. If you are a beginner, this does not help as you are still learning about the tools.
The more tools are hidden from view, the more difficult the user interface is for someone learning the software. And that is the case with Blender when it comes to 3D animation.
So, are there any alternatives to learning 3D animation? Well, those options are similar to Blender, such as Autodesk Maya. Maya is effectively the industry standard version of Blender used in various mid-range animation studios and at the top level of the video games industry.
Like Blender, it has a lot of functionality which can make things a little bit challenging to learn for a beginner. However, from our experience using the software, we found that learning mire was not as cumbersome as learning blender when it comes to animation.
As a beginner, though, it may be best to avoid these applications altogether because there’s just so much to learn from them.
Instead, many alternative 3D animation tools are far simpler in their design, with fewer features to learn.
Below is a list of free animation tools we recommend for beginners who are just starting as potential 3D animators.
- Animaker (Perfect and Simple Software For Beginners To Animation)
- Pencil 2D (2D Animator That Is Very User Friendly)
- Stykz (Discontinued Software But Excellent Choice To Learn The Process)
How Does Animation Work In Blender?
In Blender, we create animations by assigning keyframes to changeable parameters. For example, let’s say you wanted it to adjust the scale of your object and create an animation from the scale value.
You would begin on frame one wherever you wanted the animation to begin and then select your model.
Locate the value that you wish to change. In our example, this is going to be the scale. We can view our object’s transform vectors if we press the end key to open up our side panel.
Hover your cursor over the values for the scale and then press the I key. The I key is used to insert a keyframe when the mouse hovers over any specific value.
Alternatively, we can press the I key in the 3D viewport itself to open up the insert keyframe menu and choose the scale parameter from that menu.
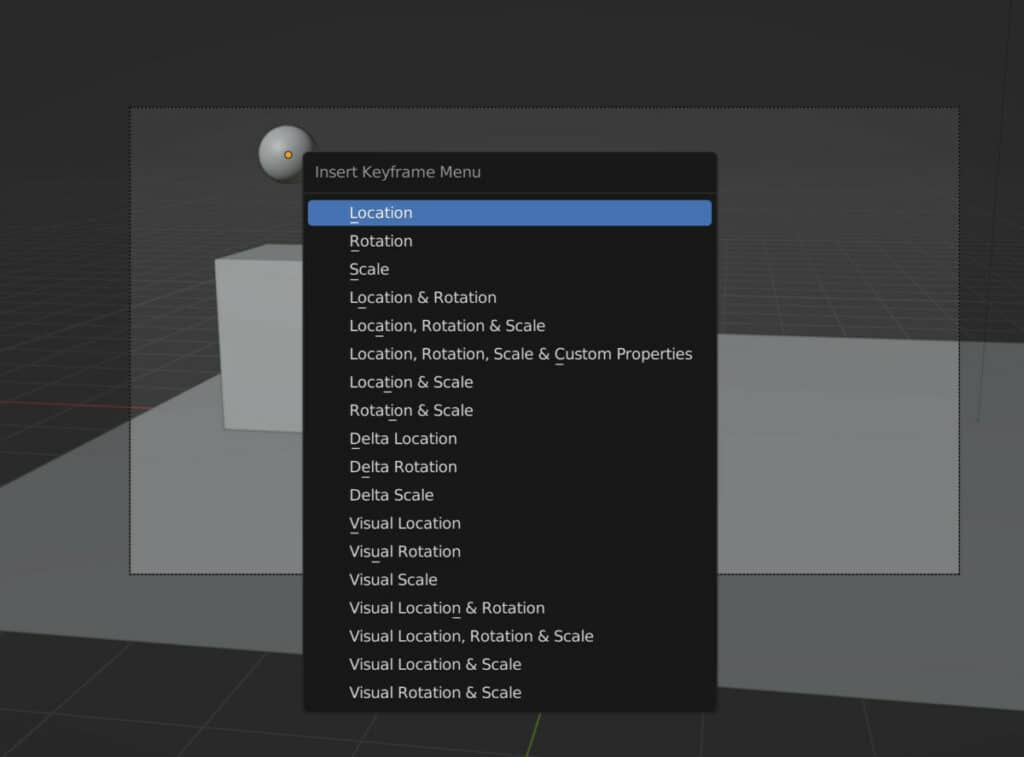
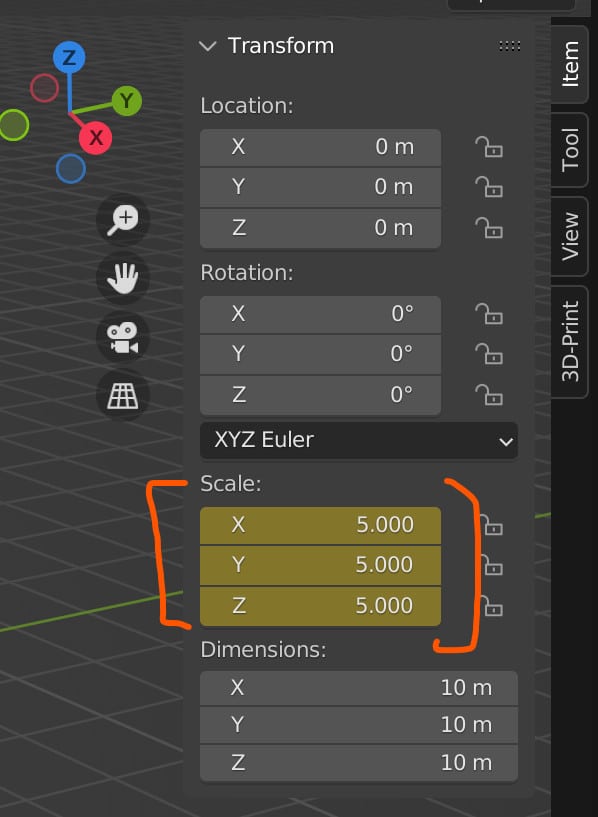
The color of the scale values will change to yellow to indicate a keyframe has been added. We would then go to the timeline and change the common frame we are on. For example, we can select frame 30.
This changes the color of the scale values in the side panel to green. We would then change whichever of the values we want to animate. In this example, we will change all of them. So we will increase the scale value from one to five on all three axes.
When a value is changed on a different frame, the color will change from green to orange to indicate that something has changed with this value, but no keyframe has been inserted.
Press the I key on these values to insert the new keyframe at frame 30. Now we have a starting keyframe and an end keyframe for an animation involving our scale. Suppose we go back to the timeline and select frame one. We can press the play button and view the animation we have created where our object scales up.
This is the basic process of creating animations in blender by adding start and keyframes where parameters are changed between them.
Using A Different Workflow For 2D Animations
The incredible array of tools and features makes Blender an extremely powerful tool for 3D modeling and animation. As earlier mentioned, this incredibly large feature set can make it more difficult for Blender to learn.
Also, Blender has a full set of features for creating 3D animations. It also has an entirely separate workflow for two-dimensional drawings. For this, we use what is known as the grease pencil, a different type of object that we can draw into our viewport.
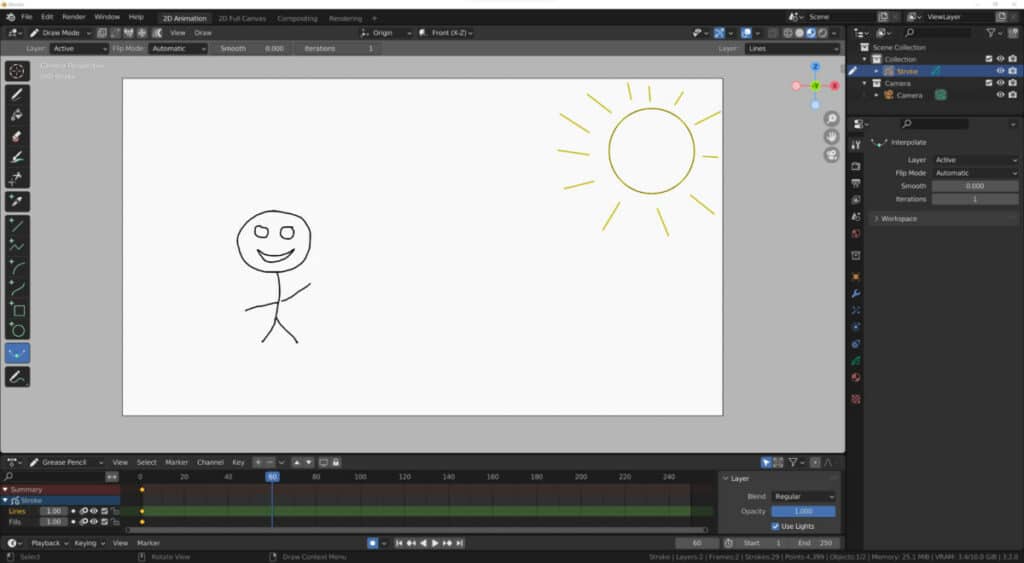
The best way to start with 2D animation is to begin a new project, go to file, and then new. And instead of selecting the general template which is for our 3D modeling workflow, select 2D animation from the list, and it will set Blender up so that you can begin drawing objects for 2D animation using the grease pencil.
The challenging thing here is that the workflow is both similar and different. For the most part, we can use keyframes to animate any objects that we create, but there are also various modifiers that we can use to animate as well.
But regardless of whether or not you plan to use Blender for 2D animation or 3D animation, we recommend the same approach to learning, and that is practice, practice, practice.
The Best Way To Learn Animation With Blender
The most effective way to learn 3D animation in Blender is actually to begin creating your animations. Blender requires a very practical skill set, regardless of whether or not you’re using it for 3D modeling, sculpting, video editing, or animation.
Therefore, the best approach is to just begin creating animations. We recommend an 8020 approach to learning. This means that you will spend 20% of your time looking up the various learning resources surrounding animation, such as blog posts and videos on YouTube.
These learning resources will provide a foundation for your learning, but they won’t be the coughing you do. Instead, you will take the tools you learn from this content and create your own animation projects.
There’s no way around the fact that we will be making many mistakes as we learn to create 3D animations because there is a lot that can go wrong. It is from these mistakes that we are going to learn the most as we begin to learn as we create.
Thanks For Reading The Article
We appreciate you taking the time to read through this article, and we hope you found the information you were looking for. If you are interested in learning more about Blender as a tool for animation, then you can take a look at some of the related articles that we have listed below for your viewing.