There are several options for getting started with computer graphics and 3D modeling. Each of which has its own pros and cons depending on factors like price, usability, and versatility. Blender 3D is one of the most popular choices, especially for beginners but can it truly be considered a great 3D modeling program or does it fall too far behind the alternatives.
Blender is a fantastic 3D modeling program for beginners as a result of its tag as free, open-source software. It has a wide variety of tools that allow artists to create any model and any scene that the artist desires. The software is compatible with multiple file formats which allow for importing and exporting to other software programs.
By no means is Blender 3D a perfect solution for everyone though. So what we need to do is assess what factors make for a good 3D modeling solution. It should be noted that we will not be assessing all of Blenders’ tools as not all of them relate to the topic of 3D modeling, such as the video sequence editor.
Variety Of Tools Available For Modeling
The number of 3D models and scenes that an artist may want to create is literally limitless. Different object types will require different tools and even different workflows altogether. A good modeling software should not only possess all the tools necessary to create 3D objects but should also allow for various methods for reaching the same tools to promote different workflows.
Does Blender Have A Good Variety Of Tools?
Blender has just about every tool that you could think of for creating 3D models, and if it doesn’t then there is likely an add-on that includes those missing tools. But let’s ignore what add-ons are for the moment and focus on the base version of Blender.
There is the functionality to create any 3D object that you want using tools like extrusion, bevel, subdivision, inset, booleans, and more. Everything that you would expect to be here is here.
The library of tools here is vast enough that different modes are required in the 3D viewport to help the artist focus on a specific workflow. Sculpting for example allows artists to create ultra-high detailed models using a variety of brush types at the expense of good topology (though this can be corrected in Blender through the process of baking).
Because it has its workflow and so many tools that you will likely never use them all sculpting has its own dedicated mode in the 3D viewport, labeled as sculpt mode.
User Interface And How Intuitive The Software Is
The UI or user interface is what gives artists and general users that all-important first impression. The first ten minutes of using new software can determine whether or not the artist continues to use that software or look for a different solution. It also plays an important role in how intuitive the software is when completing common tasks.
Is The UI Of Blender Easy To Understand?
Blender has come under criticism in this department for a number of years from the CG community, particularly from artists who also use other programs for 3D modeling such as Maya. The user experience has gotten a lot better though since the significant update that was version 2.80. It is now a lot easier to find the tools that you want with the inclusion of visible workspace tabs at the top of the interface. Although you cant drag and drop entire panels around the interface like over programs you can resize and replace panels in the Blender UI.
Is Blender 3D Intuitive?
The software as a whole is relatively easy to understand, I say relatively because any 3D software is difficult to get to grips with if you have never used this type of software. Most of the tools are easy to find and easy to use but this is not the case with every tool. Some of the lesser-used tools may be stored away in one of the sub-menus for example.
What can be seen as both a positive and a negative in this regard is the number of ways that you can use and edit the use of a tool in Blender. Let’s take the extrude tool, which allows the user to created new geometry by dragging or ‘extruding’ out from an existing selection, and analyze what we can do with this one tool.
Access
The extrude tool can be found on the tool shelf while in edit mode for a selected object. You can left-click on the icon to activate the tool and then click and drag to begin extruding your new geometry.

The tool can also be found if you go to the mesh menu at the top of the 3D viewport and then select extrude > extrude faces. The tool then activates automatically and can be finalized with the left mouse button.
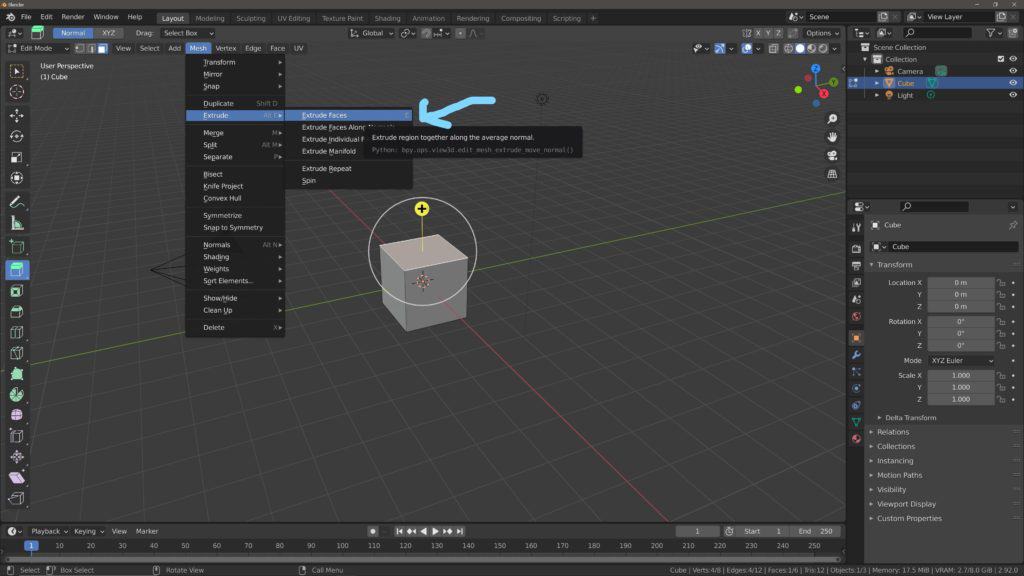
Then you have the hotkey which is the keyboard shortcut that acts as the quickest way to use a specific tool. In this case, press E when your geometry is selected in edit mode to begin using the tool. Again you use the left mouse button to confirm any changes made with the tool.
On the one hand, this is positive is it allows for multiple methods for using the same tool. On the other, being able to activate a single tool in numerous ways may be confusing to beginners, and this is certainly not limited just to the extrude tool.
There is also the issue of behavior, as using the tool from the hotkey or mesh menu feels different from using the same tool from the tool shelf. When activated from the tool shelf you don’t start extruding straight away. You can still select the geometry you want and easily navigate the UI with the tool active. However, using the tool from the mesh menu begins the process of extruding as soon as you click on the extrude faces option. Your mouse cursor is still high up in the viewport, probably far from the actual geometry, making the tool feel cumbersome and unintuitive to work with.
Variability
A single tool can have a hundred different use cases, so it makes sense to create as many variations of that one tool as possible so that it becomes easier to use the tool in these different scenarios. For example say you want to create an arch from a default cube object. With the normal tool, you would need to extrude geometry, rotate the selection, reposition and then repeat until you create the arc shape.
Just reading that you could probably tell that this is a tedious process and not very intuitive for the task. In Blender, you have the option to extrude to the cursor. So what you do is view the object from a 2D perspective, go to the tool shelf and hold down the left mouse button over your extrude icon, and you see a pop-up many with different methods of extruding geometry. One of them is the extrude to cursor option.
Enable this form of the extrude tool, and you will now be able to create instant extrusions by left-clicking in the viewport where you want to extrude to. It’s not perfect, and you still have to go back to edit the arc to get the final shape, but you reach that point a lot faster overall and can have a rough shape in seconds instead of a couple of minutes.
Adjustment Of Settings
Most editing tools will allow you to edit the parameters of that tool either before, during, or after it has been used. This is the case for the majority of editing tools in Blender and offers the artist great flexibility in their workflow. Tools accessed from the tool shelf can be adjusted before the tool is used.
The extrude tool has settings for the before, during, and after phases but is not the best example for this as it doesn’t have that many settings that you can change other than where you want the geometry to go. So instead we will use the bevel tool.
When you activate the bevel tool from the tool shelf (Again, edit mode is required) you will see several parameters appear at the top of the 3D viewport above the header menu. These parameters are exclusive to the tool that is active, so if you select the extrude tool you will see different parameters.
You can change these parameters to change the behavior of the tool before even using it. The segment parameter represents how many loops/edges of geometry are added to make a sharp edge appear smoother. The default value is 1 meaning that 1 loop/edge will be added to help create the bevel. Increase this number and you increase the number of edges created when you next use the tool.
Then you can also adjust this same parameter while using the tool. If you activate the bevel tool additional parameters will appear in a footer menu at the bottom of the Blender interface. At this stage, you will be able to use hotkeys to adjust these parameters. Again with the segments, you can either scroll up/down on your scroll wheel to change how many segments you want or you can press the S key and then move your mouse cursor to adjust the segment value.
Post tool you will get a pop up in the bottom corner of the 3D viewport labeled the same name as the tool you just used. If you open this menu you will again find many of the same parameters as before, although not every parameter appears at every stage.
The segments parameter is here once again though, allowing the user to change the number of segments used for the bevel even after the tool has been used. Once you perform an action that is not related to the bevel tool or general navigation the pop-up menu will disappear. You can bring this back with the F6 key but only if you have not used another tool in the meantime.
So as you see Blender offers numerous ways to use even a single tool. The more you use Blender the more useful this will become but it’s also that same variability that makes Blender appear daunting to newcomers.
Compatibility With Other Programs
Depending on the industry that you are working in or the project that you have assigned yourself 3D modeling may simply be one part of the process towards completing the project itself.
For example in the video game industry, you may use an adobe program to create concept art for a character. You then need to import the concept art into your modeling software of choice to use as reference material.
The next step is to create the 3D model in Blender and go through an iterative process, moving back and forth between software refining the look of your model. Then when the time comes to test the asset, you need to export the 3D model to the game engine of your choice.
This is a simple example of a more complicated pipeline commonly used in video game production. This means that Blender must is able to, at the very least, be capable of importing and exporting assets from other software programs with ease.
A typical Blender project is given the .blend file extension to indicate to your computer that it is a file used to store 3D objects and scenes.
This file extension can be used in video game engines like Unity if the file is saved directly into the game engines assets folder, but this is not the standard way of doing things and is not actually exported the model from one program and then importing it to another.
More common in this scenario is for the artist to export the asset as an FBX file format, or alternatively as an OBJ format. The File format used is key for where you want to send an asset to. Some programs, like Blender itself, can use multiple file formats for different use cases.
Flexibility With Addons And Plug-Ins
In most programs, you will find additional tool kits that can be added to a base program to improve its functionality in a specific area, as no software program will ever be perfect. These are often referred to as plug-ins and are often created either by the owners of the software, third-party companies, or even aspiring developers in the online community surrounding that software.
In Blender, however, plug-ins go by a different name. They are referred to as add ons and like plugins, an add-on can be from Blender itself, A third party who may have an investment or interest in Blender, such as Adobe, and developers within the Blender community itself.
Blender already has over 100 add-ons that are immediately accessible with Blender itself. Most of these are disabled at first but can be enabled by going to edit > preferences > add-ons and then ticking the boxes for the add-ons that you wish to use.
Other add-ons developed by members of the Blender community can be downloaded from sources like Gumroad or their own websites. They may be free or you may have to purchase them as they are of course independent products owned and sold by their developers.
Blender 3D already has a large base of tools and functions built-in, so many of the addons that you will find will help to improve your workflow as an artist. For example, the node wrangler addon includes additional hotkeys that make working with node systems in Blender a lot easier.
Development Cycle And Learning Resources
If you follow Blender to any extent then you may be aware of how Blender’s development cycle has worked other the past couple of years. A new version of the software is released every three months or so going through a well-publicized and consistent development pipeline which you can see below.
The best part about this pipeline is that these are not incremental updates to the software but legitimate upgrades to the overall experience. Each new version release will have at least one or two headline additions as well as some smaller but significant upgrades to existing workflows.
Blender version 2.92 for example saw the introduction of geometry nodes, a procedural way of creating infinitely editable objects through visual scripting.
Then you have an incredible array of learning resources. As a teacher of CG myself I believe a 3D modeling program is only as good as the learning material allows it to be, because if you don’t know how to use the tools or even where to find them, then what’s the point.
There are 1000’s of youtube tutorials out there and even the tools added in new updates are quickly added to the library of available tutorials. And if you want to go a step further then one can try out one of the many Blender courses available on Udemy, Skillshare, and other platforms.
Even if Blender 3D was lacking in any of the above categories it would still be at worst an excellent alternative choice as a 3D modeling software due to its position as being the most accessible and versatile program available. That said Blender has all of the tools needed to be many artists’ first choice when looking for a modeling suite that will allow them to express their creative ideas and get the job done.
Blenders Active Community
Blender has a passionate and active community of artists, developers, and enthusiasts who actively contribute to its growth and development.
Online forums, social media groups, and Blender-centric websites provide a wealth of knowledge, tutorials, and support.
This thriving community ensures that you’ll find assistance and inspiration throughout your Blender journey. A community can often be just as important as the product or software itself. If you have an issue, ask someone with more experience who may be able to help fix your problem.
-
Sculpting Organic Shapes in Blender
Sculpting lifelike organic shapes with advanced techniques in Blender.
-
Animation Ready Hard Surfaces in Blender
Preparing hard surfaces for animation with optimized topology in Blender.
Comments are closed.