Blender 3D can be used for a variety of different projects, and these projects can range from 3D sculpting to 2D animation. One of the more hidden toolsets in Blender is the video sequence editor, which allows you to edit video content within Blender.
The Video Sequence Editor has a simple menu system that makes it easy to import and edit clips with overlays such as text, color, images, sound, and b roll footage. It has tools allowing you to cut and separate your strips using basic editing tools and you can render your editing movie files the same way as you would animation, making for a relatively streamlined process.
It is not difficult to learn how to edit videos using the video sequence editor, and even though it is an additional skill set in Blender, some may actually claim it is easier to learn than modeling and animation. But there is a reason behind this opinion.
Is It Easy To Begin Using The Video Sequence Editor?
The video sequence editor is a bonus toolset with little to do with the software’s primary function: design and animate 3D models and scenes.
There is little to connect the two workflows besides the rendering stage; learning one does not help you learn the other.
Blenders video sequence editor is relatively barebones compared to alternative video editing applications like Adobe Premiere Pro.
This gives the Blender VSE one key advantage over the rest of Blender. Because there is not as much to learn, it will not take long before you can use the video editing software to its full extent.
In other words, the video editor’s learning timeline is considerably shorter than the modeling, sculpting, or animation workflows.
That said, getting started with the software for video editing can be a little confusing if you are new to it, so the learning curve has a steep start.
How To Access The Video Sequence Editor?
Once you understand how to access the VSE, import your first image sequence or movie file, and perform basic edits, you will be 90% there for editing video content.
But to even get started, you need to access the video sequence editor, which can be one of the most confusing stages if you are not entirely familiar with how Blenders UI works.
The VSE cannot be found among any of the workspace tabs at the top of the Blender UI, you will need to add it by using the plus tab that is found at the end of the row.

The menu appears is divided based on the workflow we want to focus on, so select video editing and then select video editing from the following menu to add that workspace.
Another method for adding in the VSE is to change the editor type. In the top corner of any panel is a drop down menu that allows you to change that editor.
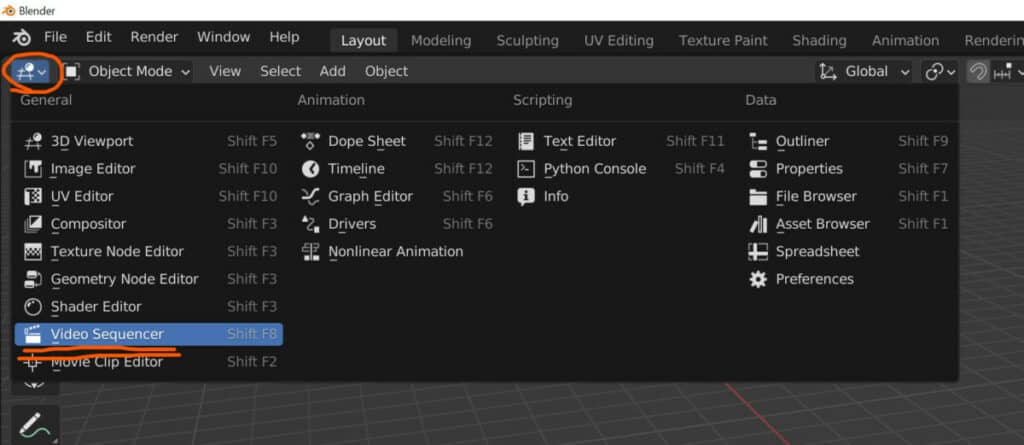
From this menu, select the Video Sequencer under the general category top and switch to the video editor.
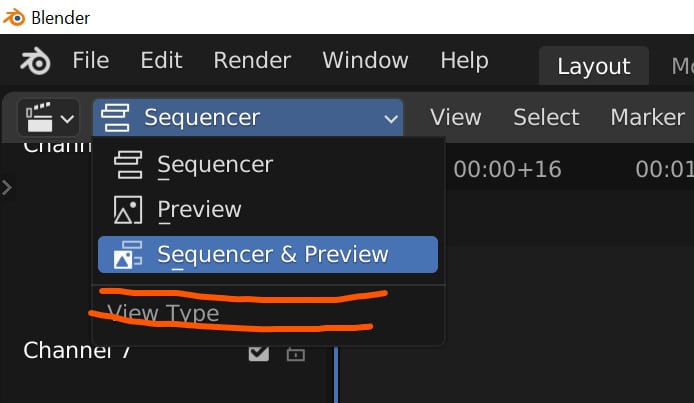
Only the sequencer itself will show, taking up the hole panel. To get the preview panel where you can view your footage, select where it says sequencer next to the editor menu button, and change this to sequencer and preview.
The easiest method for setting up Blender as a video editor is to use the video editing template. Templates set Blender up to follow a specific project pipeline, such as 3D modeling with the general template or 2D animation with its template.
To access templates, go to the file menu in the header of the 3D viewport and select the video editing template.
A new project opens up for Blender with only two workspaces available by default. The first is the video sequencer, where you can import and edit your videos, and the second is the rendering workspace to view your results.
What Can I Learn In One Hour?
As previously mentioned, there is not as much to learn here compared to other Blender workflows, such as 3D animation.
In fact, you can learn most of what you need to know in the first hour of using the tools, and from then on, it’s a matter of practicing the workflow so that you can become better at editing the content.
Here are nine helpful tips from us to help you get started and make learning video editing in Blender as easy as possible.
- To add a movie file, go to the add menu and select movie, then locate the video file in your file browser and import it. Alternatively, you can drag and drop from the file browser in the video editing workspace.
- You can perform basic color correction by right-clicking on the blue strip and selecting add modifier.
- To display a waveform on your sound strip, which is the green one, go to the side panel and tick Display Waveform.
- To improve viewport performance, you can add a proxy to the timecode in the side panel by selecting the Proxy tab, choosing your resolution, and then clicking where it says Set Selected Strip Proxies.
- To add markers for where to edit your footage, select the frame where you want to add the marker and press the M key.
- To rename your created markers so that it is easy to know what they are, use the F2 key to rename them.
- You can delete portions of your strips from the ends just by clicking and dragging where the strip’s color is slightly different.
- Select the frame where you want to split the strip and press the K key to cut up your strips for easier editing.
- Experiment with the various elements you can add from the menu, including sounds, images, and even additional movie files to act as B roll.
- BONUS tip- Go to the properties panel and set up your resolution, target frame rate, output location, and output file former as soon as possible for the best results when it comes to rendering.
Thanks For Reading The Article
We appreciate you taking the time to read through the article, and we hope you found the information you were searching for. If you are interested in learning more about how we can use the image editor, check out some of the articles listed below.