3D printing requires the use of two different kinds of software. The first is the modeling software used to design the model itself, defining the size, thickness and appearance. The second is a form of slicing software that breaks a model down into parts so that the printing knows how to create the model best, as well as providing support structures where needed to overhanging faces. As two different platforms are used, we need to use compatible file formats to transfer the 3D data from one application to another.
Below is a list of file formats that are suited to transferring 3D data from Blender 3D to slicing software such as Cura. The list is ordered from most recommended to least.
- STL
- OBJ
- PLY
- X3D
- 3MF*
- STEP*
- FBX
File formats that have an * next to them require an external addon to be installed in order for Blender to use said formats for importing and exporting.
Blender can be used to do just about anything 3D-related task that you can think of, but it still needs to be able to work with other applications in larger pipelines. Therefore it needs to be compatible with proprietary file formats of different kinds. The trick is knowing which file format is best for your task.
What Is The Best Format For Exporting Your 3D Model From Blender To Your Slicing Software?
Deciding what the best option for anything is will always be a subjective question, but what do we believe is the most suitable file format for transferring data from Blender to a slicing application?
Our top pick right now is the STL file format, which is considered the current standard bearer for transferring data between applications for 3D printing.
The term STL can actually be referred to in several different terms but was originally short form for stereolithography. This is one of the earlier forms of 3D printing from the 1980’s and is based around using resin-like materials to construct objects for manufacturing.
The file format has evolved since then and is now used for 3D printing many different materials on various scales. These days stereolithography uses the SLA format for manufacturing resin materials instead, while STL is more universal.
The reason why STL is so popular s because it is one of the easiest file formats to use in the 3D printing process. It uses Standard Tessellation Language (again can be shortened to STL) to simplify the mesh data into the form of triangles, which are the easiest shapes for 3D software to calculate due to the minimal number of edges involved.
STL is also highly compatible with the large majority of 3D modeling and slicing applications, including Blender 3D. This means that you can reliably export a model as an STL to your slicing software without much issue.
There are other options on this list that over time will become better options than the STL format because they can hold more relevant information, but the ease of use and accessibility make STL the file format that you should learn to use first.
What Is The Difference Between OBJ And STL File Formats?
The STL format is certainly one of the most popular file formats for transferring 3D data between applications, but another file format that is popular for this task is the OBJ file format.
Both of the formats primarily transfer data relating to the structure of 3D mesh objects, and both are easy to use and accessible to multiple applications including Blender and various slicing platforms. So what is the difference between OBJ and STL, and why choose one over the other?
OBJ is the wavefront object format and is not suited to a specific task, but rather acts as the one size fits all format for any purpose related to 3D objects.
If you can name any application that uses 3D models, then it is highly likely that the application will be able to use OBJ files to some capacity.
Compared to the FBX format, OBJ is a relatively simple file type for game assets used in video game engines, but it actually holds more data than STL.
For example, the STL format constructs its mesh data from vertex positioning that constructs polygonal faces to map the surface, and these faces are always triangulated, as its the most simple shape to compute.
By contrast, the OBJ format can construct polygonal shapes with more sides and therefore, is more precise when calculating the shape of the model. OBJ also allows for NURBS paths to be calculated, which makes it a better option for objects with smooth surfaces.
This increased accuracy comes at the minor expense of increased file size for the export, but OBJ is still considered relatively lightweight compared to other file formats.
Another benefit of using OBJ over STL is the ability to transfer color data, making 3D printing objects with multiple colors more viable an option.
So by the sounds of things exporting as an OBJ should be better than as an STL, since it is apparently more accurate. But using STL is still the better choice for beginners to the process because of one crucial factor, simplicity.
The more data a file format has, the more data needs to be encoded at the other end. STL is a simple, reliable option that acts as the perfect starting point when creating your first 3D prints, and works well with just about any slicing software out there.
If you want to learn more about Blender you can check out our course on Skillshare by clicking the link here and get 1 month free to the entire Skillshare library.
3MF Is A Great Format But Is It Better Than STL?
Another format that is often compared to STL for the purpose of 3D printing is the 3MF file format. This is a much newer file type that some believe to be the eventual successor of the STL format as the standard-setter for storing 3D modeling data. So why is it considered to be the eventual replacement of STL?
The reason why is because in recent years 3D printers have become more capable to the extent that we can now have fully functioning printers in our own homes that can produce small-scale objects of just about any shape depending on the software used.
The 3MF file is more powerful than STL and is optimized in this age of personal 3D printing at the consumer level. A lot more information is contained within the 3MF file that can be used with modern 3D printers. For one, 3MF contains color data much like the OBJ format as well as texture information, so not only are you able to print the base color of the parts but if you have the materials and printer you can use the texture data as well.
Whereas the OBJ format is typically larger than STL, the more modern 3MF format is actually a smaller file size than STL despite the fact that it holds a lot more information.
The key reason as to why it is a smaller file rather than a larger file is that the data is stored in an XML-based format. By contrast, STL can be read using two formats, either as a binary format or as ASCII. The XML format is more advanced and human-readable, allowing for more information to be stored in a smaller file space.
Yes, the 3MF format is more advanced than the traditional STL file type, but at this time for Blender you need to use an external add on to be able to use 3MF files in Blender, which makes the process slightly more difficult than it perhaps needs to be.
Eventually, though, we may expect to see 3MF functionality integrated into Blender permanently as the use of 3MF becomes more widespread. For now, though, STL remains the safer option.
How Can We Print Our 3D Objects That We Make In Blender And How Does It Work?
The process of modeling 3D objects for the process of printing is quite similar to creating 3D models for any other purpose. We have a variety of tools to choose from for the modeling stage including traditional polygonal modeling techniques like extrude and inset. We also have semi procedural techniques like modifiers that can be used to quickly alter our mesh or make things easier when using our standard tools.
We can go full procedural in our approach by using geometry nodes, which is very different form of modeling that is more difficult to learn but once you know how to use it you can edit every aspect of your 3D model anywhere in the modeling process.
And then if you want to create complex objects that possess a high level of detail you can go full artist and use Blenders impressive suite of sculpting tools and brushes to create your work of art.
For 3D printing, there are advantages and disadvantages to each, but they are all viable options. What you need to be able to do though in Blender is to analyze your model during the creative process so that you can check to see if it meets the specifications of both your project and your 3D printer.
For example, your printer may only be able to create 3D objects up to a certain height, so in Blender, you cannot create a 3D model that is taller than the max size that the printer is able to create.
This is easy to miss because many of us start from the default cube when modeling and the base object is already 2x2x2 meters in size, way too big for any home-based machine.
Another factor to consider is the use of zero faces. A 3D printing device will only be so precise and details that are too small for the printer will simply not be printed onto the model. Structural issues also need to be taken into consideration. Thickness in certain areas of your design can compromise the structural integrity of a model if it’s too thin for the selected material.
Blender has an add-on built-in that allows the user to assess all of these potential issues with the design. The 3D print toolbox is an invaluable toolset found in the side panel of the 3D viewport (when the addon is enabled) that can be used to assess various aspects of your model that can affect the results of any 3D print.
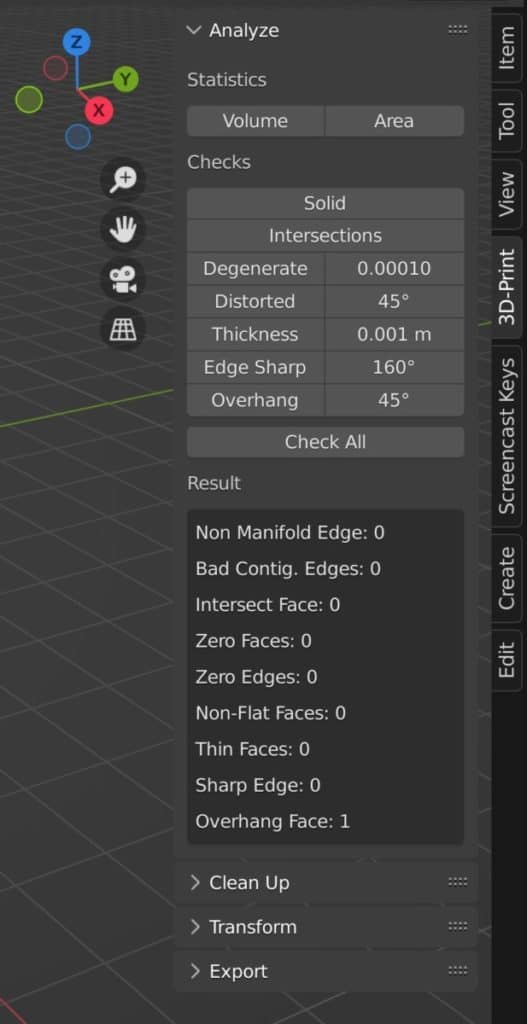
Always make sure to look up the specifications of the 3D printer that you are using before starting any project and make sure that your design falls within the limitations of your hardware.
When you have finished with the design and have deemed it suitable for the process of 3D printing the time then comes to export it in your chosen file format.
Again, if you are a beginner, then we recommend using the STL file format to easily transfer the relative 3D data. If you want to add color data then you can use the OBJ format instead.
How Do I Export A File From Blender For 3D Printing?
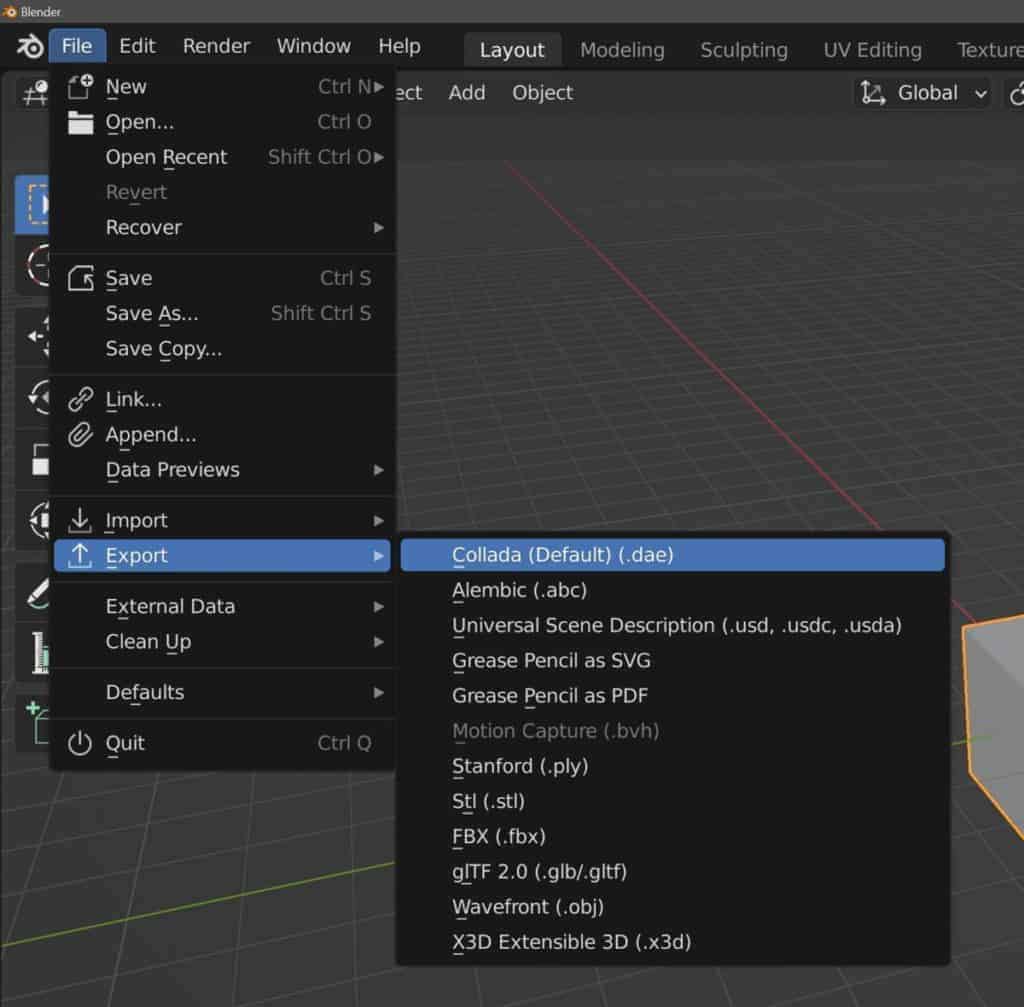
Note that the normal method of exporting 3D files is to go to the File menu in the header of the Blender UI, and then go to export and select the file format that you want to use. However, if you use the 3D print toolbox then you will also be able to export via the addon as well.
If you open up the side panel and then access the toolbox, you will find the option to export your model at the bottom of the panel.
This is the preferred method of exporting as you are limited here to the four file formats that Blender recommends you use for exporting 3D printable models.
The 3D file formats here are:
- OBJ
- PLY
- STL
- X3D
As you can see both OBJ and STL are available from this list and we recommend using either one of these two file formats for your export.
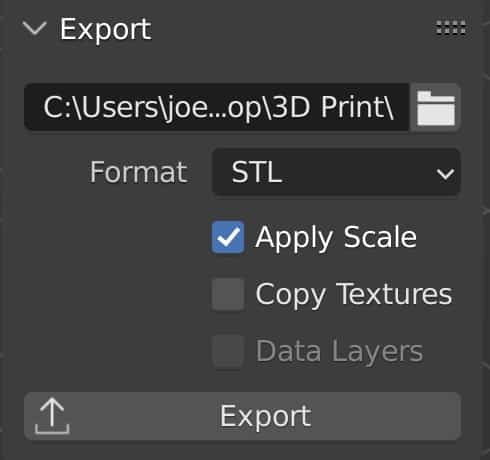
Note that when you normally export a model from the file menu a separate window opens up allowing you to dictate the location of the sent file and the settings for the export. The 3D print toolbox has some of these settings available in the toolbox itself and optimizes the rest, so when you click the export button it will simply complete the export.
Once you have exported the model from Blender the next step will be to import the 3D object into the slicing software of your choice. There are many good options out there but our preference is to use Cura with Blender. In your slicing software, you will be able to add 3D supports to overhanging faces where required and also break up the model into pieces that will act as the various stages to printing.
This is where our file is converted into what we call G-Code, a specific set of instructions sent to the 3D printing guiding the actual printing stage of the process.
Which File Format Does Blender Use?
Blender like many applications uses a unique file format for its projects, which is known as the .blend file format. This format is generally purpose-built to hold all the data required to edit the scene in Blender from the object data to materials, lighting, and animation.
Blenders file format is known as a proprietary format, which is created exclusively for use within a single application and is developed to store all the data required for editing within said application. For the most part, we cannot use a blend file anywhere other than Blender, although there are a couple of known workarounds, like in game development.
If we want to use any data created in Blender, then we need to store that data in an appropriate file format that can be used to transfer that data from one application to another. These formats include the likes of STL, OBJ, and FBX and are crucial tools for transferring various kinds of data.
Why We Do Not Recommend The FBX File Format?
The FBX file format is a standard format for the transfer of 3D data from Blender to video game applications like Unity, Unreal Engine, and Godot. It can also be used to transfer 3D data for use in 3D printing, but it is not the recommended format to do so.
Why? Because while the FBX file format does allow you to transfer different types of information, like material color data, it also transfers data that is surplus to the requirements of 3D printing, like animation data.
FBX is built around the field of digital 3D applications, like animations, image renders, and video games. And so the data it stores is focused around these industries and fields.
It is recommended instead to choose a file format that is designed specifically for use in 3D printing, like STL or XMF.
Thanks For Reading The Article
We appreciate you taking the time to read through the article and we hope that you found the information that you were looking for. Below we have compiled a short list of additional topics that you may be interested in reading.
- Is Blender Any Good At 3D Printing?
- Can Blender Use The Step File Format?
- Why Should We Use Python Script In Blender?
- Retopologize Your Model The Fast Way
- What Are The Blender Shortcuts That Are Used In Object Mode?
-
Custom Normals: Blender Hard Surface Tip
Enhancing hard surface models with custom normals for realism.
-
Align Perfectly with Blender’s Snap Tools
Aligning objects perfectly with Blender’s advanced Snap tools.