For a long time now, Blender has been a powerful 3D modeling application with a full 3D animation suite of tools. Recently, however, Blender has introduced geometry nodes for procedural modeling, and there has also been the introduction of nodes that can allow for procedural 3D animation, such as the scene time node.
Using the scene time node, we can control various aspects of our based on the current second or frame of our animation. A rudimentary example of this would be to have the SEC value from the scene time node act as the location for an object on the Z axis. The more time passes, the higher the second value and the higher the objects will go as a part of the animation.
If you know how to combine the scene time node with other nodes in Blender, you will find it offers a lot of potential for creating procedural animations that can be edited in real-time just by changing a few values.
How Does The Scene Time Node Work?
The Scene time node is an input node that has two output sockets. You cannot plug anything into the scene time node. It is used to provide value for your node tree.
This value can be in the form of either the active second or the active frame. If he was to connect this up to a set of values, such as the location values of a transform node, then those values would mirror the current second or frame that the animation is currently on.
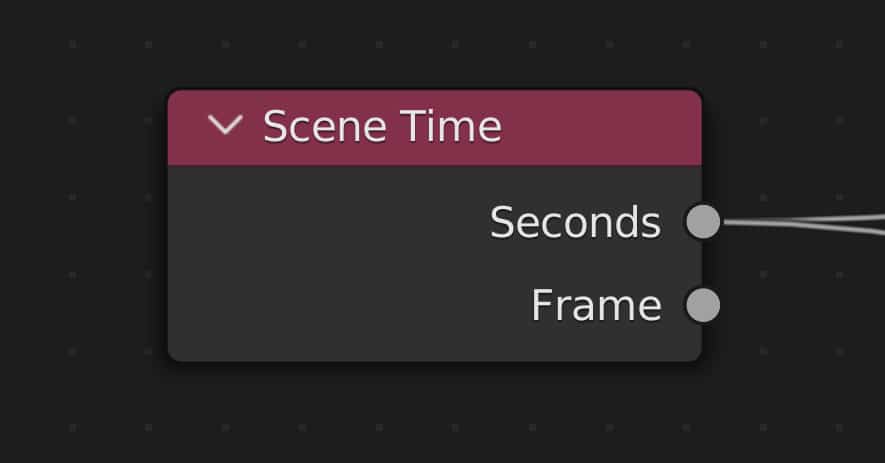
If you were to use the seconds’ output, then you would be able to control values using the seconds’ value of your animation. If your animation lasts for approximately 4 seconds, then you would be working with the values of zero to 4.
Alternatively, you have the frame’s value now because there will be multiple frames within each second; using this output will result in much faster changes to your target value. In most cases, this means much faster animation.
Isolating Axis With The Combine XYZ Node
One way of gaining more control with the scene time node is to isolate our axes if we are affecting the vectors of our model.
For example, let’s say we wanted to create an animation of a rolling ball. This would mean we would have to control a single axis for the location value and a single axis for the rotation.
We can achieve this by adding a combine XYZ node for each of them. We need to combine XYZ nodes because we don’t want one to influence two separate values here.
With the first combine XYZ node, we can plug the seconds’ output from the scene time node into the x input.
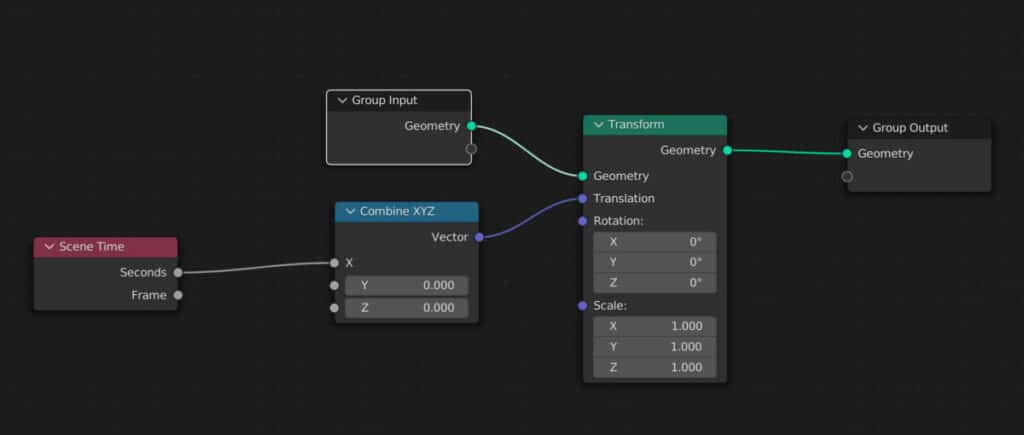
We then connect the combine XYZ node to the location factor of the transform node. With this setup, the scene time node will only affect its location on the X axis. If we were to press play in the timeline, the ball would begin to move along the X-axis.
To turn this into a rolling ball, we need to sort of repeat the process with the rotation, so we can duplicate our combine XYZ node by pressing Shift + D.
Position to duplicate it and then connect the SEC output from the scene time node to the Y value of this duplicated combine node.

Then Connect this node to the rotation vector on the transform node if we go back to the timeline and play from the 1st frame. Our bull will begin to move on the X-axis and roll on the Y-axis.
Just by adding a couple of nodes, we have created a simple but effective rolling ball animation using the scene time node.
How To Stop The Animation
Because the value of our parameter will always increase based on whatever the value coming out of the scene time node is going to be. It’s just going to continue throughout the animation.
But what if you wanted to stop this action before the end of the animation? So in our example, we want to stop the ball halfway through our 240 frames clip.
The easiest way to do this is to introduce a clamp mode that allows you to control a changeable value so that it does not fall outside a specific range.
Open up the add menu and search for the clamp node. Then, position it between the combine XYZ node and the scene time node.

Using the location first as an example, we need to calculate how long our Animation will last in seconds and at what point we need to stop it.
In our example, we have a 240-frame animation running 24 frames per second. That means that it will last approximately 10 seconds.
If we want the rolling ball to stop halfway through this animation, then we’ll need to set the Max value for the clamp node to five, equivalent to 5 seconds.
If we do this and then play our animation, you will notice that after 5 seconds, the ball stops moving on the X axis, but it keeps rolling because we have not clamped our rotation value.
Duplicate the clamp node and position the duplicate before the combine XYZ node that was used for the rotation.
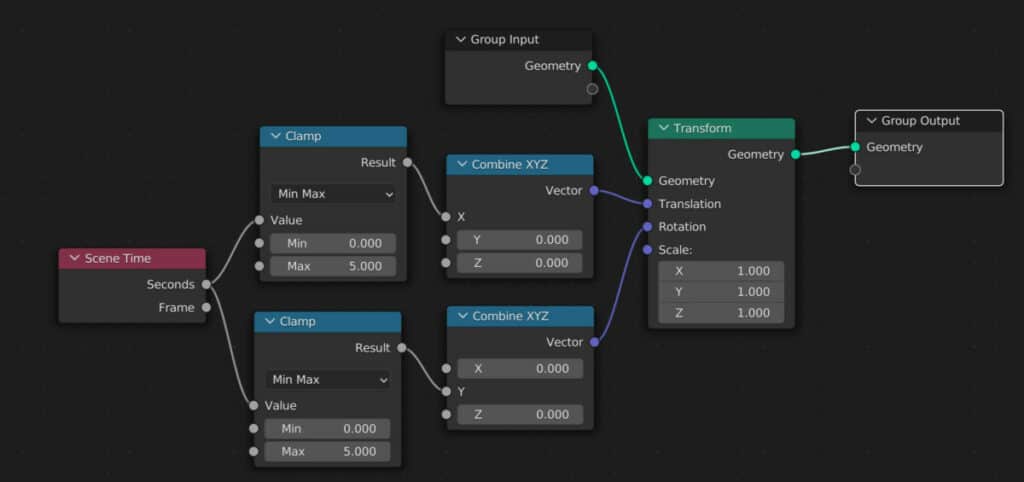
Now we have a rolling ball animation and can control when it’s going to stop in the animation.
We can also use the clamp value to determine when our animation will begin. If I were to set them in value to one for both the rotation and location, the ball would not start rolling until one second into our animation timeline.
Thanks For Reading The Article
We appreciate you taking the time to read through the article, and we hope you found the information you were looking for. If you are interested in learning more about learning Blwndwe and how we can use geometry nodes, check out some of the articles we have listed below.