Creating material is more complicated than it sounds, as there are a lot of attributes that make a material both look and feel in the real world. Some attributes are exclusive to certain types of materials, like sheen for instance, but there are some that apply to every material like the index of refraction, roughness, and fresnel.
Index of refraction is the change of direction that a beam of light takes as it moves from one medium to another. For example when light passes through the air (medium 1) and then hits the surface of a glass bottle (medium 2) the direction of the light is shifted in the bottle’s surface.
All PBR standard materials will have an IOR value assigned to them as the process of refraction is a natural occurrence in the real world. It plays a particularly important role with objects that have a degree of transparency. We will go through what refraction actually is below, but if you are just interested in learning what the correct values are for the common materials check out our table at the bottom of the article.
What Does Refraction Mean?
Refraction is a physical property of light where its speed and wavelength are altered as it passes from one medium to another. A medium is what the light has to pass through, this can be either a solid, liquid, or gas object. It can even represent a vacuum.
Light is measured by wavelengths, and these wavelengths can change depending on the density of the medium that it passes through. This will create an effect where light can visibly bend through certain objects, especially when those materials are transparent.
There are two key properties that we need to be aware of if we are to understand how refraction works for our material. the first of these is the index of refraction, and the second is the angle of refraction.
Assuming that the 1st medium is either air or a vacuum, both having a very similar index of refraction, we need to calculate the IOR (index of refraction) of the second medium in order to calculate what the angle of refraction is going to be.
What Is The Index Of Refraction And How Is It Calculated?
The index of refraction is a formula used to calculate the exact change of direction for a beam of light based on the material of the second medium (which is normally the 3D object in Blender). Below is the formula used to calculate the index of refraction for a given material.
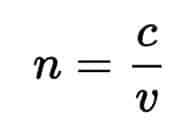
In this formula, we have the following variables…
- n = Refractive index value
- c = Speed of light
- v = Phase velocity
So if you want to calculate the index value of a specific material, we have to divide the speed of the light beam by the phase velocity as it hits and passes through the material.
Let’s provide an example of this calculation being used to determine the IOR of water. The speed of light in a vacuum is approximately 299,792.5 Kilometers per second. So this represents the value of C in our equation above. In water, it travels at a speed of around 224,900.6 kilometers per second, which takes the place of the value of V. The variable for N will be replaced by the division of these two values.
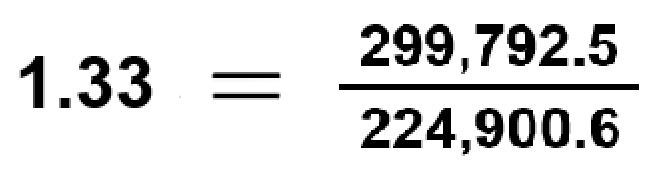
The phase velocity is dependant on the density of the material, and so will always be a smaller value than the speed of light in a vacuum.
Using This Value To Determine The Angle Of Refraction?
Once you have the IOR value of both mediums you will be able to calculate the angle of refraction, which is the actual bending of the light and what you can see through an object. The further the value is away from 1, the more the light will bend. This can create the warping effect that you may see through certain types of glass.
We use snells law to calculate how refraction works, and how the light is redirected as it passes from one medium to another. You can see the formula directly below…

Take a look below to get an idea of how the formula works…
- n1 = Index of refraction for medium 1
- n2 = Index of refraction for medium 2
- O1 = The angle of incidence
- O2 = The angle of refraction
Let’s use vacuum as our 1st medium and water as our second, replacing n1 with the IOR of a vacuum and n2 with the IOR of water.
1.0 sin(O1) = 1.33 sin(O2)
The angle of incidence is the difference between the normal (perpendicular line to the material surface) and the direction that the light itself passing through the 1st medium. We can change this to any value between 0 and 90 to get a different result each time. For now, let’s use a value of 15 degrees.
1.0 sin15 = 1.33 sin(O2)
What we want from this equation is the value of O2, so we need to rearrange the formula to create a new expression.
sin(O2) = 1.0 * sin(15) / 1.33
Here we calculate the value of the 1st half of the original equation as we now have the value for both n1 and O1, then we take that value and divide it by n2, which is the index of refraction for water. This gives us the equation below…
sin(O2) = 0.194
This value then needs to be converted back to degrees to get the value for O2, which is the angle of refraction.
O2 = arcsin(0.194) = 11.19
The angle of refraction is the difference between the perpendicular normal of the boundary (object surface) and the direction of the rays. Using this formula we can now determine how light will shift as it passes from one medium to the other so long as we know the IOR of both mediums and the angle of instance.
What Are The Main Rules Of IOR Values?
If you were to look at the IOR values for the common objects listed below, you would notice a common trend. All of the values air either 1 or higher. This is because a value of 1 is attributed to a vacuum and anything below a value of one would indicate that the velocity of the light beam would actually increase as it passes through the second medium. In normal circumstances, this is virtually impossible.
One very curious exception to this rule seems to be gold, as this has a value of just 0.47. The reasoning behind this is very complex but in simple terms, the refractive index is calculated differently for metals, which are 100% reflective, compared to gas, liquid, or transparent materials like glass.
Another rule is that the formula of Snells law is only applicable to isotropic mediums. In the case of crystals, for example, the light can be split into two raws as it passes through the boundary between the mediums. This makes snells law obsolete in this case as the formula is used to define the angle of refraction for a single ray.
Using The IOR In Blender Itself?
The whole reason why you have come to this article in the first place is that you have learned that IOR exists in Blender and you want to know what it is used for, so you probably already know where to find it. But in case you don’t…
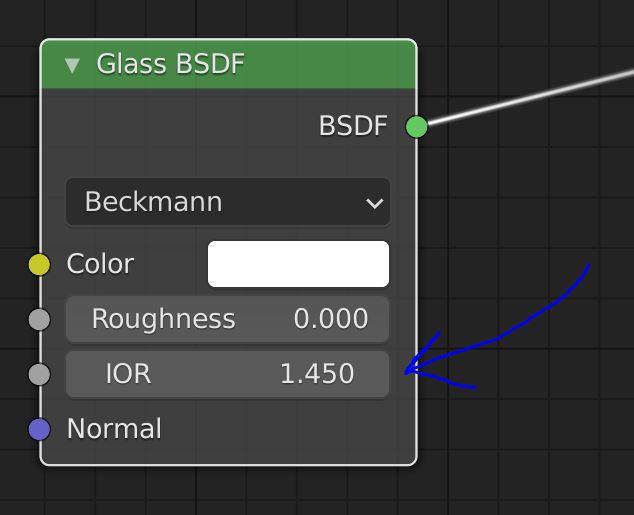
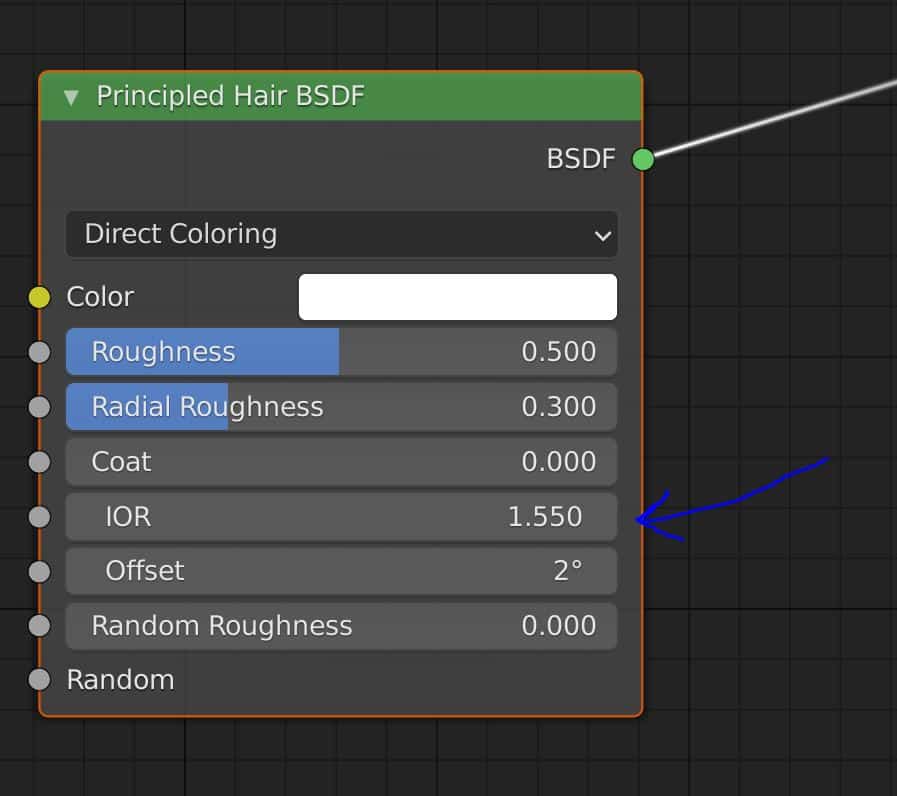
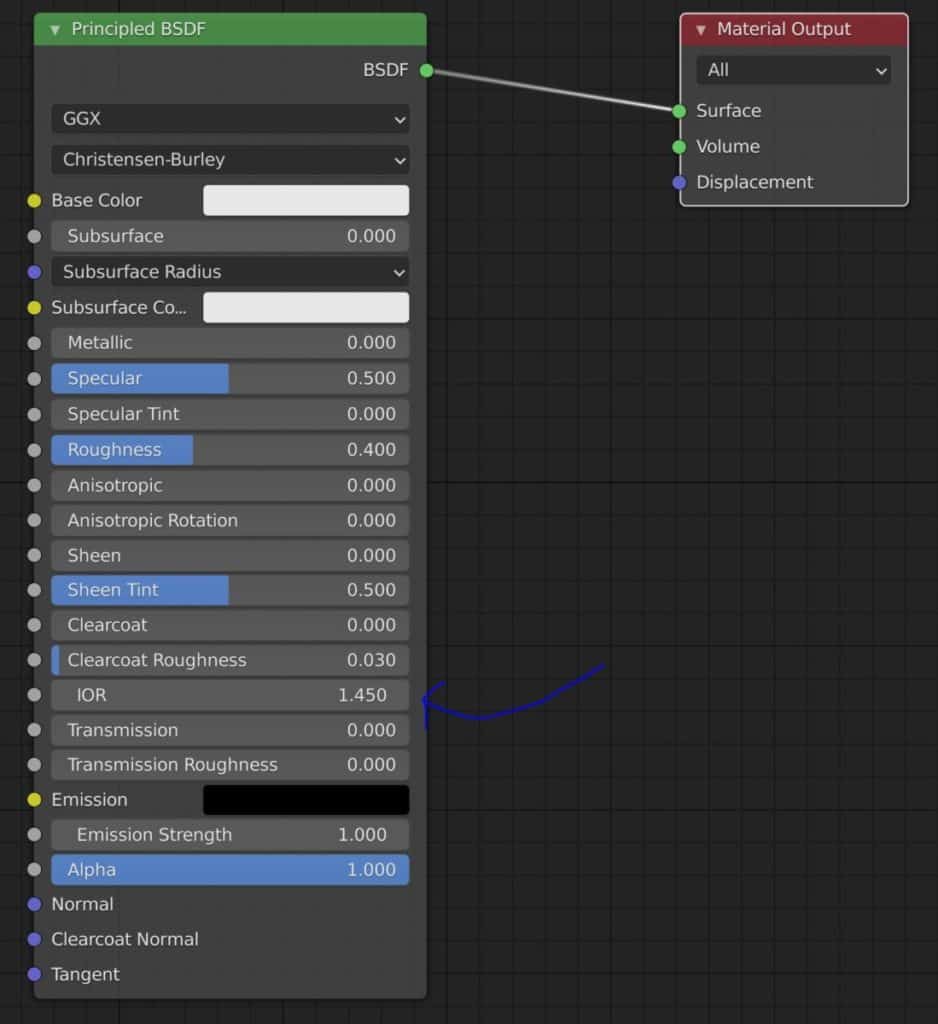
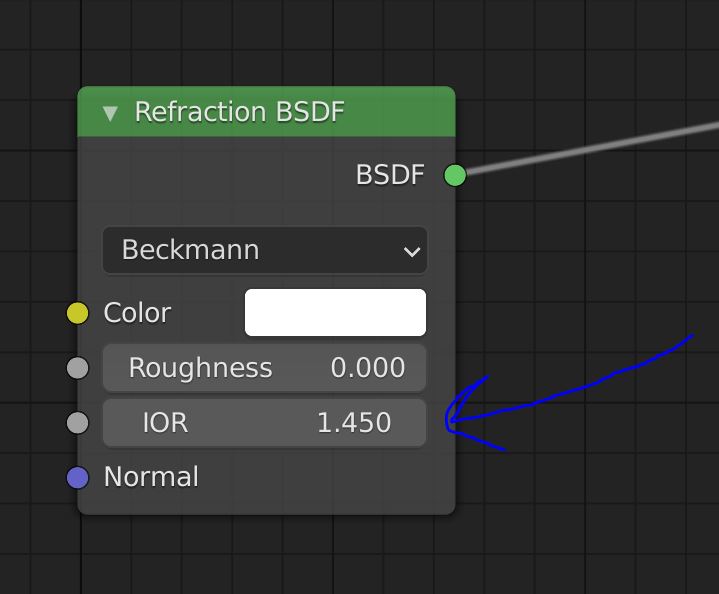
The IOR value is found with several shader nodes in the node editor, used to create materials for objects in Blender 3D. You can find the IOR attribute in the following nodes:
- Principled BSDF
- Glass BSDF’
- Principled Hair BSDF
- Refraction BSDF
Each node of course has a different use case in Blender. The refraction node for example is often combined with the glossy and fresnel nodes to create the base for transparent materials aside from glass. Of course, if you want to create glass there is a glass node dedicated to that material. The principled node is used to create a wide variety of different materials and the principled hair node is for hair, hay, fur, and other really thin materials.
The IOR Values Of The Worlds Most Common Materials…
Below is a shortlist of IOR values for what we consider to be the most common materials in the world as well as the most commonly used materials in Blender for which you will need to find the correct index of refraction. Note that the values are in alphabetical order and in some cases, ranges are given instead of exact values for materials such as glass as these include man-made materials that can have variable values.
| Material | IOR |
|---|---|
| Hair | 1.55 |
| Skin* | 1.3* |
| Air | 1.00002 |
| Vacuum | 1.00 |
| Water | 1.33 |
| Ice | 1.31 |
| Glass | 1.45 – 1.9 |
| Clear Plastic | 1.40 |
| Ceramic | 1.52 |
| Wood | 1.36 – 1.42 |
| Gold | 0.47 |
| Silver | 0.18 |
| Aluminum | 1.44 |
| Steel | 2.50 |
| Acrylic | 1.49 |
- *No clearly defined value or range, as skin is a multi-layered surface of different materials. 1.3 is often used as a base value.
The Role Of IOR In Blender 3D
Within Blender, the IOR plays a crucial role in rendering objects more realistically. It determines how light interacts with the surfaces of 3D models, influencing both reflection and refraction.
By tweaking the IOR, we can make a surface appear like glass, water, plastic, or any other material, thereby enhancing the believability of our scenes.
To utilize the IOR in Blender, we typically work within the material properties panel. In a material’s shader, specifically the Principled BSDF, there’s an IOR input where you input the value for your desired material.
The default value of 1.45 is ideal for generic materials, but specific IORs can be applied for different materials to provide more accurate representations. For instance, the IOR for glass is about 1.52, while for diamond, it’s significantly higher at 2.42.
The IOR’s impact is most noticeable when rendering transparent or semi-transparent objects. A higher IOR will create stronger reflections and more noticeable bending of light or refraction.
On the contrary, a lower IOR results in softer reflections and less refraction, making the object appear less glossy and more matte.
When working with the IOR in Blender, keep in mind that real-world physics and 3D rendering don’t always align perfectly.
It’s important to balance mathematical accuracy with artistic license. While the actual IOR values for materials are a great starting point, don’t be afraid to adjust them as needed to achieve your desired aesthetic. Remember, the final goal is to create a compelling and believable image or animation.
-
Sculpting Organic Shapes in Blender
Sculpting lifelike organic shapes with advanced techniques in Blender.
-
Animation Ready Hard Surfaces in Blender
Preparing hard surfaces for animation with optimized topology in Blender.
Comments are closed.