Sometimes when creating our 3D models, we need to sacrifice our topology for the incredible detail that we are searching for. This is true when creating high poly characters using workflows such as sculpting, and modifies like subdivision surface to increase the overall geometry.
Retopology is the process of reducing the total geometry density of our model as well as being able to clear up any issues that may exist with our current apology. This can help create objects that are more suitable for tasks like video games and 3D animation, as well as things like 3D printing.
The art of being able to re-topologize your model is perhaps one of the more complex workflows for any aspiring 3D artist to learn, but it is also widely used in a variety of different industries that require the use of 3D objects.
What Is Retopology?
Retopology is a special workflow or process that many 3D artists undertake after they have created their initial model. It is commonly used in multiple industries, including the creation of 3D game assets for video games as well as 3D animation.
In order to understand retopology, we must first understand topology. Topology refers to the flow and structure of the geometry on a 3D mesh object. When working with quad-based geometry, in other words, four-sided faces, you’re going to want to focus on two key factors. These are the loops and poles constructed by your topology.
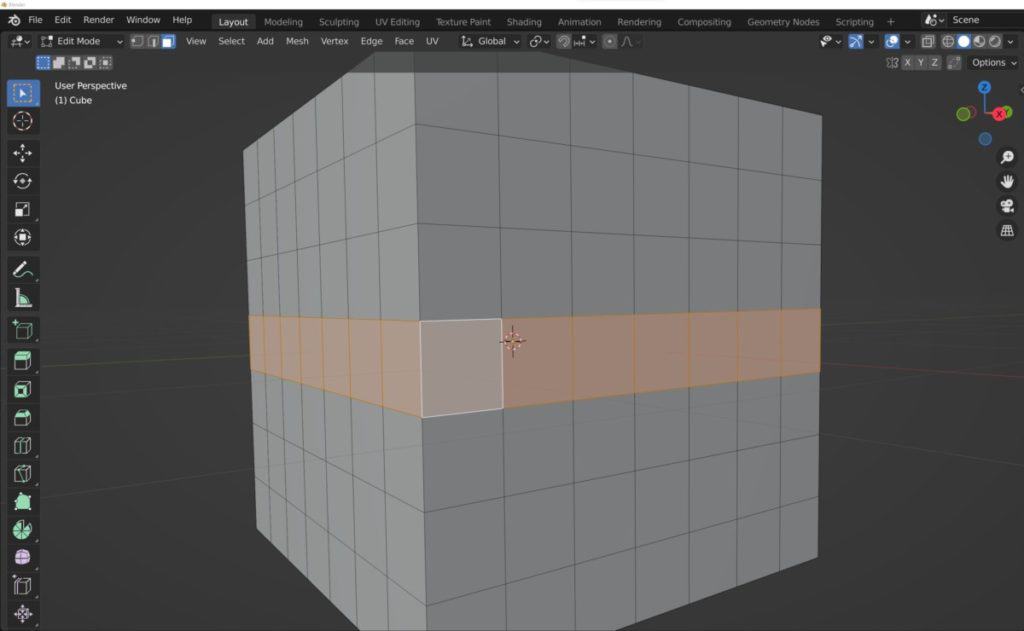
Loops can be selected in Blender by holding down the Alt key and then clicking on a piece of geometry like a four-sided face. Blender will attempt to follow a path or a loop until it can no longer follow that path anymore.
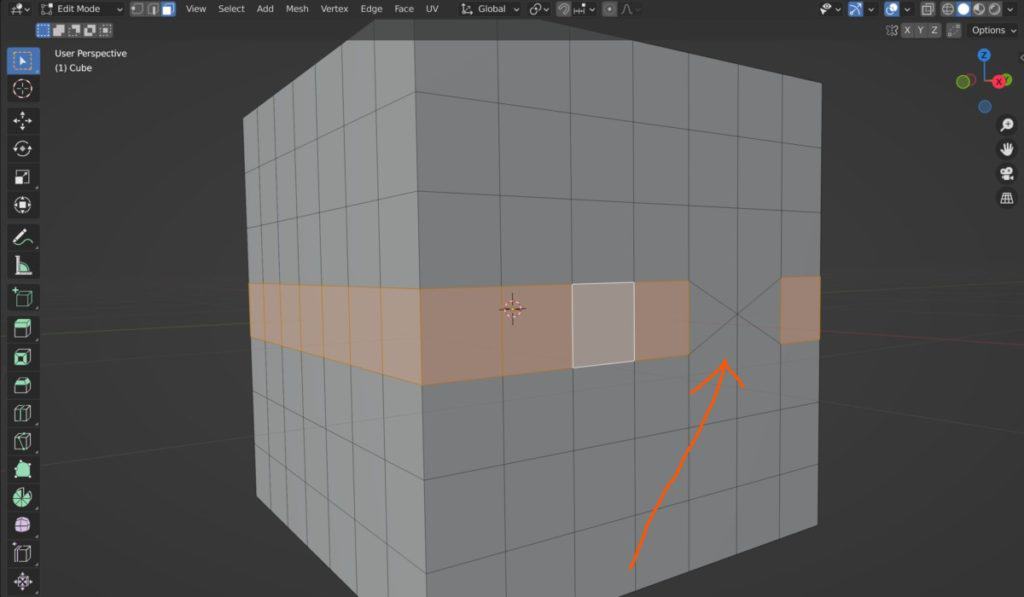
A loop will be halted if it comes to a pole. A poll, for example, can be a face that has either free sides, so it’s a triangle, or if it has more than four sides, which makes it an end gone. It is classed as a pole because Blender will not know what direction to take the selected loop so it will terminate the loop at that pole.
Having good topology for your model means having loops and poles that you have control over, so you can construct your geometry to work the way you want it to. A good example of this is when creating a face, facial animations can be quite complex, and good topology can help make your animations look more natural.
Retopology is where we need to correct poor topology on our model. This can occur for a variety of different reasons and in a number of different ways. The primary reason is where tools have been used that can disrupt the flow of the topology.
These tools may help to get the visual look faster, but if they affect its apology in a negative way then it can affect the capabilities of the model in terms of its animation, 3D printing, etc.
Does Blender Have Retopology Tools?
Blender has various tools that you can use to begin re-topologizing your model and you can do this using various methods.
Perhaps the most commonly used tool for retopology in Blender is to use the Poly build tool, which will allow you to begin creating your geometry on a much simplest scale based on what you already have.
This tool is commonly used as part of a process where we create a Low Poly version of a High Poly mesh. We use the poly build tool to construct the low Poly version using the High Poly version as the baseline.
Other examples of retopology include certain modifiers. For example, you can use the Remesh modifier to break down your base model and then reconstruct it using several mesh methods. A common way of using the Remesh modifier is to use the voxel method.
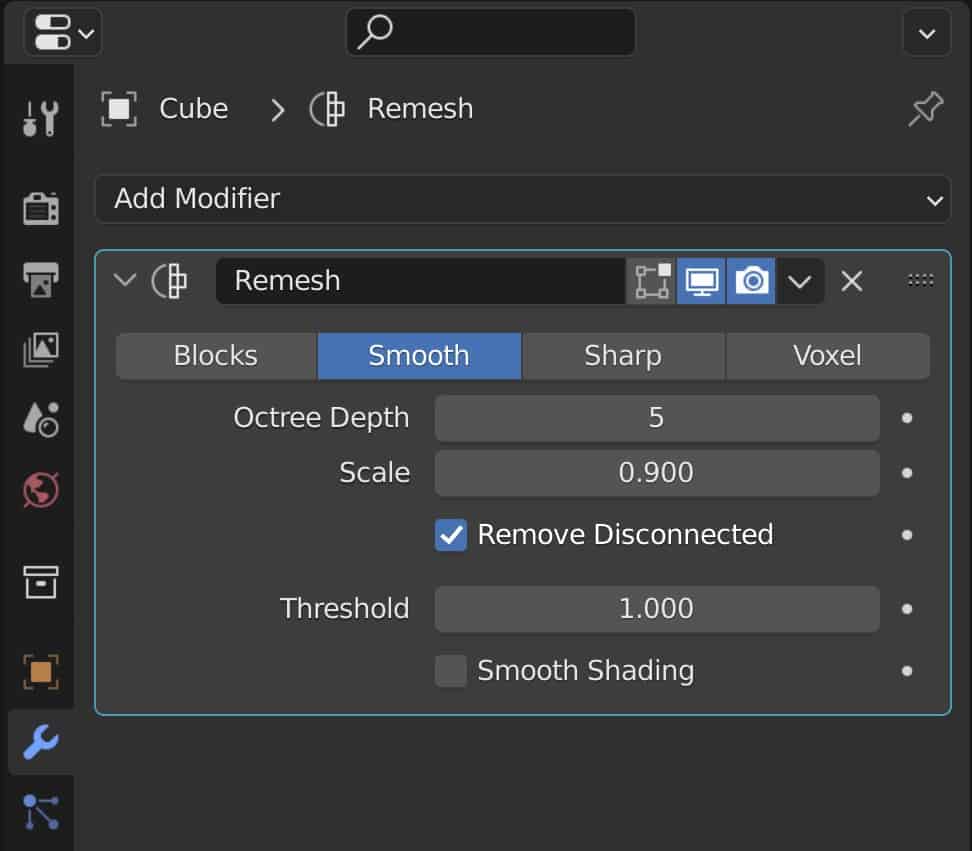
This allows you to recreate your model from scratch very, very quickly with the help of voxels that can reconstruct your topology so that it is easier and cleaner to use.
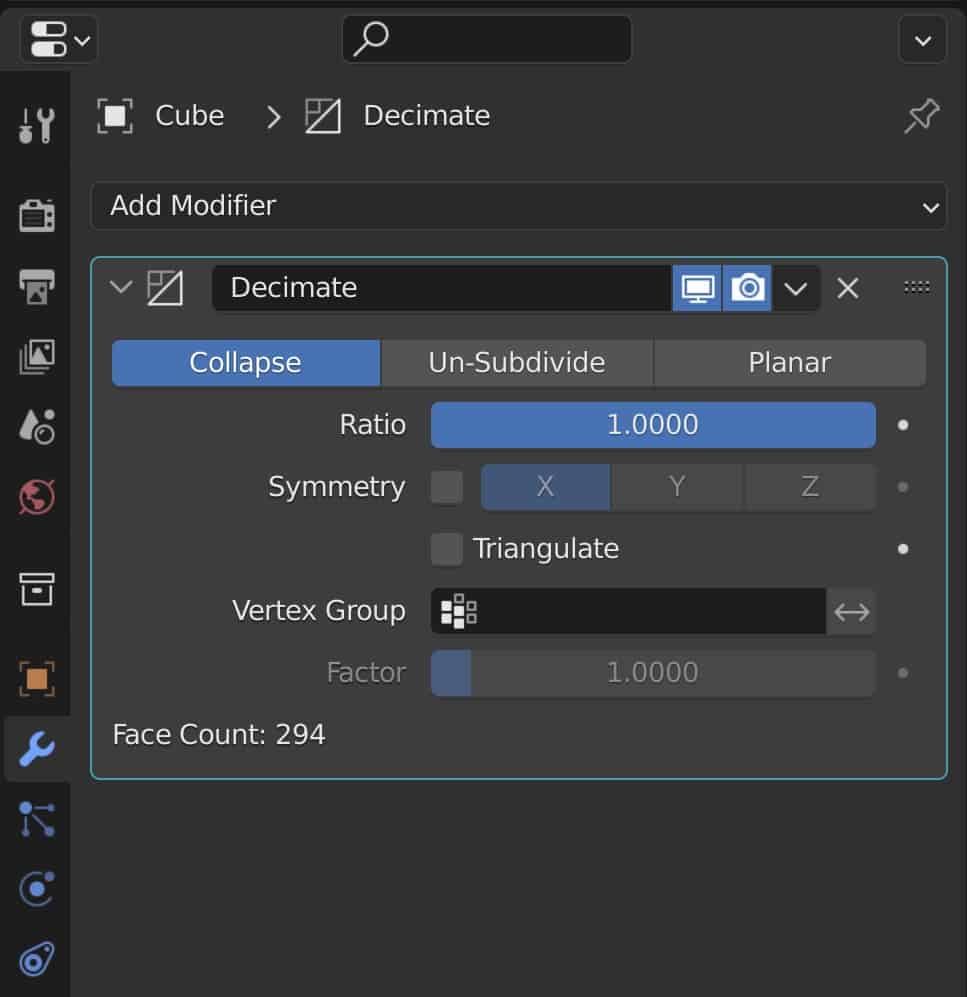
If you are not as concerned with the actual topology of your model and just want to reduce the geometry density, then an alternative is to use the decimate modifier with the decimate modifier you can choose to either collapse un-subdivide or reduce short geometry density, by planar angles.
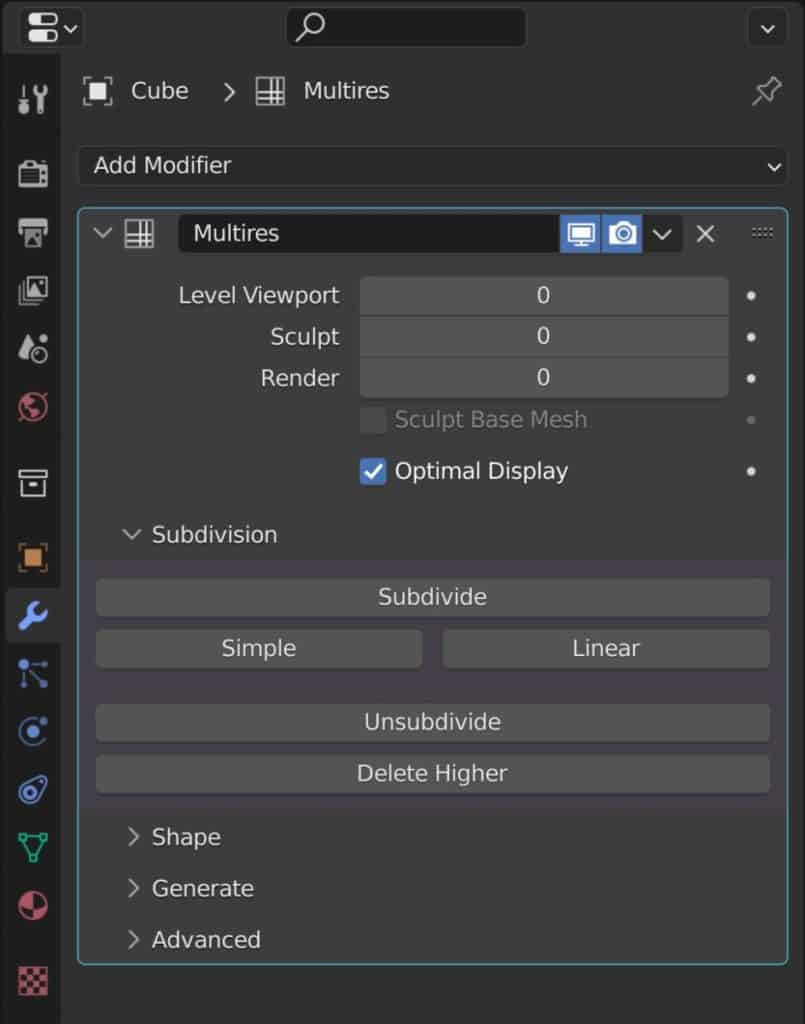
A third modifier that you can use for a form of retopology is the Multiresolution modifier. With multiresolution, you can both subdivide and unsubdivided your model and then control how much detail it has for sculpting. Working in the viewport and for rendering. Again, this modifier focuses on geometry density more than it does on the topology of the model.
In addition to the modifiers, you also have various tools that can be used for the retopology process. Retopology is effectively just creating a simpler form of your model so you can use tools like merging, deleting, dissolving, and vertex grabbing to reassemble your topology from the ground up.
The art of being able to retopologise your model is again a very important skill for most 3D artists to learn.
Fortunately, there are many add ons that you can install in blender that will make the process of retopology much much simpler, and we do recommend checking out some of these add ons as a lot of the tools we have mentioned are not built specifically for the process of retopology, and are more used as alternatives to some of the better methods of retopology that do come in the form of add ons.
When Is It Necessary To Use Retopology In Blender?
We have already mentioned a couple of examples where it would be necessary to retopologized your models in Blender. You will not need to retopologise your model if the visual appearance of the model is acceptable and it is not used for a task where that model will need to be manipulated either physically or digitally.
However, if your model is being used for any purpose where it needs to be either physically produced or digitally altered in the form of, say, an animation. Then it will need to be retopologized if the geometry of the model is not suited for the purpose.
Step By Step For Using Retopology In Blender
There are different ways to approach your retopology, but the generally accepted method is to take a higher Poly version of your object and then create a Low Poly version over the top of it before baking the detail onto the Low Poly version. This helps to improve the performance of your new model in video games, and animations and makes it more accessible for 3D printers.
Let’s now go through a step-by-step process of how we would retopologize a model from scratch.
Step 1: Building The Base Model
Your first step to retopologizing a model is to have a model to retopologize! In many cases, your base model will often be built for detail rather than functionality. For example, you can create a high poly sculpt of a human character.
The topology of the model will be extremely dense, but with the use of dynamic topology, you can create excellent detail at the expense of having a messy topology.
Step 2: Clean The Base Model Where Applicable
While the base model is only the foundation for your low poly object, that foundation still needs to be solid.
In many ways, your original mesh needs to be the finished product, with all the pieces in place and all of the details drawn.
If there are any artifacts visible on the model, either in the form of nonmanifold geometry or incorrect shading caused by poor topology, then it can impact the effectiveness of your choice of method for retopology.
Step 3: Choose Your Method Of Retopology
The next step is to choose the method of retopology. You can either use the tools already available in Blender such as the poly build tool to help reconstruct your model, or you can use one of an impressive library of add-ons that center around retopology.
Step 4: Construct Your Low Poly Model
Using your choosing method, you will now want to recreate your mesh using as few polygons as you can while keeping the base shape as much as possible. In most cases, this is done by using your high poly model as the canvas and then creating your new geometry as an overlay on top of the base model.
Step 5: Bake The Detail From The High Poly Mesh To The Low Poly Mesh
When you have completed the low poly form of your mesh it will still look low poly, so the last step is to project the finer details of your geometry onto your new mesh via a process known as baking.
How Long Does Retopology Take?
Retopology is an additional part of the modeling process on top of the original modeling of the 3D object. But how long is it going to take for you to retopologize an object? And is it simply a better approach to try and create the perfect model the first time?
When you are creating low Poly models, to begin with then you will not need to reach retopologize your model. The process of retopology is built around creating easier-to-use versions of high-density meshes like sculpts for example.
When we are retopologizing our model then the amount of time that we spend on this part of the process is always going to be dependent on the actual objects created. Generally speaking, we use the 60% rule when it comes to retopology. For every 10 minutes that you should spend on modeling the original object, at least an additional 6 minutes should be spent on at the retopology stage, and sometimes this can be longer.
What Are The Best Addons For Making Retopology Easier?
While there are many tools in Blender that can be used for the purpose of retopology, the general process is a little bit cumbersome and there are other applications that do this better such as Autodesk Maya.
As a result of this, one of the most popular types of add-ons that are often produced are the add-ons that allow you to more easily retopologized your geometry in Blender. If you don’t know what an add-on is, this is a form of a plugin that is used to expand on the functionality of the base software. So let’s take a look at a few of the best add-ons for Retopologising models in Blender.
1. Retopoflow
There are some great options out there for retopologising your 3D models, but perhaps none are better than the now, pretty much famous retopoflow add-on.
This item has been around for several years now and has been used for various versions of blend up from 2.7 all the way up to the current 3.0 series. However, with each new version of Blender, there is also an updated version of this add-on and it remains one of the best add ONS that you can use in Blender in almost any category. With Retopoflow you are able to recreate your geometry. Regardless of the shape of the original. For example, you can create contours so that you can add loops around your geometry where you have circular base meshes.
Created by a CG cookie who is also the creator of one of the most popular blender tutorial channels out there on YouTube. This add-on has been touted as a creation by artists for artists and not only provides the functionality required to retopologized your model, but also the ease of use that is expected from an add-on of this quality.
The only downside to deciding on is its price. You can access this add-on from the blender market for a grand total of $86. This is actually a very reasonable price, given exactly what the add-on is capable of doing. However, there are a lot cheaper options out there that you will probably want to try first if you don’t want to pull out your wallet.
2. Quadwrap
An alternative that you can try that would allow you to do most of what we top of flow allows you to do is the quadratic add-on. This comes in at a slightly cheaper price of $80 for a full studio license for the add-on.
When working with specific shapes like cylindrical shapes such as human body parts, QuadWrap works extremely well, allowing you to create very easy loops around your model, for designing that low Polybase.
Well, that all is generally easy to use. There are two things that could be improved with the add-on. The first is that it only really focuses on certain types of shapes. The cylindrical shapes are used to make up things like limbs, horns, arms, legs, et cetera. It should also be noted that the quadratic add-on at this time is not updated for version 3.0 and the most recent version according to the Blender Markets page is 2.91.
3. Instant Mesh Remesh
This is the one add-on that is on the list that you cannot get from the blender market. Ann is instead accessed from GitHub. As a result, it’s a free open source. Add on. That will allow you to very quickly retopologized your mesh, hence the name instant mesh remesh.
Think of this add-on as a direct replacement for the Remesh modifier that is used in Blender. It is able to produce much better results than any of the built-in tools for recreating your topology. It’s not as good as the other options on this list, and if the original topology of the base model is poor, then this can affect how the add-on will generate the new version of that mesh.
4. DynRemesh
If you want the process of retopology to be as fast and as simple as possible, then DynRemesh is the option for you. This add-on is designed to recreate your objects with a single button press. It is best suited for sculps where dynamic topology has been used to create highly dense objects with a lot of finer details. Using this add on we are able to with a single button press create a quad-based variation of our Dyna topic sculpt.
There are a few settings here that you can change to manipulate the way that your remesh is going to work on your model. This is a fast method of re-topologising your object, but it is not as effective as the options above which offer more, controlled methods of recreating your geometry. It is, however, one of the cheaper options on this list, and you can get it for as little as $15 in 2022.
5. SpeedRetopo
If you are going to try any add-on for retopology, this is the add-on that we recommend personally. Out of all of the add ONS on this list, it is the highest rated on the blender market and is easy to use yet also a very powerful tool for retopology for any type of mesh.
As the name suggests, the Speedretopo add-on will allow you to create your topology very quickly by doing something as simple as drawing lines or contours onto your mesh and then watching as the add-on creates faces based on where you have positioned those contours. This technique works well in both the case of cylindrical models as well as things like how interfaces.
In terms of the learning curve and the sheer usability of the add-on, we still think that the Retopoflow add-on is the better choice. It’s simply perfect in terms of its usability. However, Speedretopo negates the number one factor why we are hesitant about Retopoflow flow which is the price. Speedretopo currently costs just $5 on the blender market, so it’s well worth a try at the very least.
Thanks For Reading The Article
We appreciate you taking the time to read through this article and we hope that you found the information that you were looking for. We have many articles on the various aspects of Blender and have compiled a few in the list below for your reading.
- How To Identify Normals In Blender?
- Isolating A Single Objects In Your Scene For Editing
- Exporting A Game Asset For Blender To Unreal Engine
- Is It A Good Idea To Learn Blender 3D Or Not?
- Creating A Simple Character Model
-
Edge Loops for Hard Surfaces in Blender
Utilizing edge loops for defining crisp hard surface details in Blender.
-
Blender Kitbashing: Complex Shapes Made Easy
Simplifying complex shape creation with Blender’s kitbashing approach.