As you would no doubt expect, being able to work in 3D space on your computer is a very different skillset from working in 2D space, which is familiar with most applications. Sometimes even the simplest of actions can prove to be frustratingly difficult.
If you cannot select and move your objects in Blender, you will likely have enabled an option that prevents you from choosing your models. Alternatively, you may have also locked specific transforms from the side panel.
99% of the time, when we can’t move or select our objects in Blender, it’s because we have enabled a setting when we are we’re not aware. The solution is nearly always to locate that setting and then restore our functionality.
The Main Culprit For Not Being Able To Select And Move Objects Is…
Sometimes you maybe not be able to move your objects, and sometimes you may not be able to select them at all.
There is usually one reason if you cannot select your objects in the 3D viewports. You have disabled the ability to select that object.
Disabling your selection is most commonly done when we disable a selectability of objects within the outliner panel. So go to the outliner panel, and you will see next to each object that we have a series of icons. In most cases, there should only be two icons visible with each object. The first should be an eye icon that can be turned on and off to determine the visibility of that object.
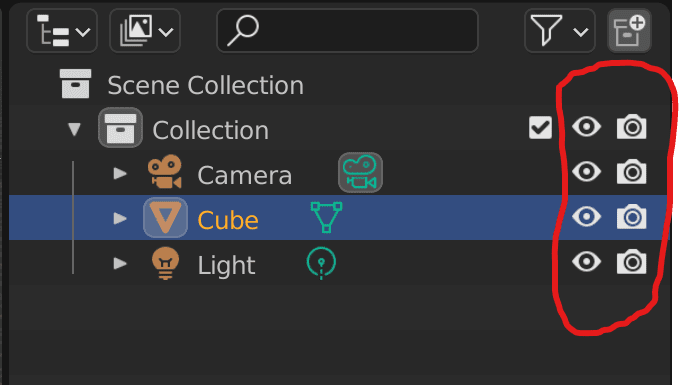
The second icon is that of a camera that determines each object’s visibility when the scene is rendered.
You might see a third icon in the shape of a mouse cursor. If you do see this icon and it is greyed out. Then that indicates that you have turned off selectability for that specific object.
If the Selectability icon is invisible, we will need to make it visible in the outliner to check if our object is selectable.
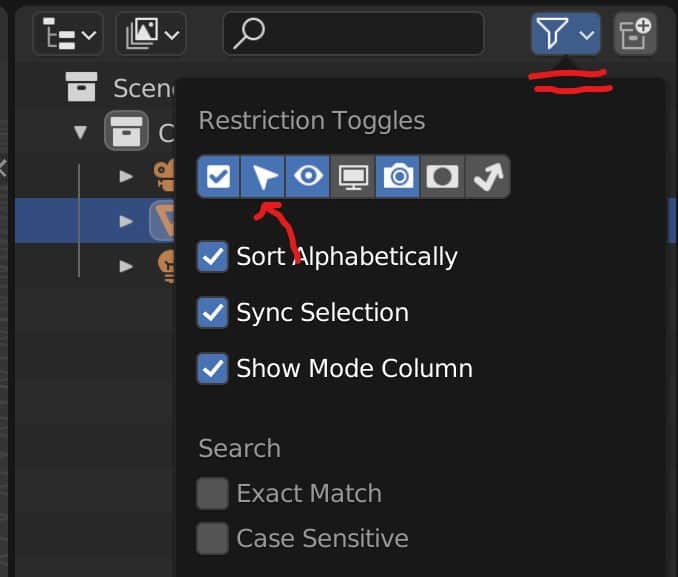
Go to the filter icon at the top of the outliner panel and left-click to open up the filter menu. Then select the icon that looks like a mouse cursor from this menu. It should highlight blue when it is activated.
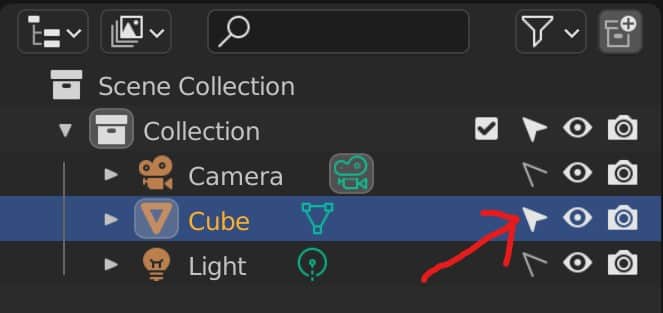
Next, test your object to see if you can move it again. If not, check out the next section of this article to determine how your transforms can be locked.
Locking The Transforms Of Your Objects Using The Side Panel
If your object is selectable, it should by default be able to move, rotate and scale. However, in Blender, we are also able to lock our individual transforms and the axes of each transform.
We can open up our side panel if we press the N key while in the 3D viewport. The item tab should be the currently selected tab from the list at the side. Within this tab, we will be able to manipulate the transforms of our selected object, including the location, rotation, scale, and dimensions.
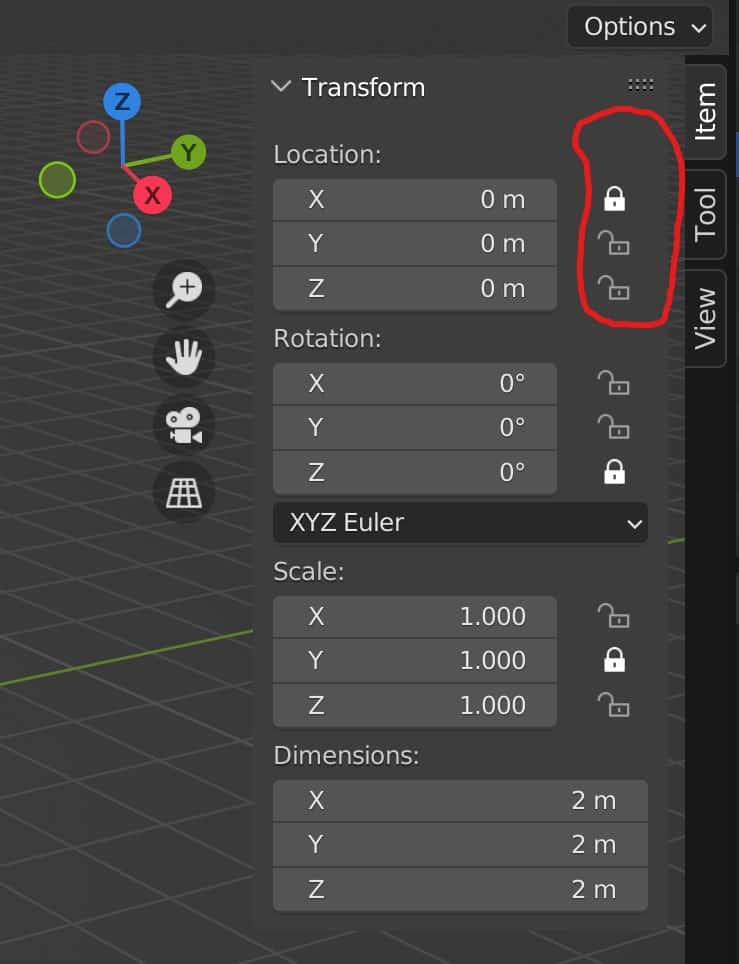
For the location, rotation, and scale, each axes’ values will have an icon that looks like an open lock next to them. If the icon is an open lock, the transform can be edited in the 3D viewport. However, if the icon is a closed look, then the specific transform on that axis is locked for manipulation within the 3D viewport itself.
You can still edit lock transforms by manipulating the numerical values within the side panel itself, but you cannot use the grab, rotate, or scale tools from the tool shelf, nor can you use the hotkeys to manipulate the transforms while they are locked.
To unlock your transforms, left-click on any locked icons to unlock them and make it possible to manipulate the rotation, location, and scale.
If you want to learn more about Blender you can check out our course on Skillshare by clicking the link here and get 1 month free to the entire Skillshare library.
Only Moving The Objects Origin Point Rather Than The Geometry
A third, though less common, means of preventing the movement of your objects is to set up Blender to only manipulate the location of the origin points.
The object’s origin defines the location, rotation, and scale values that you see in the side panel for any selected object.
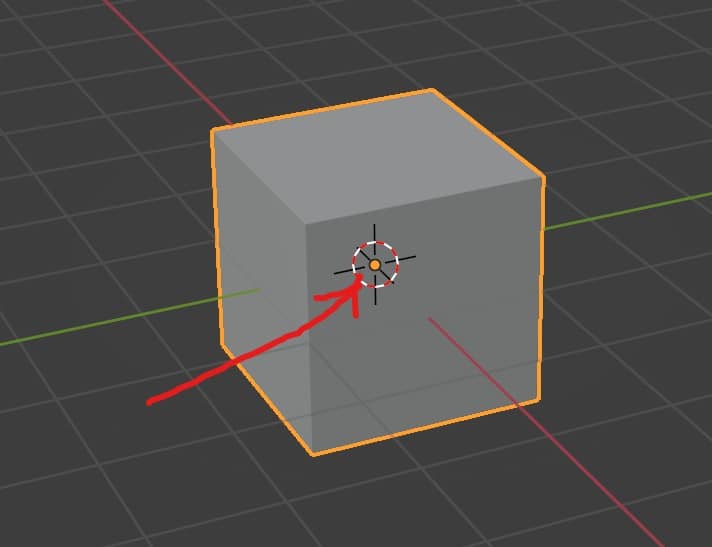
In the 3D viewport, the object’s origin appears as a small yellow dot. In some cases, you may find that only this yellow dot will move with your interaction when you attempt to move your object. If this is the case, you have set things up so that only the object origin is manipulated using the transform tools.
In the top right-hand corner of the 3D viewports, you will be able to locate a menu labeled as options. It should be found directly underneath the various viewport shading buttons.
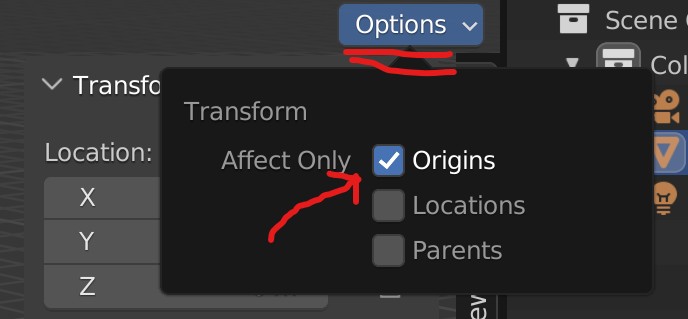
Click on this button to open up the options menu, where you will have the ability to enable origin-only transforms.
You also can restrict your transforms to the location only from this menu, as well as being able to manipulate parent objects without affecting their children.
If the origin is the only part of your object moving, then this box will be ticked. Untick it, and you will be able to move your geometry as usual.
The Difference Between Moving An Object In Object Mode And Edit Mode
While this is not necessarily a means of preventing the ability to move your objects around your 3D viewport, it is worth noting the difference between manipulating or transforming in object mode. And edit mode.
The object’s origin defines the transforms of your model in terms of location, rotation, and scale.
You can also grab, rotate and scale your objects in edit mode. However, this has a slightly different impact on your model. When using these tools in edit mode, we grab, rotate, and scale the geometry itself.
So even if we can manipulate this geometry in edit mode, when we return to objects mode. Those changes will not be reflected in the side panel. This is because editing our transforms in edit modes does not affect the object’s origin.
You Are In Edit Mode For Another Object
There is another reason you may not be able to select objects in Blender, and that is when you are in edit mode for another model in your viewport.
This one is relatively easy to spot as there is a very visual distinction between object mode and edit mode in terms of the visible appearance of an object. While you are in edit mode for one object, you will be unable to select or edit the second object in your scene or any other object.
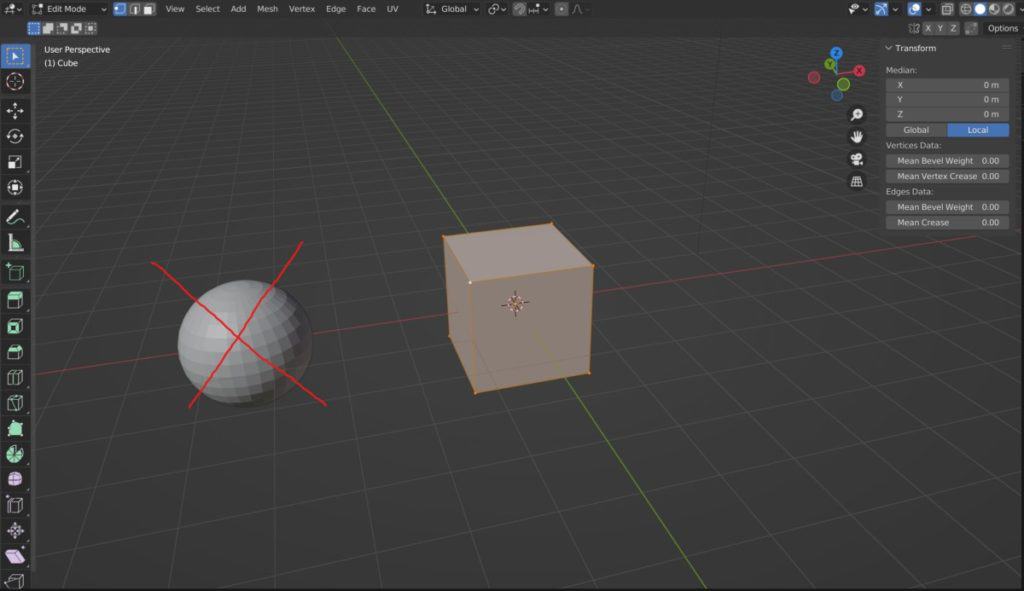
The solution here is to come out of edit mode for the current object and select the object you wish to manipulate.
If you select multiple objects in object mode and then go into edit mode, you will be able to edit both of these objects. However, again, keep in mind that you will only edit the geometry of the objects and not the actual transforms of the object’s origins.
Cannot Move Linked Or Appended Objects
The final reason you may not be able to move your objects in Blender is that you have linked or appended those objects from another project. In particular, you may not be able to move, rotate, or scale an object you have linked.
When we link objects, we can determine how much influence we have over that model. Conversely, if we choose to unlink our objects, we will have more control over what we can do to that model in our current project.
For appended objects, on the other hand, we should be able to manipulate the transforms of our appended objects in Blender without having to make any changes. So if you are unable to select an appended object, make sure that you have assessed the other potential causes listed above.
Thanks For Reading The Article
We appreciate you taking the time to read the article and we hope that you were able to find the information that you were looking for. Below we have compiled a list of additional topics that you may be interested in reading based on the article above.
- How To Create 3D Printable Objects?
- How To Clean Your Objects After Using The Boolean Tool?
- Adding An Image Sequence As A Plane Object
- What Are Overhang Faces When Modeling For Objects For 3D Printing?
- How To Isolate A Single Object In The 3D Viewport For Printing?
-
Non-Destructive Workflow in Blender
Embracing a non-destructive workflow for flexible modeling in Blender.
-
Detailing with Booleans: Blender Techniques
Incorporating Boolean operations for intricate detailing in Blender.