Modifiers are a great way of modeling in Blender without making permanent changes to the object, as modifiers follow a procedural workflow. Sometimes when using modifiers some of them will have red icons. But why is this the case?
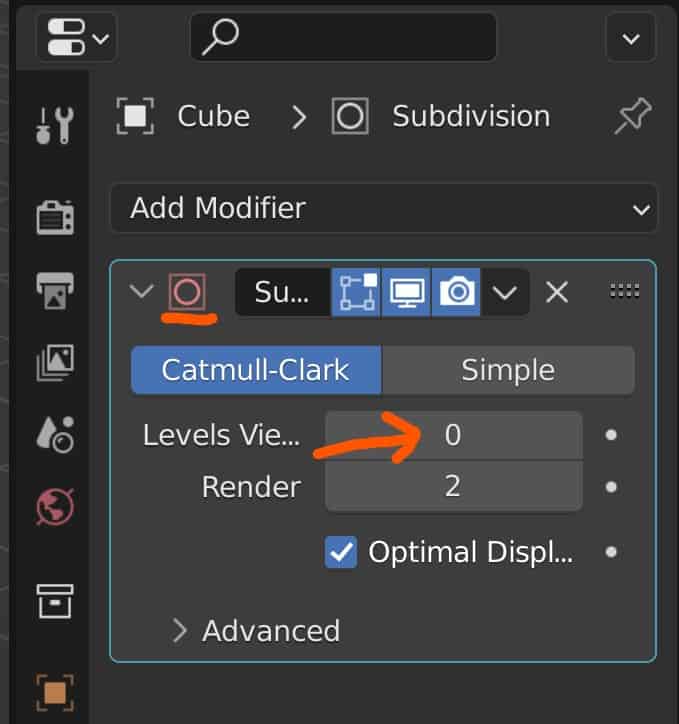
When the icon of the modifier appears red, then the modifier is in a state where it has no effect on the model and is effectively inactive. An example of this is the subdivision surface modifier when the levels are set to 0. As the modifier has no impact on the model in the viewport, the icon appears red.
Modifiers are progressively improving in terms of their usability and effectiveness, and the red icon effect is a simple quality of life improvement to make using modifiers easier.
Which Modifiers Can Have The Red Icon?
The red icon is a quality of life improvement that was made back in Blender version 2.91. And it’s primary purpose is to display when a modifier has no effect on an object in the 3D viewport. But do all modifiers have this red icon, or is it only select modifiers that appear red when not in use?
As of Blender version 3.0, the following modifiers all have an off state, where the icon that represents the modifier appears red in the viewport.
- Subdivision Surface
- Bevel
- Geometry Nodes
- Data Transfer
- Mesh Cache
- Mesh Sequence Cache
- Normal Edit
- Weighted Normal
- Vertex Weight Edit
- Vertex Weight Mix
- Vertex Weight Proximity
- Armature
- Cast
- Curve
- Displace
- Hook
- Laplacian Deform
- Lattice
- Mesh Deform Shrinkwrap
- Smooth
- Smooth Laplacian
- Surface Deform
- Warp
As you can see many of the modifiers now have an off state that is defined by the red icon when the modifier has no effect on the object, However, there are many more modifiers that do not make the list.
Why Do Some Modifiers Not Have A Red Icon When Not Being Used?
While there are many modifiers that have a visible off state using the red icon, there are also many more modifiers that do not undergo this change, even when you set the parameters of the modifier so that it does not visibly affect the model.
There can be two reasons why a modifier may not have a red icon at any point when in use for a 3D model. The first reason is that it simply has not been added to the functionality of the modifier. In blender version 2.9X when this was introduced, the subdivision surface modifier was the only one to have the red icon when its viewport levels were set to 0.
The second reason is that the way certain modifiers work requires them to affect the model in some way, even if that effect results in the same visual appearance. An example of this could be the remesh modifier, which is always active even when the geometry is yet to have been reduced.

Generate Modifiers Normally Do Not Have An Off State
When adding your modifier to the object, the menu always splits your options into four distinct types. The most common type that we use is the generate type, which includes the bevel and subdivision surface modifiers.
In most cases, these modifiers affect the model simply by being added to the modifier stack, and so do not have an off-state where they do not affect the model.
There are of course known exceptions to the rule, like the subdivision surface modifier when the value of the levels is set to 0, the bevel modifier when the bevel amount is set to 0, and the geometry nodes modifier when no node tree is connected.
Why The Modify And Deform Types DO Normally Have A Red Icon?
Two modifier types that are more likely to have the red icon when they are not in use are the modify and deform categories.
The main reason why this is the case is that these types of modifiers require assigned attributes to function correctly, and when the attribute is not assigned, the modifier does not work.
An example of this from the modify category is the vertex weight edit modifier, which requires an assigned vertex group to function.
An example from the deform category would be the cast modifier, which requires you to apply the cast on at least one of the three main axes.
In both categories, there are a couple of exceptions that do not have the red icon when inactive. For the modifier category, the UV-related modifiers are the exception to the rule. For the deform category the wave, simple deform and smooth corrective modifiers are the exception.
Physics-Based Modifiers Work Differently To Other Modifier Types
The fourth category is for the physics-based modifiers which are very different from the previous three categories. These are rarely added as modifiers in the modifiers tab as they have their own tab in the properties panel where they can be activated and adjusted.
Because of this, red icons cannot appear for this modifier type, as they are always active for the model so long as they are connected.
Is It Possible To Change The Color Of The Icons In Blender?
If you are a more advanced user of Blender and know how to manipulate the user interface, then you may be interested to know if you can change the colors of the modifier icons. Perhaps when a modifier is inactive you want the icon to appear yellow instead of red.
At this time, however, there is no known way that the end-user can change these icons and their colors, despite the fact that 99% of the entire user interface can be edited. These colors are hardcoded into Blender and not currently editable in the theme section of the preferences panel, where you would go to adjust the colors of Blender.
Thank You For Reading Through The Article
We appreciate you taking the time to read through this article and we hope that you found the information that you were looking for. Below we have compiled a list of additional topics that you may be interested in reading.
- Smooth Shading And The Auto Smooth Tool
- How Do You Unsubdivide A Model In Blender
- Troubleshooting Problems With The Subdivision Surface Modifier
- Why Is My Model Transparent With No Visible Faces?
- What Is The Shortcut For The Subdivide Tool?
-
Cloth & Drapery: Blender Modelling Tricks
Modeling realistic cloth and drapery with specialized techniques in Blender.
-
Symmetrical Sculpting in Blender
Achieving perfect symmetry in sculpting projects with Blender.
-
Detailing with Dyntopo in Blender
Enhancing details using dynamic topology for refined sculpts in Blender.