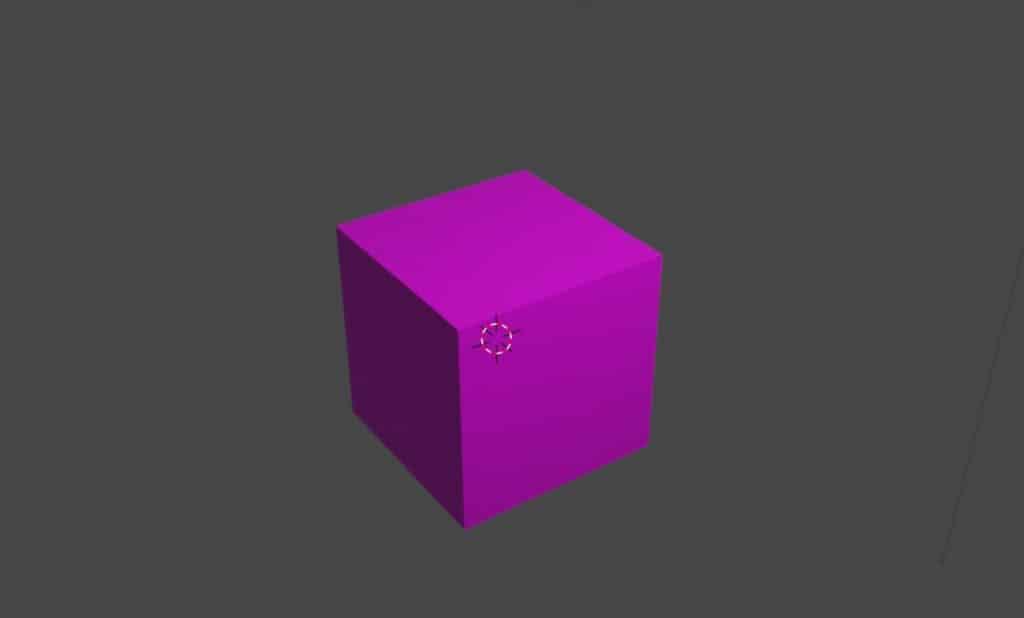
A core part of the 3D modeling process is the ability to create materials and textures to give your 3D models that actual character and appearance that she was searching for. Occasionally you may find that your material appears to be a purple, magenta-like color when viewing it in the 3D viewport.
The main reason why your material would appear as a magenta color in the viewport is when you do not have a texture applied to that material. When you use an image texture node in your node editor, you need to connect an actual texture to that node, otherwise, it’s going to generate a magenta color if it’s connected to the base color of your main shader.
It should be noted that if you are in the situation where your material appears in this color, it’s not really A cause for concern, and 99% of the time it is simply the result of not applying a texture to your image texture node.
The Reason Why Your Model Appears Purple In Your Viewport And Render
The typical process of loading in your image textures is to first of all create a UV map for your model. When you have created your UV map, you will then be able to create an image texture node and assign an image texture to that node in the shader editor.
This means that you have to normally create your material first, have your base shader information, and then add your image texture node before connecting it to the base color of your main shader.
You then need to click on the open button in the image texture node which will take you to the file directory where you will be able to locate and assign a texture for that specific material.
This last step is the main reason why you are likely to see the magenta color on your model. If you fail to assign an appropriate image texture to this node, or if the image texture itself is a file type that is incompatible with blender. Then the software will not be able to read that texture and will instead display a magenta color.
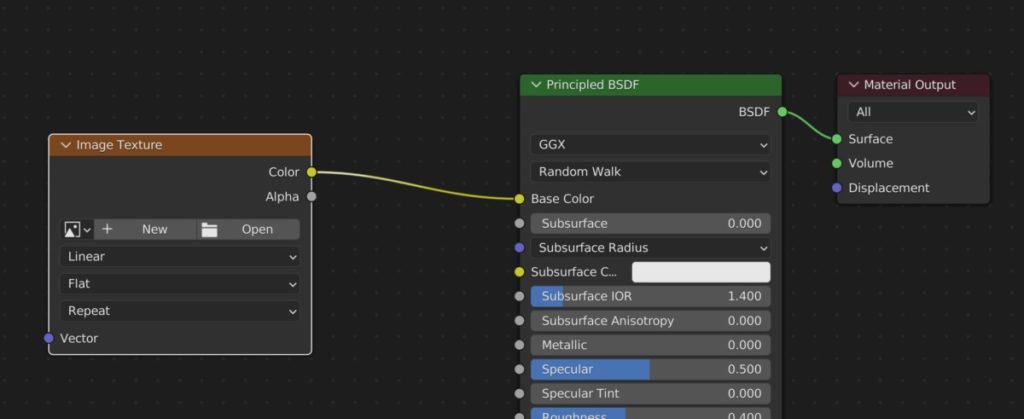
Because the image texture node is connected to the main shader’s base color. And no texture has been assigned to the image texture node. Then Blender needs to replace that information with a placeholder of sorts.
But why is this placeholder the magenta color? But it’s because Magenta is actually very special. It is the one color that has no wavelength and as a result this does not technically exist.
That’s right, Magenta technically does not exist on the spectrum of colors. If you were to recreate the magenta color using the RGB numerical values, you would need to use our value of 255,0,255. Our brain is unable to distinguish the fact that green can be found in between purple and red on the spectrum. So in its place, we end up with a magenta color which is the complement color of natural green.
Is It Also Purple In The Eevee Render Engine Too?
The cycles render engine is based on light paths that allow us to create realistic effects in our 3D viewport.
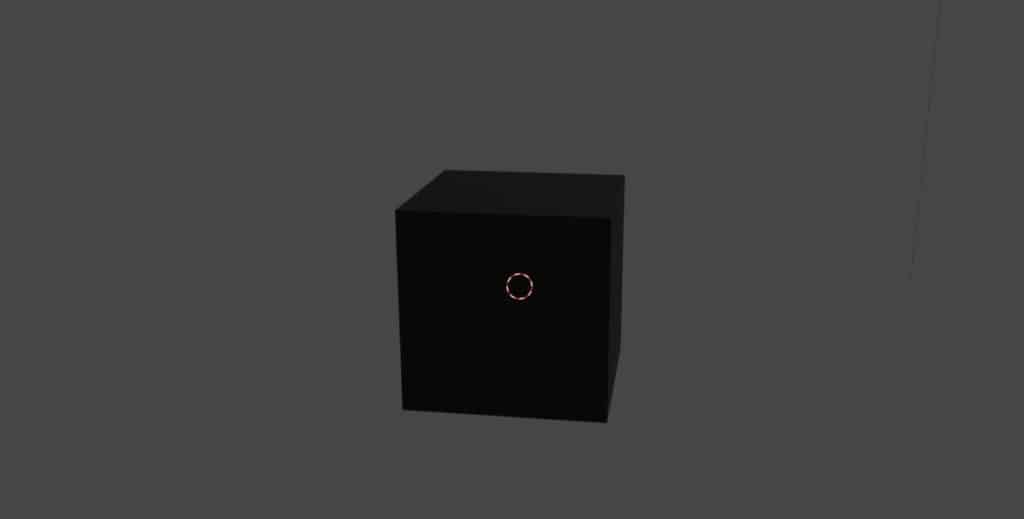
But what happens if we were to recreate this scenario of not having an assigned texture to our material using the Eevee render engine? When using the EV render engine, we know that we will get the magenta color on our texture.
In Eevee, we do not see a magenta color. Instead, the material appears black. This is because of the way that Eevee actually calculates its materials and textures in relation to its lighting. A pure black color is used because it is not affected by the light sources that will hit the surface of that material.
If you want to learn more about Blender you can check out our course on Skillshare by clicking the link here and get 1 month free to the entire Skillshare library.
How To Fix Missing Textures On Your Objects?
If you have yet to assign a texture to the image texture node, then the solution is simple. Just click on the folder button within the image texture node to open up the file browser. Then locate a compatible image texture and load it in to that project.
If you have already loaded in an image texture, but you still see the magenta color, then it could be a bug where blender has not read the image texture correctly. The solution here will be to click on the X button to remove the image texture from that node.
You will not have to open up the file browser again as once you load up the image texture the first time, it will already be in the project. So just click on the little down arrow that opens up the menu allowing you to choose from existing image textures.
If this still doesn’t work, then you may need to consider actually reloading the texture or double checking to see if it is a compatible type.
When sculpting or texture painting in Blender the best method is to always use a graphics tablet. But these come at many different price points and forms. If you want to get started with sculpting using a graphics tablet then we recommend this as your starting point. It served us well for over 4 years before we upgraded to a more expensive tablet ourselves.
Removing Unusable Textures From Your Project
Textures that you initially load in can become unusable if you moved their text chat to another location. When you import your image textures, you are doing so by creating an invisible path between your blender project and the location where that texture is stored.
If you move that image texture from its original location, then you break the chain between the blender project and the target destination.
As a result of this, you may have an image texture added to the image texture node, but if it has been moved then it will not be read by the Blender project itself and you are likely to again see that magenta color in your viewport.
There are two solutions to this scenario. You can either relocate the image texture and import it from its new location or you can bring it back to the original location on your computer where it was initially loaded into your blender project.
When Are You Most Likely To See the Magenta Texture Color?
The most likely scenario where you will see the magenta texture color is when we have added an image texture node in our node editor connected to our main shader.
When we add an image texture node, we of course need to assign a texture to that image texture node and if we are unable to do so, then instead of a texture we will see that magenta color.
Note again that this is only true if we are using the EV render engine and we will see a different result if we are using these cycles render engine instead.
Will This Happen If Your Use Procedural Textures Instead?
If you choose to use procedurally generated textures instead of external based textures from other sources, then it’s very unlikely that you will ever see the magenta color on your material. This is because we do not have these situation where a node is present but not currently doing anything to the actual material.
When we are creating our materials and textures using procedural methods like other texture nodes, then those texture nodes would already be having the correct impact on our texture. We don’t have the same situation where a node has been added, but is not pointing to an external texture node.
Instead, we are combining nodes to create our own custom texture. As a result of this, we are unlikely to ever see the magenta color on our material.
Thanks For Reading The Article
We appreciate you taking the time to read the article and we hope that you were able to find the information that you were looking for. Below we have compiled a list of additional topics that you may be interested in reading based on the article above.
- What Does Sheen Mean When Working With Materials?
- How To Use The Clearcoat Property In Blender Materials?
- Why Materials Get Deleted When You Close Your Project?
- How To Optimize Our Node Setup For Our Materials?
- The Best File Formats For Exporting 3D Models From Blender?
-
Sharp Edges in Blender with Crease Sets
Utilizing crease sets for maintaining sharp edges in subsurf modeling.
-
Bevel & Chamfer: Blender’s Edge Mastery
Mastering the application of bevels and chamfers for sharp edges in Blender.
-
Non-Destructive Workflow in Blender
Embracing a non-destructive workflow for flexible modeling in Blender.