If you are creating an animation where you have a monitor or TV within that animation, then it might be cool or even necessary to have something playing on that monitor. In other words, an animation within an animation. But this is much easier than you may at first think.
To add an image sequence as a plane object, we first need to add the image sequence as planes add-on by going Edit > Preferences > Addons and then ticking the box for the add-on, you can type the name into the search bar to find it. Then press Shift + A in the viewport, scroll down to image and then select images as planes. Select your images from the file browser and then press the blue import button.
Using the add-on is the best way to bring in rendered animations and videos as a part of your new scene, and there are several example projects where this tool proves useful.
How Best To Use The Import Sequence As Plane Add-On?
While it sounds complicated to do, importing an image sequence into your scene is actually really easy thanks to the Import Images As Planes Add-On. But why import as a plane? Well, any video needs to be a part of an object in order for it to be visible in the 3D viewport.
All videos are rendered using a rectangular shape, the same as a simple plane object. Therefore using another object type or shape is generally impractical, so the plane is used as the base for the add-on.
The add on is not normally enabled by default, so you will need to enable it by following the steps below:
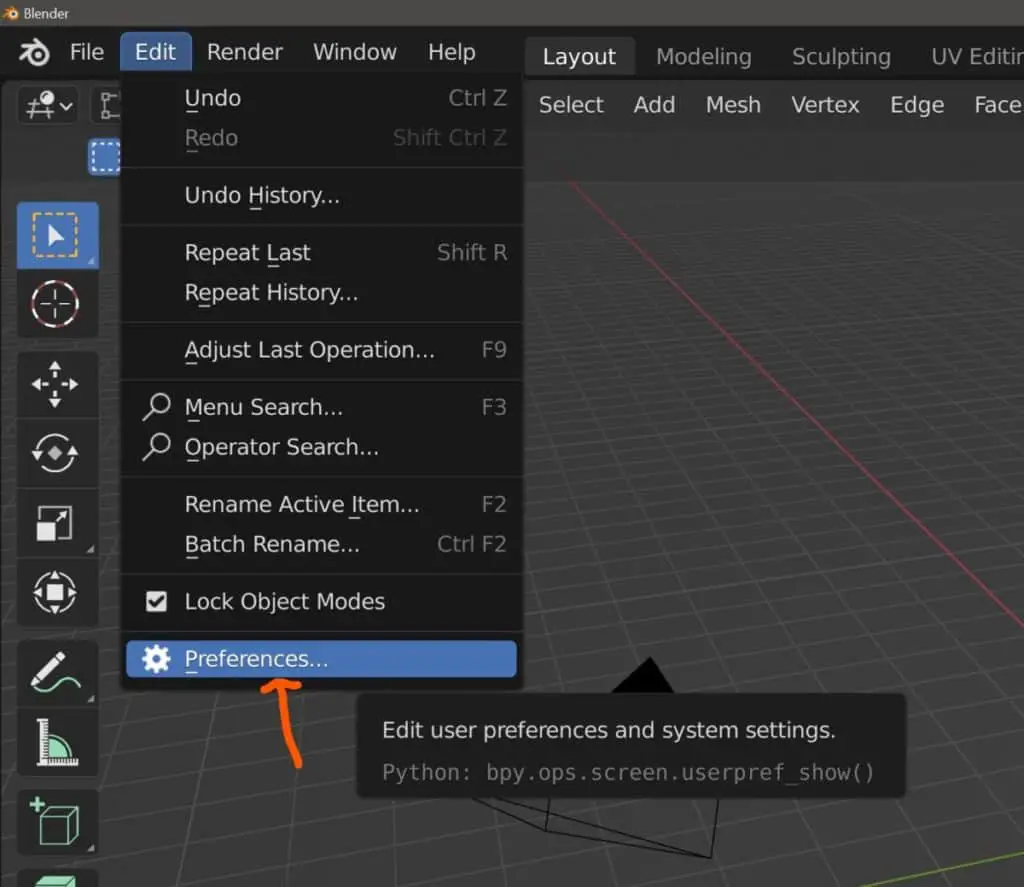
- Go to the edit menu at the top of the blender UI
- Select the bottom option that is labeled as Preferences
- This will open up the preferences panel in a new window
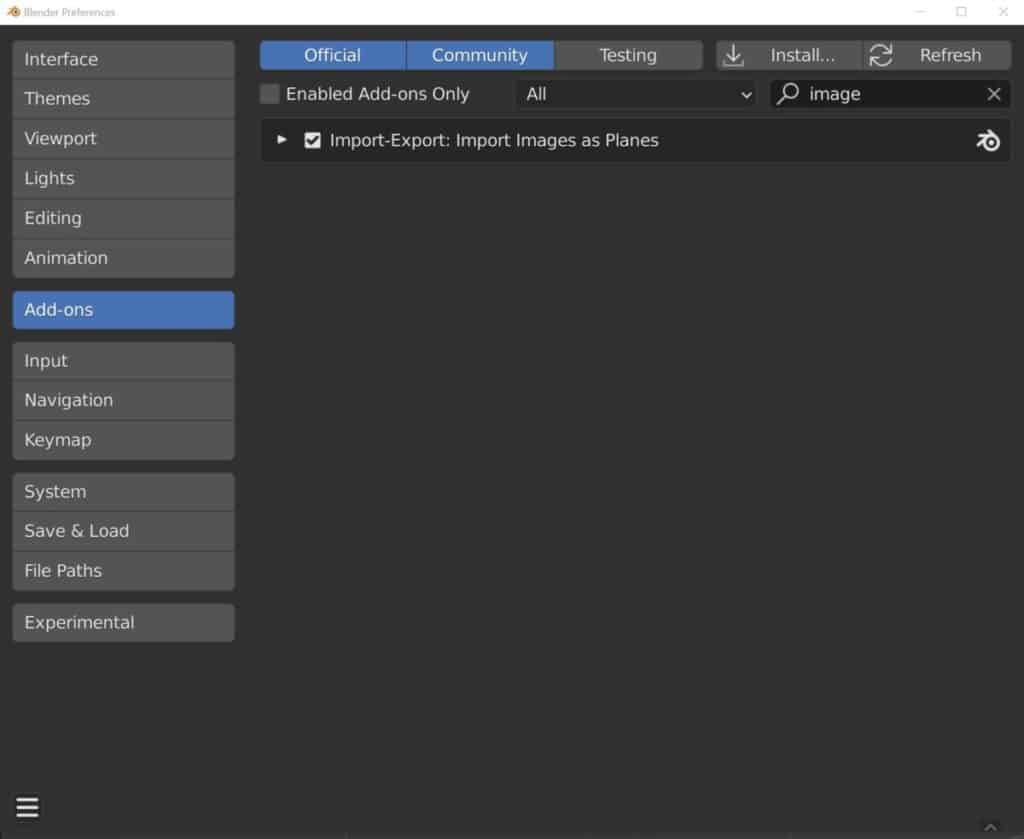
- From the column on the left-hand side, pick the Add-on section
- In the search bar, type in ‘images as’
- Tick the add on and then close the preferences panel
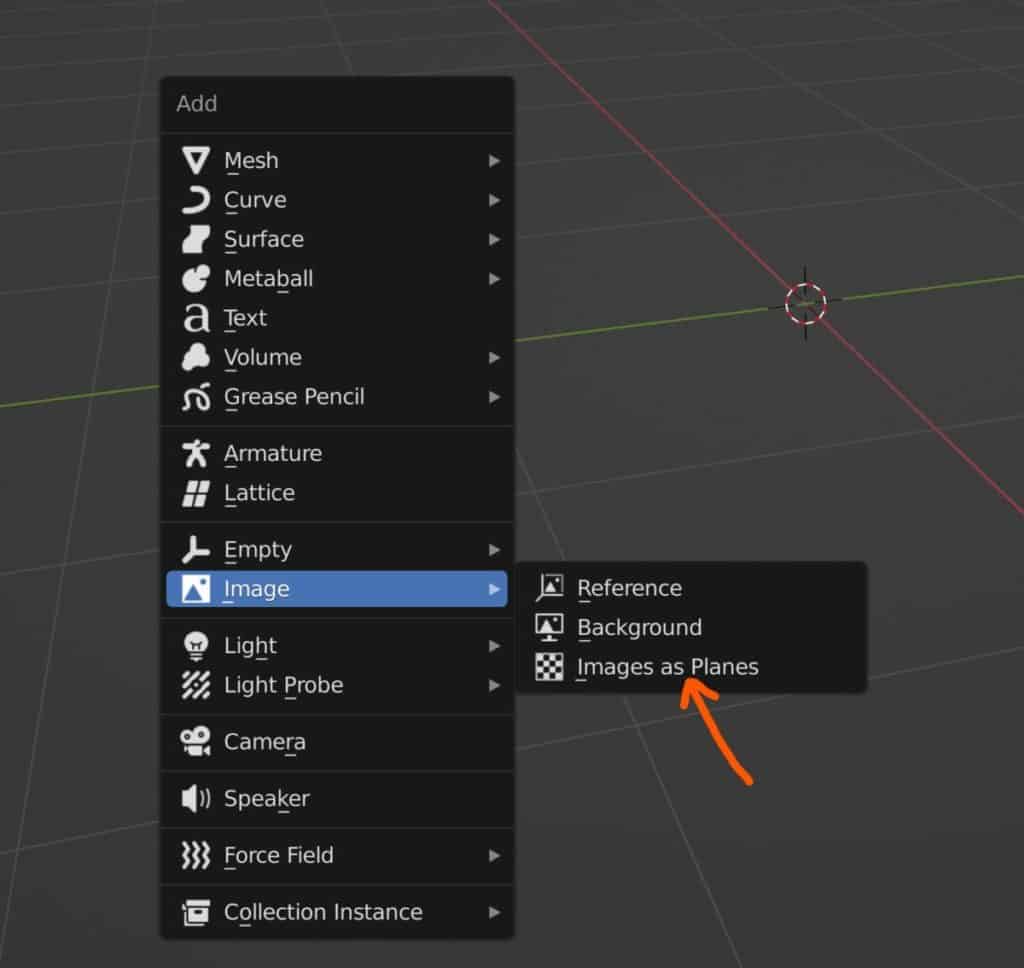
You will now be able to add an image sequence in a similar manner to adding any other object type. If you want to add an image as a plane then press Shift + A to open the add menu.
While geometry is used for the form of the object, you will not find the option under ‘mesh’. Instead, go to where it says images in the menu and you will see three options if the add-on has been imported correctly.
The first is to add a reference image, the second is to add a background image, and the third is to add an image as a plane. Select the third option to open up the file browser.
Next, locate your image sequence in your browser and select all of the images in that sequence. This is easiest when the sequence is the only thing in a folder, as you can select the first frame, and then shift select the last frame to select the entire sequence.
Before you select the import button, take a look at the settings for the import to the side. In recent versions of the add-on, more options have been added allowing for greater control.
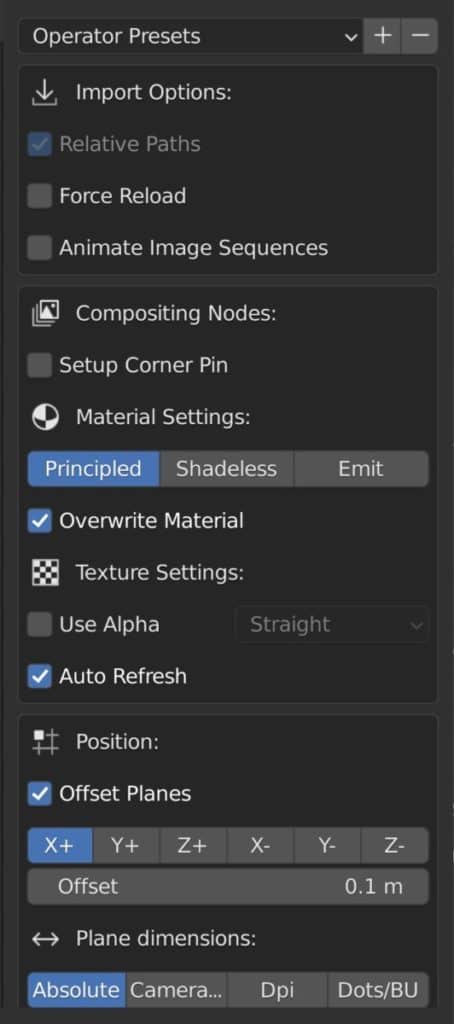
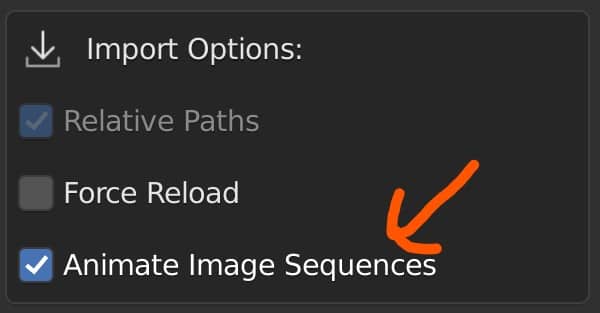
You won’t need to change too many of these, but there are two options that do need to be addressed. In the import options sections, there will be an option labeled ‘Animate Image Sequences’. This box will need to be ticked as if you do not tick the box, then a separate plane will be created for every single image in the sequence.
Another option that you may want to tick depending on if the footage has transparency is the Use Alpha option found in the compositing nodes section. The menu to the side determines how the alpha channel is or is not packed with the RGB channel on import.
The straight option uses the alpha channel as a mask to create transparency on the plane. This is best suited when importing png files.
The premultiplied option is the primary method used by render engines as well as files using the OpenEXR format.
The channel packed option stores different variations of the image in each channel to save memory space. This method is suited if you plan to use the object in a video game engine.
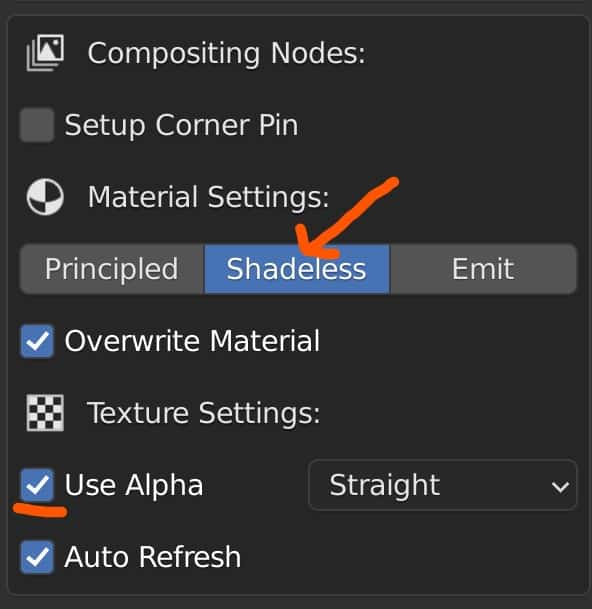
The last option that you may wish to change is the material setting also found in the compositing nodes section. In most cases, your image sequence will be projected from an object like a monitor, phone, or tv.
We recommend NOT to use the principled setup in this case and go with either shadeless or emit. If your scene is a living room you can have the emit option set so that your television generates the lighting.
When you are ready press the big blue button at the bottom to import your entire image sequence as a single plane object.
Why And When You Should Add An Image Sequence As A Plane?
The number of potential scenes and objects that you can create in Blender or in any 3D software is near limitless. There are many real-world objects that behave in a similar manner to that plane that shows your animation, in fact, you are looking at one right now.
You could also potentially use an image sequence to imitate a backdrop, for example, cars driving by in a city, to save both on render time and modeling time.
If there is a situation where you can use stock footage as a part of your scene, then using a plane to project that footage is both the easiest and most effective way to go.
Say you wanted to render a scene of downtown Manhattan, with all of the animated billboards and advertisements dotted around. How much more difficult do you think it would be to create those advertisements without this add on. Initially, you may think that there are not that many use cases for something like this, but you would be surprised with what it allows you to create.
Troubleshooting Steps For If Import Does Not Work Correctly
While the add-on is fairly simple to use, things can always go wrong regardless of the tool used, so below we cover a few of the common issues that you are likely to face when importing your plane.
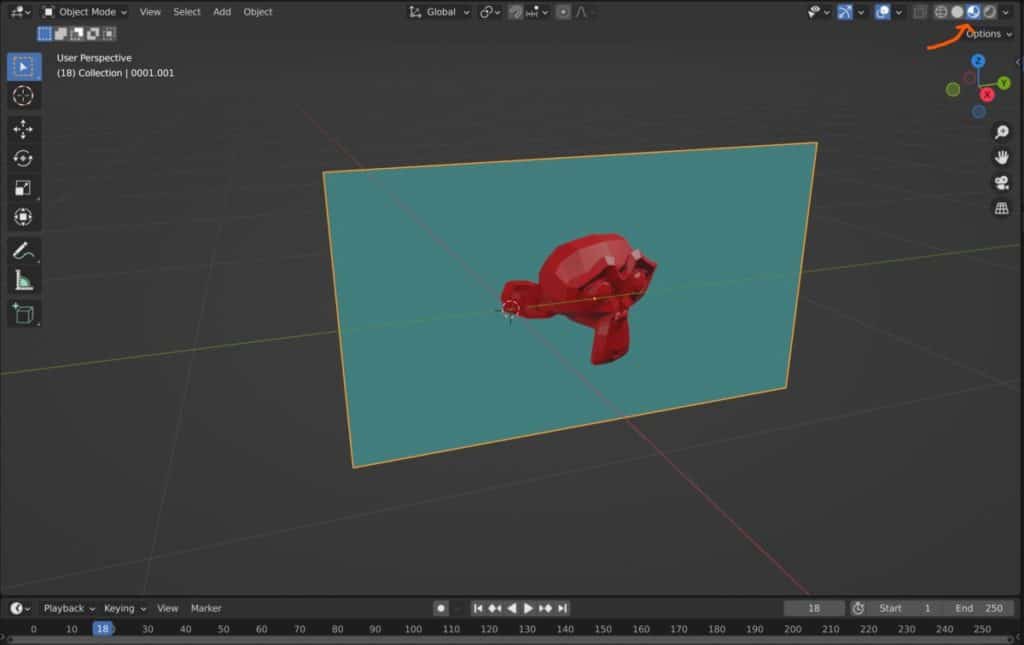
- Cannot see the image sequence on the plane due to wrong viewing method – If you are new to Blender, then you may be confused when you try to play your animation from the timeline and see nothing happen. This is most likely due to the fact that you are still in solid shading. Go to the top corner of the viewport where you have five buttons in a row that all look like circles. Select the second to last option, which is the material preview, to see the materials on your model, and your animated image sequence.
- The add-on created too many planes – This is easy to do if you did not follow the steps above. In the import settings, there is an option to animate your image sequence. Make sure that the box is ticked before you import, as this stores all the frames as a sequence on a single plane, rather than having a plane per each imported frame.
- My object is creating shadows – It is unlikely that you will want your plane itself to be creating any sort of shadow in your scene. If this is the case, then you likely have the material settings in the compositing section set to principled. Change this to either shadeless to elimate shadows, or even to emit to generate light. Monitors do generate their own light so we recommend this option for greater realism.
Can You Import A Movie File Instead Of An Image Sequence?
An image sequence seems to be more complex to import than a simple movie file, so can you just use a movie format such as mp4 instead of a bunch of png images?
The answer is actually yes, you can import a movie file instead of an image sequence using the add-on. Note that the settings are geared towards importing image sequences, however, and so you may run into a couple of issues when importing a movie file.
For example, when we have the option to animate the image sequence ticked in the import settings, Blender will normally crash when we try to play the movie file in the viewport after we have imported it. While it is required to have this option ticked for an image sequence, it is not necessary and even detrimental when importing an mp4.
Thanks For Reading The Article
We appreciate you taking the time to read through this article. Below we have compiled a small list of additional topics that we believe you may be interested in.
- Adding An Image To A Movie In The VSE
- Extruding 3D Text In Blender
- Can I Create A 3D Print Directly From Blender?
- Does Blender Use The GLTF File Formats?
- How To Paint Transparency Onto Your Image Textures?
-
Anatomy Modelling: Blender Muscle Guide
Sculpting anatomically accurate muscles with Blender’s powerful tools.
-
Sculpting Organic Shapes in Blender
Sculpting lifelike organic shapes with advanced techniques in Blender.