There are three stages to material application for any 3D object. The third stage involves the application of a texture to the material to give the object its appearance. One thing that appears in 3D textures though that is not consistent with most real-world counterparts is the appearance of seamed edges.
To repeat a texture without having any seams, you need to use a seamless texture. The pattern though still repeats and can be corrected by introducing techniques such as color variation, where creating an overlay adds the illusion of variation, and adding height displacement to flat surfaces.
Just because you have a large object to texture, does not mean you should use an 8K map to texture it. Often the best approach is to use a 1K or 2K texture, and then repeat the pattern while adding the variation on top.
Always Try To Use A Seamless Image Texture For Larger Models
When applying a texture to a large object, or even an environmental object like a mountain or a grassy field, it is best practice to use a texture that is seamless.
The term seamless refers to a texture that allows for the pattern at both ends of the texture image to connect perfectly without any noticeable seems being visible.
This does not completely eliminate the repetitive look that can occur when repeating a small texture across a large surface, but certainly makes for a better result.
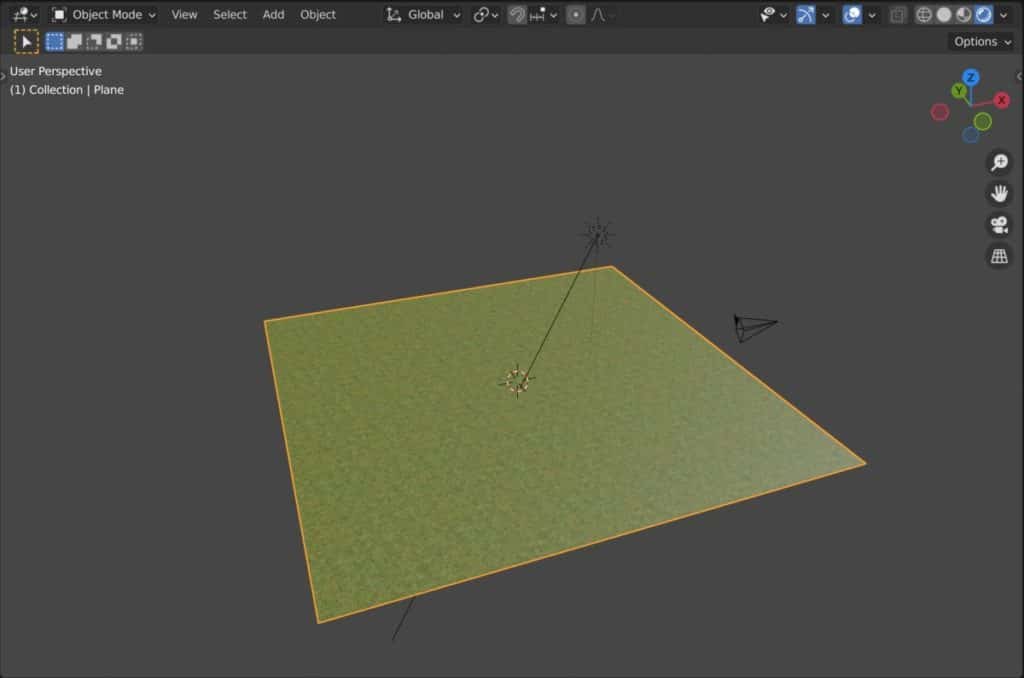
Below is an example of two textures being applied to a surface, the 1st is not a seamless texture but the second one is.
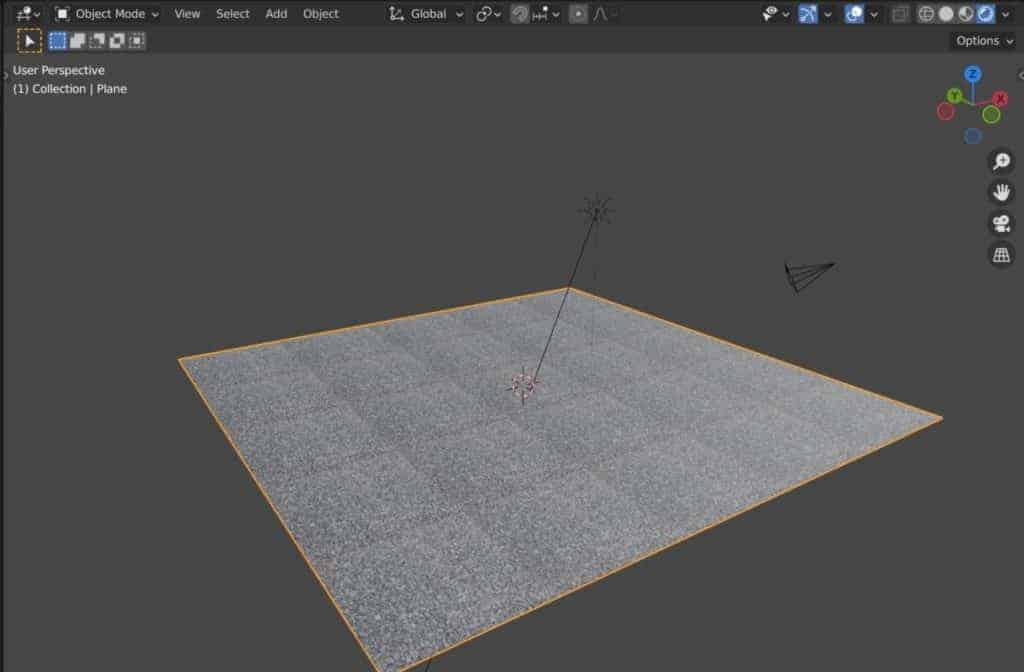
You can see that the second texture looks a bit more natural compared to the 1st, as you cannot see any seams where the texture repeats.
Where To Get Seamless Textures?
The attribute of being seamless is almost a requirement now for textures that are used in 3D projects, particularly for materials that have a randomized appearance. So almost anywhere that you can find textures you will also be able to find seamless textures.
Textures.com is an old but reliable website for locating thousands of image textures of various sizes and resolutions. It is a great choice for locating seamless textures as it will normally label textures as such when you are downloading them, so it’s very easy to find them.
Poliigon is a fantastic alternative where they have an increasing number of textures that have either been photo scanned or digitally constructed using software like substance designer. As such you will find that nearly all of the textures on this website are seamless and easy to use.
Using Color Variation To Disguise Repeated Patterns On A Texture
One technique that can be employed to help mask the effect of the repeated texture is to introduce some color variation. This is surprisingly is to do using the node editor system.
In a standard setup, you will have your image texture plugged into your main shader to display the material on the model.
To create the color variation, you should have as a minimum a color node and a procedural texture node. For example, add a hue/saturation/value node in between the image texture and the main shader to adjust the color of the texture.
Then add a noise texture node and connect the factor output of the noise texture to the factor input of the hue node, as seen in the image below.
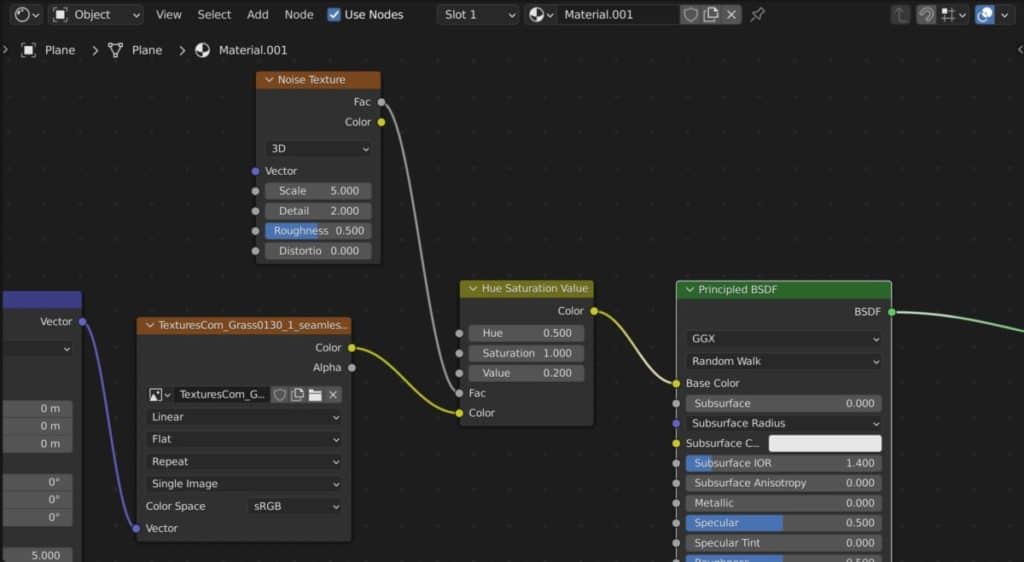
This will use the noise texture as a mask for where and how the color is altered on the texture. you can change the brightness value for example to make patches of the grass darker.
This works well because the mask does not take into account the repeated texture pattern underneath, and so you can create the illusion that the pattern does not exist.

You can even swap out the texture nodes to change the pattern, like in the image below where a Voronoi texture is used and the saturation is decreased to give the effect of frosted grass in the winter.
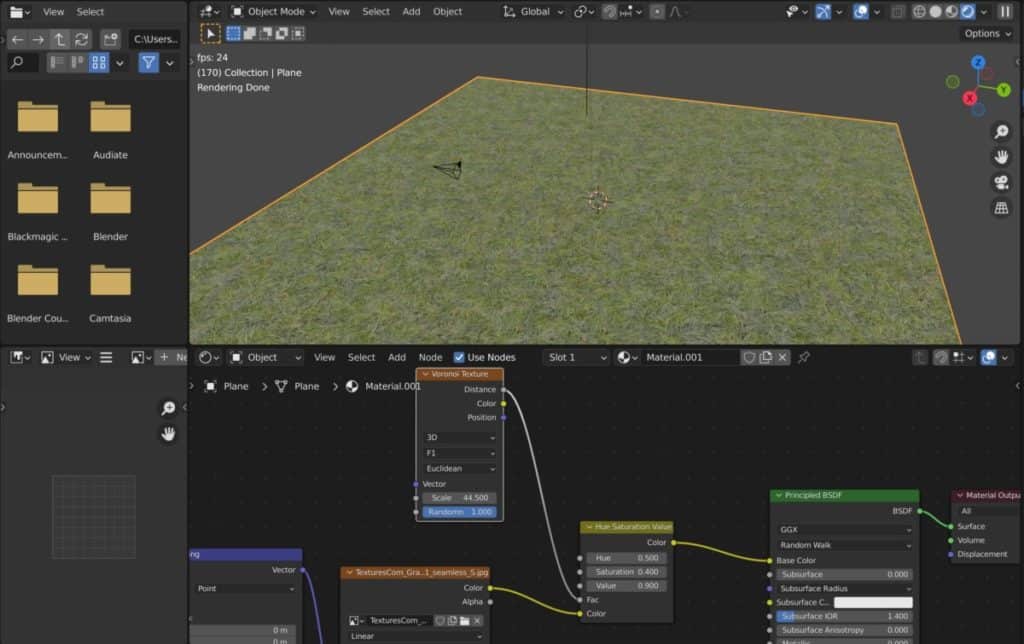
We can even go one step further and change out the color node to something like the brightness/contrast node and plug the voronoi into the contrast input to vary the levels of contrast across the textured surface.
You can add more nodes if you like to improve the complexity of the mask, but the general concept remains the same, add the color variation as an overlay to disguise the repeated patterns underneath.
Combining Your Texture With Other Variations
The whole reason why we have these seams is that all textures are constructed in a grid fashion when scaled. If we use the rotate options in the mapping node then we can rotate the position of the texture but the grid would also be rotated.
A good workaround here is to use the same texture twice and combine the original with a second version of the texture which can then be rotated.
To do this, select the texture coordinate, mapping, and image texture nodes in your setup and then duplicate them. Next, add a mix RGB node and position it before your main shader. Connect the two image textures to the color inputs of this node.
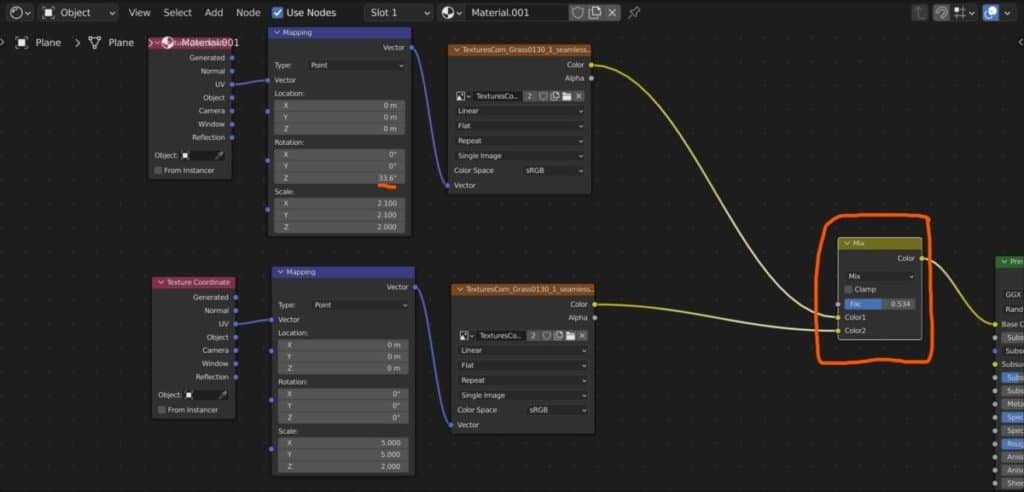
Note that you may think to use the mix shader node, but this is for combining material shaders like plastic and glass, not for combining textures, which is the main purpose of the MixRGB node.
Nothing will have changed in your viewport because both textures are mapped the same, so go to the mapping node of the second texture and change the rotation value on the Z-axis (If applying to a plain object) and watch it change the look of your texture in the viewport.
Adding Height Displacement To Improve The Randomness Of A Texture
This technique uses the data from our material to displace the geometry of the model, creating an uneven surface. This is beneficial as it is much harder for the human eye to discern patterns when the surface itself creates variation.
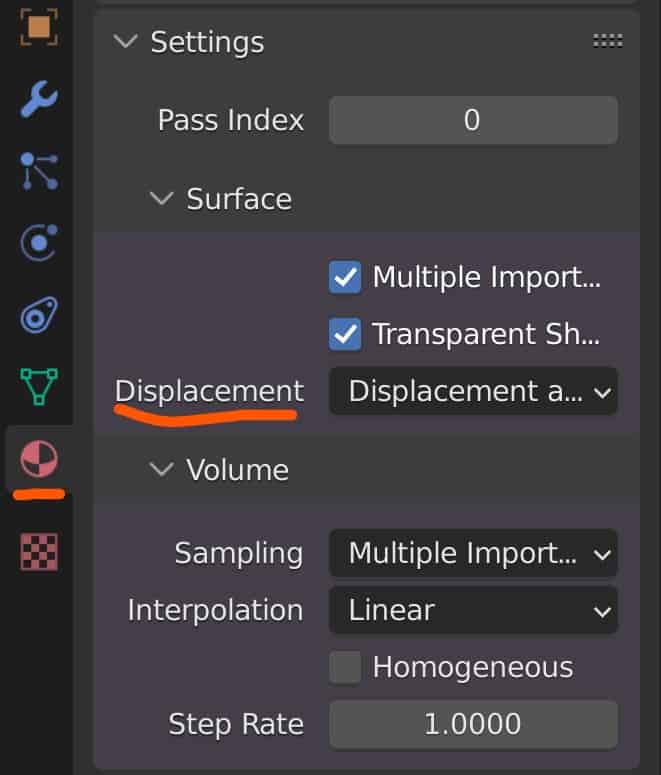
Before making any changes to the material node set up, you may need to tool Blender that you want to use displacement. Go to your material in the material properties tab, and then scroll down to where you have the settings for that material.
Under ‘surface‘, you will have the option to change the displacement, which is currently set to bump only. Select the menu and change this to use both bump and displacement.
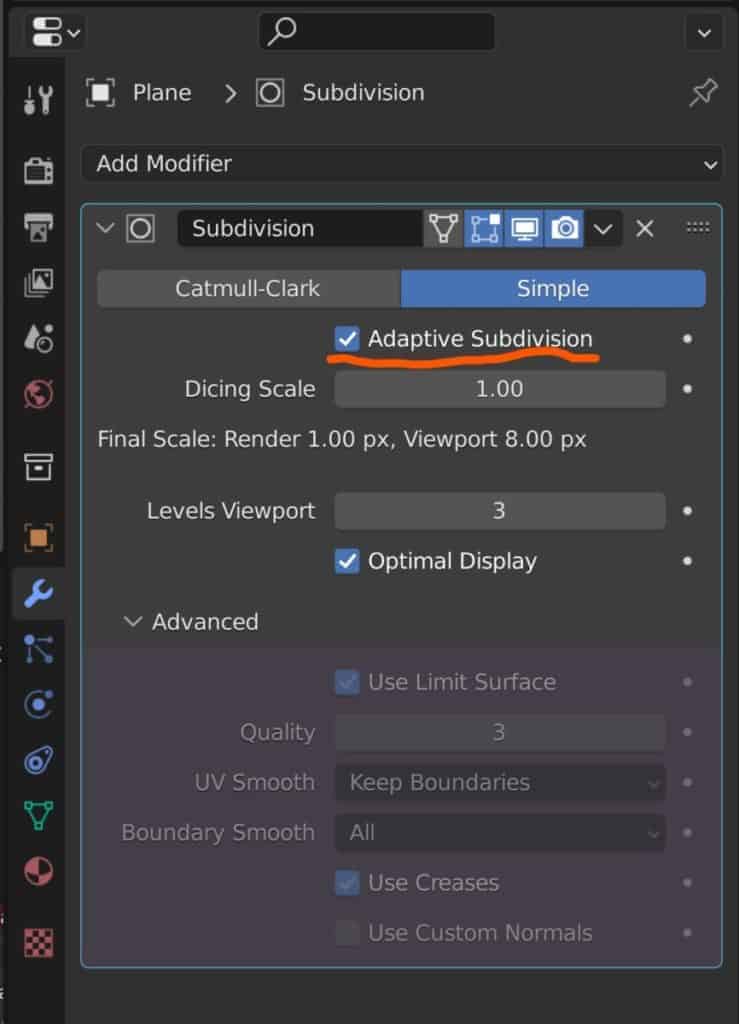
You might think that we are now able to create the displacement for the model, but actually, we need to ensure that the object has enough geometry for it to work.
Add a subdivision surface modifier to the object itself. You may need to use a high value, such as 5 or 6, to get the level of detail that will be required.
Alternatively, go to the render properties tab and set the feature set to experimental, then go make to the modifier and check the box for adaptive subdivision, which increases the detail based on camera positioning.
Now your model will have the required detail for this to work, so return to the material in the node editor. For the material output node, there will be an option to add displacement.
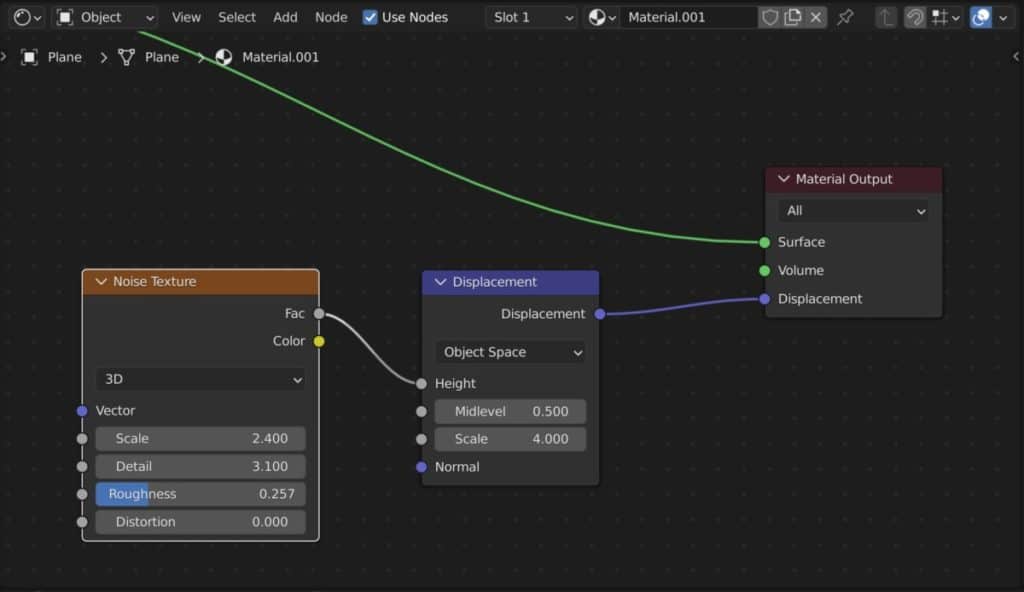
First, add a displacement node and connect it to the displacement input of the material output. Then add a texture node like a noise texture to create the pattern for the displacement. You may need to adjust the scale on the displacement needed to get the desired effect.

Like with the color method, you can try using different approaches to improve your levels of detail with displacement. Experiment with different nodes and try connecting to other areas of the material to improve your displacement.
Thank You For Reading Through The Article
We appreciate you taking the time to read through the article and we hope that you found the information that you were looking for. We have compiled a list of additional articles that may be of interest to you:
- Getting Rid Of Dark Spots On Our Texture
- Why Does Blender Crash While 3D Modeling?
- What Does Sheen Mean When Working With Materials?
- Using The Clearcoat Attribute To Our Materials
- Overlay A Decal Onto A Model
-
Anatomy Modelling: Blender Muscle Guide
Sculpting anatomically accurate muscles with Blender’s powerful tools.
-
Sculpting Organic Shapes in Blender
Sculpting lifelike organic shapes with advanced techniques in Blender.