We create 3D models for various purposes, from asset creation for video games to 3D printing. Whenever we design 3D models for use outside of Blender we need to ensure that the topology is suitable for the task. Therefore on some models, we need to think about doing some retopology.
The fastest method for retopology is to use the Quad Remesh Add On. The best method for retopologising in Blender without the use of add-ons is to create a low poly version or a model using the high poly version as a guide, and then bake the details onto the low poly version. We can also use modifiers such as the mirror, decimate, and multi-resolution modifiers to help with retopology.
Retopology is an important skill that many artists should attempt to learn but normal methods can be time-consuming. Let us take a look at the process of retopology and how we can complete the process as fast and as effectively as possible.
What Is The Process Of Retopology
Before we can understand how to retopologise a model, we first need to be aware of what topology actually is. When we talk about topology we are referring to how the geometry flows on our model. Where do loops exist where you can select rings and paths from the faces on the geometry? Where are there poles that end these paths using triangles and ngons? How does the geometry affect the look of the model, its smoothness, and its ability to rig for animation?
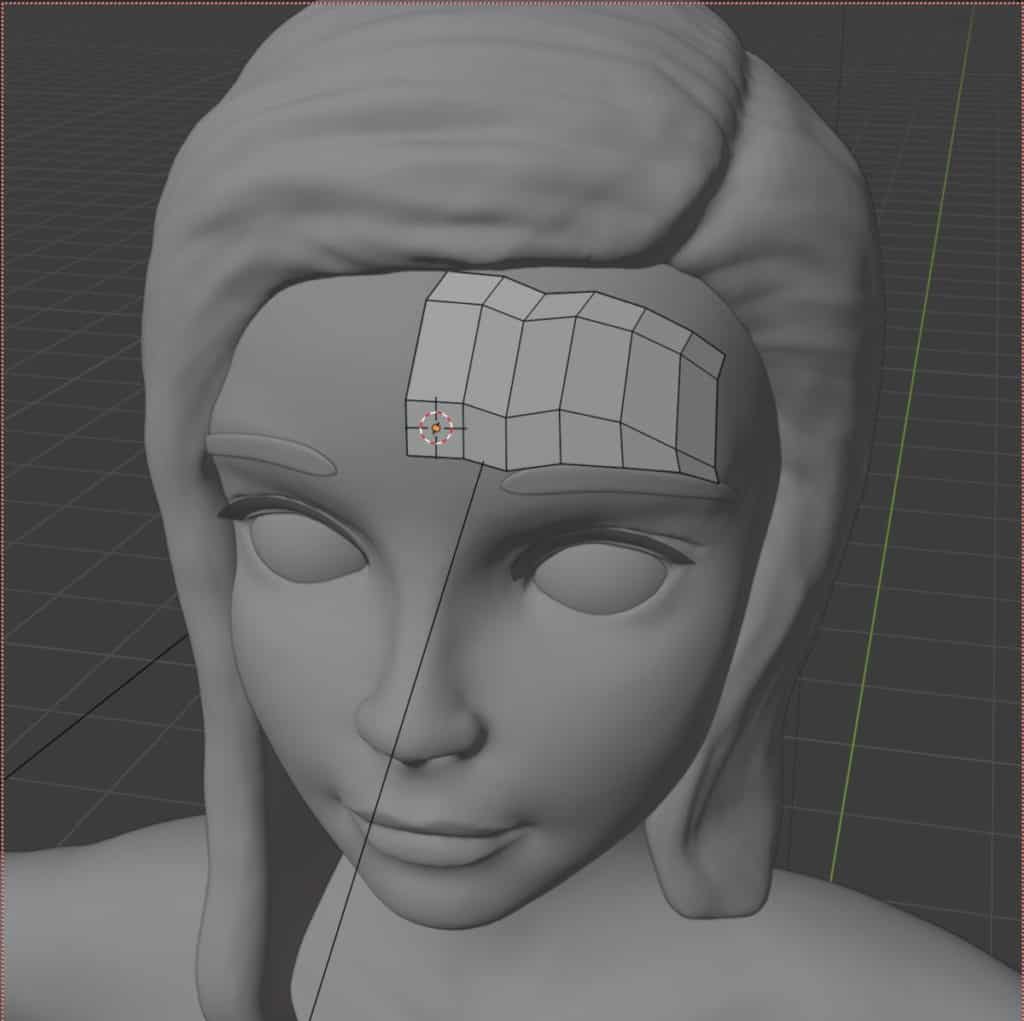
The process of retopology is where the object has already been created, and we now go over our model with our mouse cursor and reconstruct the topology wherever we deem necessary. There are a few ways that we can retopologise our work but the general idea is to make our object suitable for its main purpose.

For example, with game design, the topology needs to be clean and simple for texturing and use in the game engine. For animation, the topology needs to flow in a way that allows for the motions required for that specific model, such as how the eyes and mouth interact on a human face.
The Traditional Method Of Retopologizing Your Geometry
So how do we normally go about retopologising a 3D model? Well, that depends on what the object needs to be used for. The most common reason as to why you would want to retopologise a model is to prep it for use in an external application such as Blender.
The idea is to get the best of two worlds. You want as much detail on your 3D model as you possibly can, while at the same time having a structure that minimizes any potential issues further down the line. The most efficient way to do this is to combine retopology with baking.
The process of baking involves copying data from one object over to another, and this can be different kinds of data, from normal data to texturing to ambient occlusion from light sources.
This means that we need to create a new object that is much lower poly than the original but maintains as much of the original shape as possible. You can go about this in any number of ways.
The fast way is to duplicate the original mesh, have both objects in the same location, hide the original from view so that it does not distract, and use a decimate modifier to lower the geometry count of the new model.
Then you would select the high poly version, then select the low poly version, go to the render tab in the properties panel and scroll down to where it says bake, and finally bake the objects detail onto the low poly version.
Alternatively, you could go the slower but more controlled route of using plane snapping to build your low poly model using a plane and basic tools like extrude, while using the high poly model as the canvas to build on. Then when finished bake as before.
Which Tools Do You Need To Learn To Successfully Retopologise Your Model?
If you choose not to go the route of using addons to retologize your 3D models, then you will need to manually do it using the tools available to you. So what are the tools that will allow you to retopologize your models effectively?
- The snapping tool is important if you are going the route of creating a separate model for the low poly version of your objects. With the snapping tool you can work along any surface and every time that you extrude or reposition geometry you can use snapping to lay that geometry on top of the original model.
- The extrude tool is used in conjunction with the vertex slide tool if you are using the canvas approach of using the original object as the base for your new one. This approach involves starting with a single plane and then extruding across the object while using vertex slide to correctly position the vertices and to get good topology.
- The mirror modifier is a great tool for retopologizing any 3D model that has at least one line of symmetry. This is normally on the X or Y axis depending on the initial orientation of the model. By using the mirror modifier we can edit one side of the mesh and have Blender opy the changes over to the other side, halving the workload.
- The shrinkwrap modifier is another way of being able to stick the geometry of your new low poly object on top of the original. It works really well with the canvas method but keep in mind that not all the geometry may be visible above the surface of the base. In these cases go to the shrinkwrap modifier and increase the offset value to push the geometry just above the surface while modeling.
- The decimate modifier allows the user to dramatically reduce the geometry density of the object using three methods. All of these methods however will have a negative impact on the topology and this tool is not best suited to animated objects. It is best served to replace a high poly model as the canvas for a low poly object, to help with viewport performance, as you can reduce the geometry count without losing important details.
- The multiresolution modifier is more used to control the detail levels for sculpting and while not the best choice for retopology does allow you to quickly create higher and lower poly versions of your models for various tasks.
The Best Add On For Retopology At Speed
If you decide to look for an easier, faster solution to fixing your object’s topology then you can try downloading some external and add ons that will hopefully improve your workflow.
The title is all about how we can create a usable mesh with the right amount of detail and geometry density, and there are numerous add ons that can help us achieve this to various degrees, but when it comes to speed without major sacrifice, then our recommendation is the Quad Remesher add on by Maxime at exoside.com.
This plugin is not exclusive to Blender and there are versions for Adobe fusion, Houdini, and Maya among others. In the case of Blender you can use the add on from the side panel in the 3D viewport and have access to a host of tools to help you recreate your geometry.
The REMESH button at the top is the one-stop button that fulfills the process depending on the options selected below. Of these options, the most useful is the adaptive size slider, which allows the remesh to defer from the assigned max poly count so that you do not lose detail in the model.
This is not the best add-on for getting the best topology on your model, that title belongs to Retopoflow. But Quadremesh will get you 90% on the way there in a matter of seconds and is a fantastic tool to have in animation, game design, and 3D printing.
Be warned however that this is a paid add-on, and that it will typically set you back around $60 if you want to purchase it for your own use.
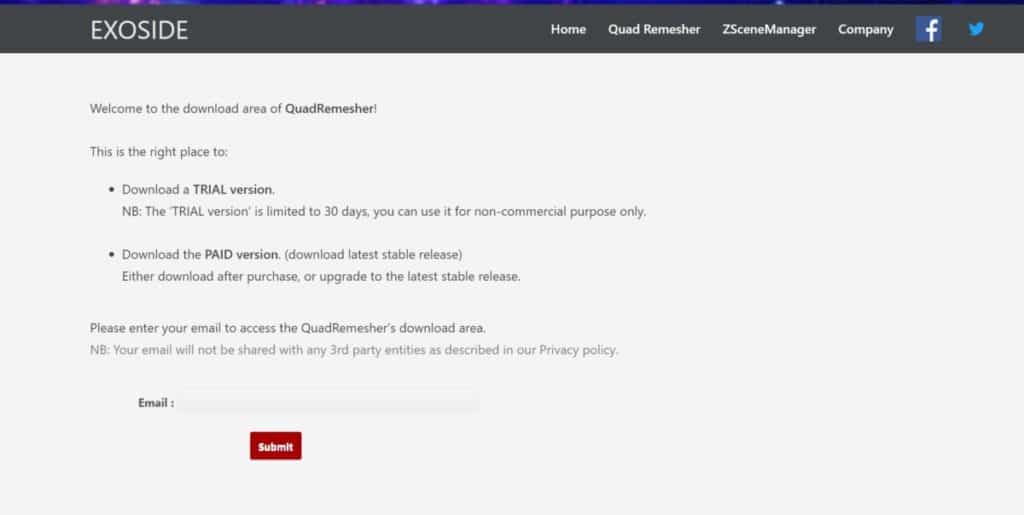
You can also download a trial version of the addon, which will last for about 30 days. Either way, you will need to create an account on the Exoside website to download.
Thanks For Reading The Article
We appreciate you taking the time to read through our article on the fastest method for good retopology. We have gathered a list of additional topics that may be of interest to you.
- Troubleshooting Problems With The Subdivision Surface Modifier
- Unsubdividing A Model To Reduce Its Geometry
- Why Does The Boolean Modifier Not Fill In The Holes It Creates?
- Extruding 3D Text In Blender
- Where Does Blender Get All Of Its Money From?
-
Animation Ready Hard Surfaces in Blender
Preparing hard surfaces for animation with optimized topology in Blender.
-
Symmetry for Hard Surfaces in Blender
Ensuring symmetrical perfection in hard surface models with Blender.
-
Detail with Shrinkwrap: Blender Modelling
Achieving intricate detailing with Blender’s Shrinkwrap modifier.