While there are no shortcuts to becoming a great artist, there are certain shortcuts in Blender to your favorite tools. As you continue to learn 3D modeling you will begin to realize that Blender likes to offer you multiple ways to use the same tool. This is not an oversight, but intentional so that you can develop your own workflow when modeling, animating, etc. Normally, the fastest way to use a tool is through its assigned blender shortcut or hotkey.
The best way to view what hotkeys are available is to go to Edit > Preferences > Keymap, where you can see every single hotkey that has been assigned to most of the tools available in the software. The hierarchy system allows you to view the hotkeys that you need, such as for the 3D viewport. You can also search for a hotkey based on the tool you want to use with the help of the search bar at the top.
There are more Blender shortcuts than you are likely able to count, seriously don’t count them unless you are REALLY bored. But do you need to learn all of the hotkeys in Blender and how important is it for an artist to use these Blender shortcuts?
Do I Need To Learn All Of The Blender Shortcuts?
You do not need to learn every single hotkey that there is to know in Blender, much like you don’t need to know every tool in Blender. Your focus should be on learning the tools that you will use on a regular basis, and the shortcuts that go with them.
The main reason why it is a good idea to learn Blender shortcuts in the first place is that using them can speed up your workflow. Accessing a tool via a hotkey will always be a couple of seconds faster than locating it in the menus.
Learning a new blender shortcut is only applicable to you if you are already using that tool in your projects, or if the tool is otherwise difficult to access, which is not that often.
So how can I learn the right shortcuts for me?
There are two methods that you can use to find the keyboard shortcuts that you need to learn for your projects. The first method is to go to the hotkey library, where all of the assigned keymaps and relevant information is stored.
You can reach this by going to the edit menu at the top of the Blender UI, then accessing the preferences panel. Here you have subsections listed to the side and the one that you want will be listed as keymap.
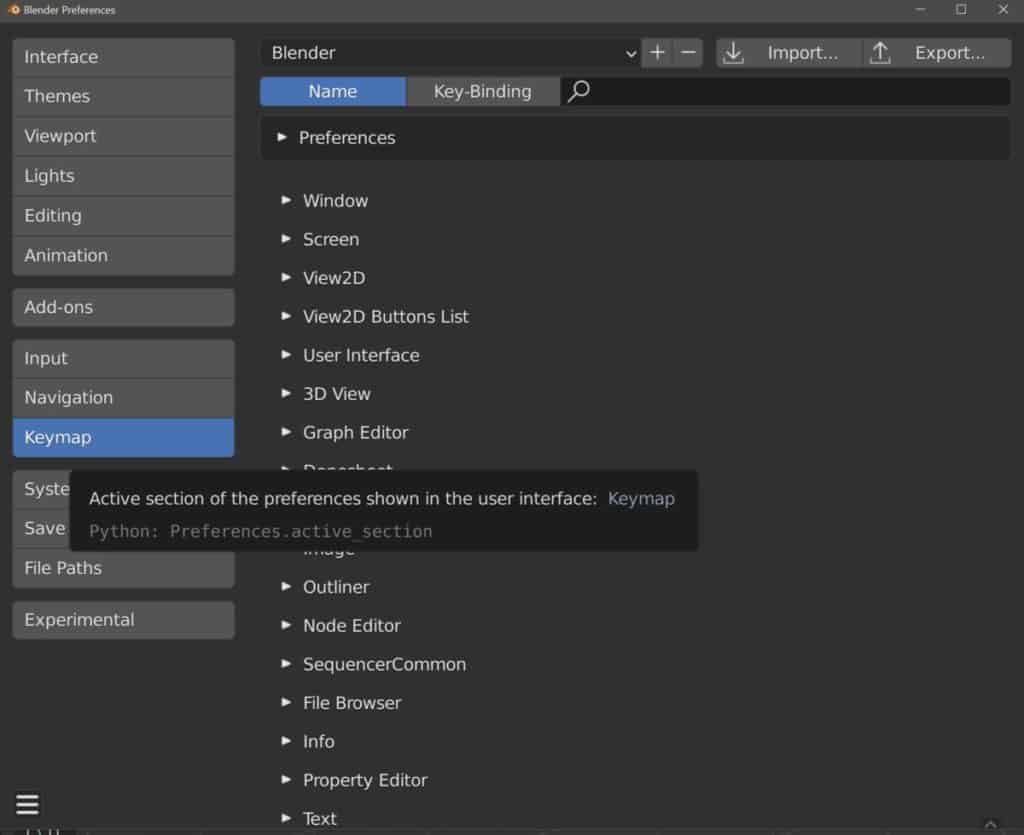
The keymap library is divided up into the different editors used in Blender, from the 3D viewport to the outliner. So if most of your work is done in the 3D viewport and revolves around modeling, then you won’t need to like the shortcuts for the NLA editor.
There are so many Blender shortcuts however that it can be a bit overwhelming trying to find the exact hotkey that you are looking for, so instead you can use the search bar at the top corner. By typing in the tool that you want the shortcut for you can reduce the list so that it becomes much easier to find your hotkey.
It is not always necessary to go to your keymap library to locate the shortcuts. If you already know where to find the tool that you want to use in the menus, then you will likely have already seen its associated hotkey.
For example, let’s say you want to find the shortcut for the duplicate tool in edit mode. The tool itself is found in the ‘mesh’ menu, and if you go to that menu you will find that the assigned hotkey, ‘Shift + D’ is written to the side in greyed-out text.
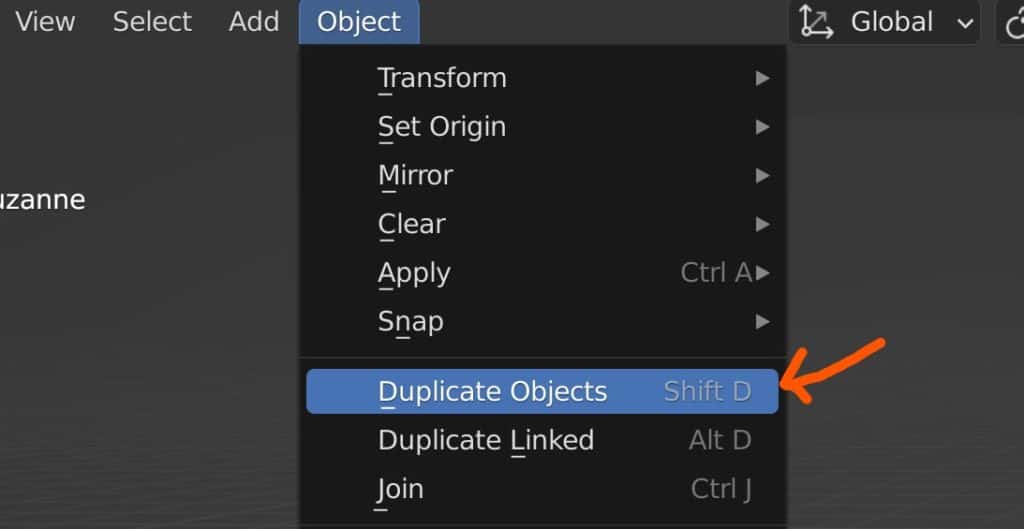
This is useful for two reasons. One, you can easily find the hotkey that is associated with the tool. Two, you can see from these menus whether or not a tool even has a hotkey assigned to it.
Using Shift, Control, And Alt
There are a lot of tools and Blender and therefore a lot of potential combinations for shortcuts. Some hotkeys require a single button press, such as using the E key to extrude in edit mode. Other shortcuts require the use of secondary keys, like the Shift, Control, and Alt keys.
Note that this is for the windows configuration, and if you are using a Mac control is replaced by Command, and alt is replaced by Option.
A secondary key is pressed first when using a shortcut (Counterintuitive I Know) and should be held down as you press the primary key.
For example, if you just press E in edit mode you get the extrude tool, however, if you hold down control and then press E you will get the edge menu instead.
What if the tool I want to use does not have a Blender shortcut?
There will be some tools that do not have a hotkey or Blender shortcut directly assigned to them. However, there may be a hotkey that has been assigned to the menu that they are found in. This is not as quick as using a shortcut for the tool itself but is slightly faster than searching for the same menu in the interface.
For example, you want to unsubdivide a mesh to lower the geometry density of a model. This tool does not have an assigned shortcut but the edge menu that it can be found in does. By using the shortcut Control + E you can bring up the edge menu anywhere in the viewport. This seems almost inconsequential given how little time it saves but saving seconds of your work time are the whole point of using shortcuts in the first place.
Adding a tool to your quick favorites
Another method of reaching your tools faster is to assign them to your quick favorites. This is a custom menu that stores the tools that you like to use the most. Accessing the quick favorites menu requires the use of the Q key.
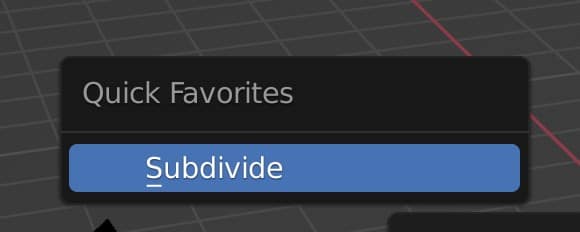
Accessing the menu initially you will find that the menu is empty, as you will need to add the tools in yourself. This is very simple to do though.
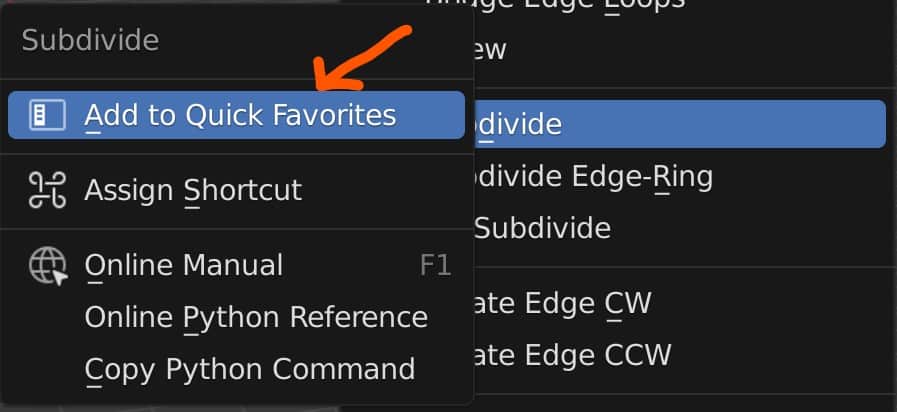
To add a tool to your quick favorites, locate the tool in the appropriate menu and hit the right mouse button to open up its context menu.
Your first option will be to add the tool to your quick favorites. When you do it will become visible in the quick favorites menu.
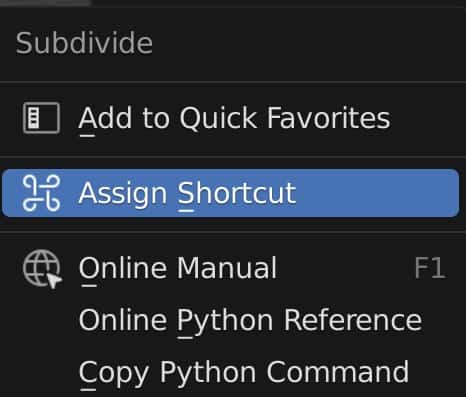
Assigning a shortcut to a tool
There are two methods for adding a Blender shortcut to a tool. The first method requires you to go to the keymap library and add a new hotkey there by going into the hierarchy, locating where in Blender you want to add the hotkey (such as edit mode), clicking the add new button at the bottom, and then filling in the data for the tool that the hotkey is for and the actual shortcut to be used.
That all sounds a bit complicated, and it is. So instead let’s use the second method, which adds a shortcut using the context menu. Much like the quick favorites trick, we need to locate the tool that we want to assign a shortcut for.
When we find it, we can use the right mouse button to open the context menu and then select the second option to assign a shortcut. Here, add the shortcut that you want to use for that tool. In the example of the unsubdivide tool, we use the shortcut Alt + U.
Make sure to test the new shortcut on your model after it has been assigned.
What are the shortcuts that I need to know?
There are 100’s of shortcuts in Blender and the large majority of those you may never use depending on what you are using Blender for. So Below we have gathered a sample list of the hotkeys that you will NEED to learn to become good at 3D modeling. We have divided them up into smaller sections so that it is easy for you to read.
Navigation
Tool Hotkey
Orbiting MMB (Middle Mouse)
Panning Shift + MMB
Zooming Control + MMB
2D Views Numpad 2, 4, 6, 8
Perspective/Orthographic View Numpad 5
Camera View Numpad 0
Local View Numpad /
Focus On Selection Period
Select Object LMB (Left Mouse)
Context Menu RMB (Right Mouse)
Rendering
Tool Hotkey
Render Image F12
Render Animation Control + F12
View Rendered Image F11
View Rendered Animation Control + F11
Manipulating Objects In Object Mode
Tool Hotkey
Grab G
Rotate R
Scale S
Delete X
Add Object Shift + A
Apply Transforms Control + A
Duplicate Shift + D
Join Objects Control + J
Subdivision Surface Modifier Control + 1, 2, 3, 4, 5, 6
Editing Mesh Objects
Tool Hotkey
Select All A
Box Select B
Circle Select C
Extrude E
Bevel Control + B
Loop Cut Control + R
Inset I
Grab G
Rotate R
Scale S
Thanks For Reading The Article
We appreciate you taking the time to read through this article. We have compiled the following list of additional queries that you may be interested in reading about.
- How Do I Assign A Blender Shortcut To A Tool?
- What Is The Best 3D Print Plugin For Blender?
- Can I Create A 3D Print Directly From Blender?
- What Is The Definition Of An Overhang Face For 3D Printing?
- Streamline Your Node Setups With Reroute Nodes
-
Expressions with Shape Keys in Blender
Creating expressive characters with Blender’s Shape Keys.
-
Stylized vs Realistic: Blender Techniques
Comparing stylized versus realistic sculpting techniques in Blender.
-
Detailing with Multires in Blender
Utilizing Blender’s Multiresolution for detailed sculpting and texturing.