If you are a beginner in the process that is 3D printing then you may not be aware of some of the terminology used when designing 3D printable models. Unlike in animation, there are certain parameters that artists need to work within to avoid issues that may occur during the printing process as a result of bad design.
One thing to avoid that is common in modeling is a zero face. This is a face that does not take up any area of the model at all. For example, when you have two or more vertices or edges overlapping each other it creates a zero face. These faces make it difficult for 3D printers to accurately follow the geometry of the mesh since all faces require an area greater than 0 to be formed. Faces that are smaller than a certain threshold, such as a 0.01mm face, can also be classified as a zero face for 3D printing, as it is too small in size to accurately create.
Zero faces are common in 3D modeling and are very easy to miss, so what methods are best used to identify them and how do we get rid of these zero faces?
What Is The Definition Of A Zero Face Or Zero Edge In Blender?
A zero face refers to a face that falls below a defined threshold in terms of its size. In the case of 3D printing, the printing can only create detail within a certain range. Some for example require parts of the model to be no smaller than 2mm.
If a face, or a selection of faces, is too small for the printer to read then it will not be able to print that area of the mesh correctly.
Zero faces are very difficult to spot by the naked eye even in Blender unless you are able to zoom in enough to see them. Zero edges are similar, except they are edges instead of faces. Again if it is too small, an edge will not be read by your printer’s software or will be too small to print correctly.
How Can We Identify A Zero Face On A 3D Printable Model?
Identifying a zero face first requires you to define what a zero face is to Blender, as this is a user-defined value. the best way to moth create this value and use it to find your zero faces is to use the 3D print toolbox. This is an addon that allows you to identify problems with your mesh objects before sending them off to be 3D printed.
To enable the 3D print toolbox, you will need to go to Edit > Preferences > Add-ons and then type in 3D print into the search bar in the top corner. Tick the checkbox for the 3D print toolbox to enable it and then close the window for the preferences panel.
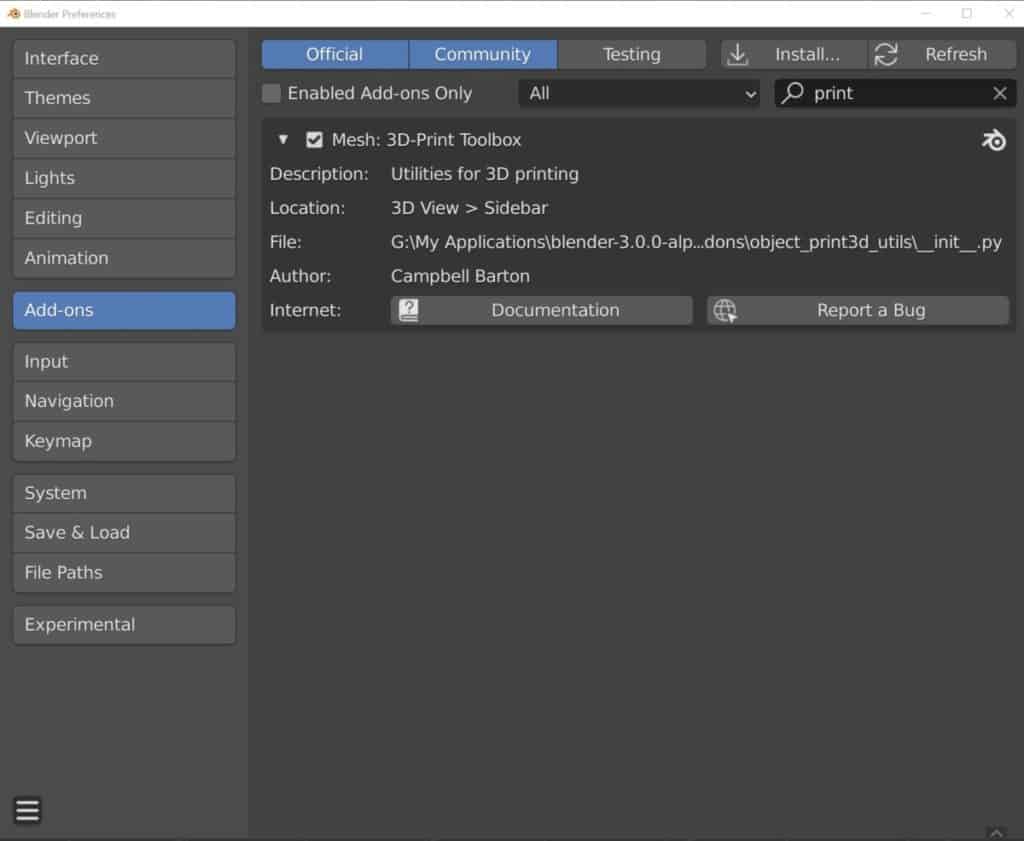
The 3D print toolbox is located in the side panel of the 3D viewport. If it is not already visible press the N key to open up the side panel and then select the 3D-Print tab.
This will allow you to check for any geometry that may negatively affect your 3D prints. you can do this by selecting the object that you want to check and then selecting the check all button. This will open up a list of the following issues that the add on searches for, and the number of faces that fall into each category:
- Non Manifold Edge
- Bad Contiguous Edge
- Intersect Face
- Zero Face
- Zero Edge
- Thin Face
- Sharp Edge
- Overhang Face
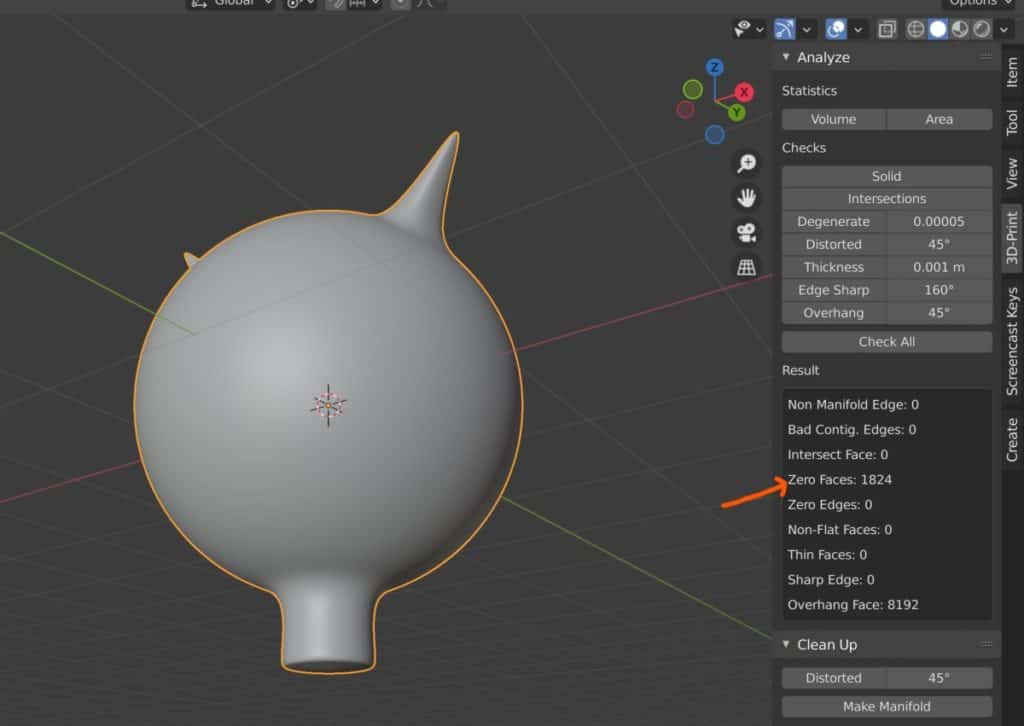
You will want as many of these as possible to read as a value of 0, although you may not be able to avoid having overhanging faces because of how Blender defines them, these are the least important. Our concern right now is identifying zero faces.
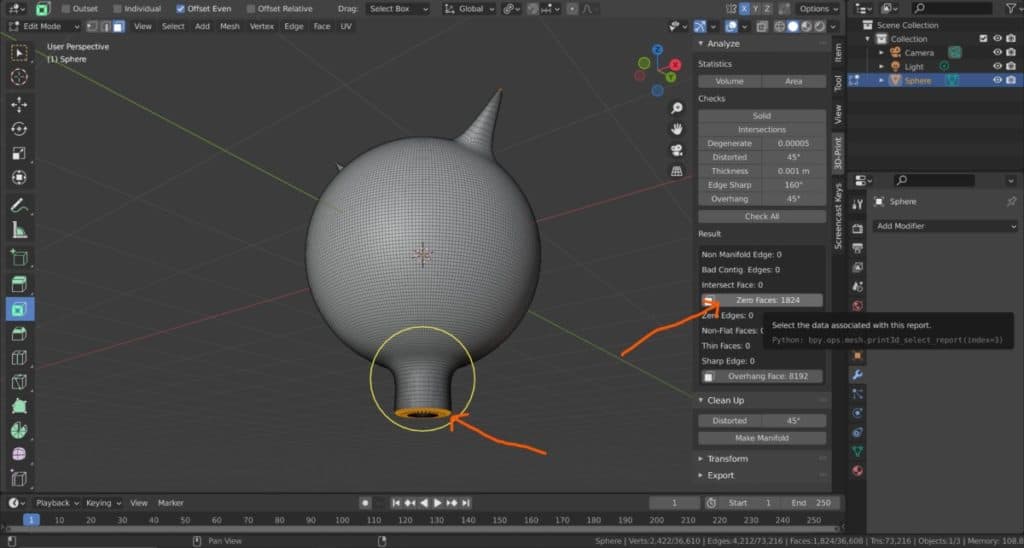
To highlight which of your faces are zero faces, press the tab key to go into edit mode for your selected object. Any categories in the toolbox that have a value other than 0 will become selectable buttons. By selecting zero faces, any geometry that falls under this category will be selected.
What Methods Can We Use To Fix Zero Faces On Our Model?
When you transition into edit mode you are able to select all of the zero faces on the model, which helps to identify them.
Looking at the print toolbox options you may think to use the clean-up tools to fix the issues, but this does not affect zero faces unless they are also nonmanifold. An example of this is where the vertices of the face are in the same location, which creates doubles.
You can also remove doubles by using the merge by distance tool, which is accessed by pressing Alt + M to open up the merge menu.
If we go back to the print toolbox, you will see that there are some parameters that we can control. You when of these parameters is to find degenerate geometry, which zero faces and edges are classified as.
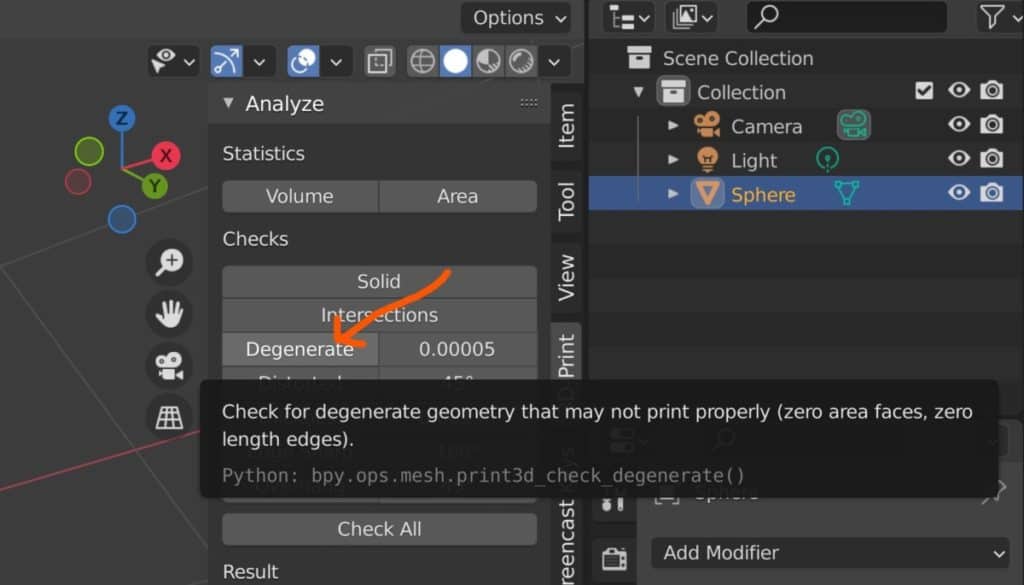
By adjusting this value we can tell Blender how small a face needs to be considered a zero face. You will always want to keep this value very low, based on the minimum size that your printer is able to work with.
Are There Any Other Issues That We Need To Identify Before We Can Send A Model Off To Be 3D Printed?
In addition to having to deal with zero faces and edges, there are other issues that can occur when modeling that will affect your 3D prints. Many of these are identified using the print toolbox addon and are listed in the section above. On top of these, it is important to make sure that the topology of your model has a good flow, which is a common practice, and that all of your vertex normals are facing the correct way.
Another thing to consider is the size of the model that you are working with. Your 3D printer will only be able to create objects up to a certain size, and will only be able to add finer details to a certain point for smaller parts.
When 3D printing, the volume of the model is an important value to consider, as this directly relates to the amount of material that is going to be used to create it.
This is why the 3D print toolbox allows you to check both the volume and area of a selected object. Knowing the volume of your model allows you more control over how you can scale your models to the appropriate sizing for your project. It is also useful if you are creating multiple products to distribute as a pack since that will often need to be of a certain size.
Thanks For Reading Our Article
We appreciate you taking the time to read through our article. Below we have gathered a small list of additional topics that we think you may be interested in.
- Is Blender Taking Over As The Software Of Choice?
- What Is An Overhang Face In 3D Printing?
- Can I Create A 3D Print Directly From Blender?
- How To Use The 3D Print Toolbox Addon?
- Is Blender The Only Free Software Out There?
-
Symmetry for Hard Surfaces in Blender
Ensuring symmetrical perfection in hard surface models with Blender.
-
Detail with Shrinkwrap: Blender Modelling
Achieving intricate detailing with Blender’s Shrinkwrap modifier.
-
Edge Loops for Hard Surfaces in Blender
Utilizing edge loops for defining crisp hard surface details in Blender.