When modeling 3D objects and scenes you will find many tools available to you, all in different places and menus across the Blender interface. Each of these has a specific purpose and for some, it is easy to know that purpose just by reading the name of the tool. But other tools, like the mark crease option, may require a bit more research into knowing what they are used for and how.
The mark crease tool is a 0 to 1 slider that can be assigned to the individual edges of your model, or a group of edges. The crease values are primarily used to control the shape of the model and restrict certain tools from deforming the model, such as the subdivision surface modifier.
As the term crease suggests, the mark crease tool creates those creases or tighter edges around your model to help it maintain a degree of shape. Here is how to use the crease tool…
How to Assign The Crease Value To A Selected Edge?
There are three methods to adding a crease value to your selected geometry in Blender, and while you can use any of the 3 methods to suit your own workflow, there is one that we prefer to recommend ahead of the others.
The first method is to select the edge that you want to assign the crease value to, which is required for all methods, and then open the edge menu from the header bar of the 3D viewport. You can also use the hotkey Control + E to bring up the edge menu at your cursor location.
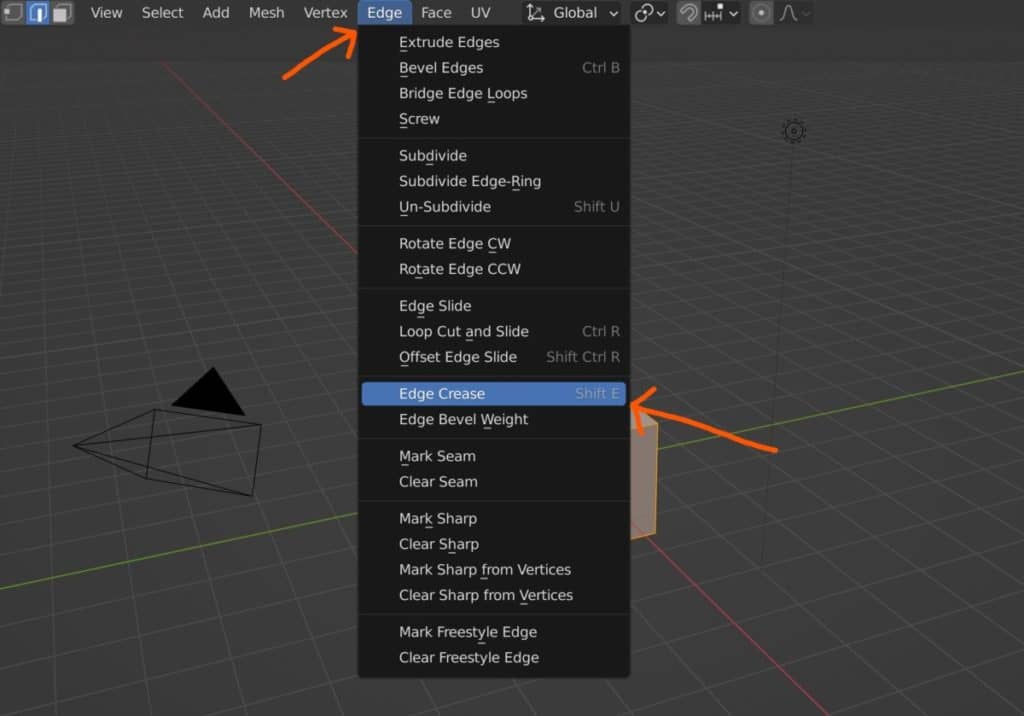
From here you will find the edge crease option about halfway down the list, so select the option to activate the tool.
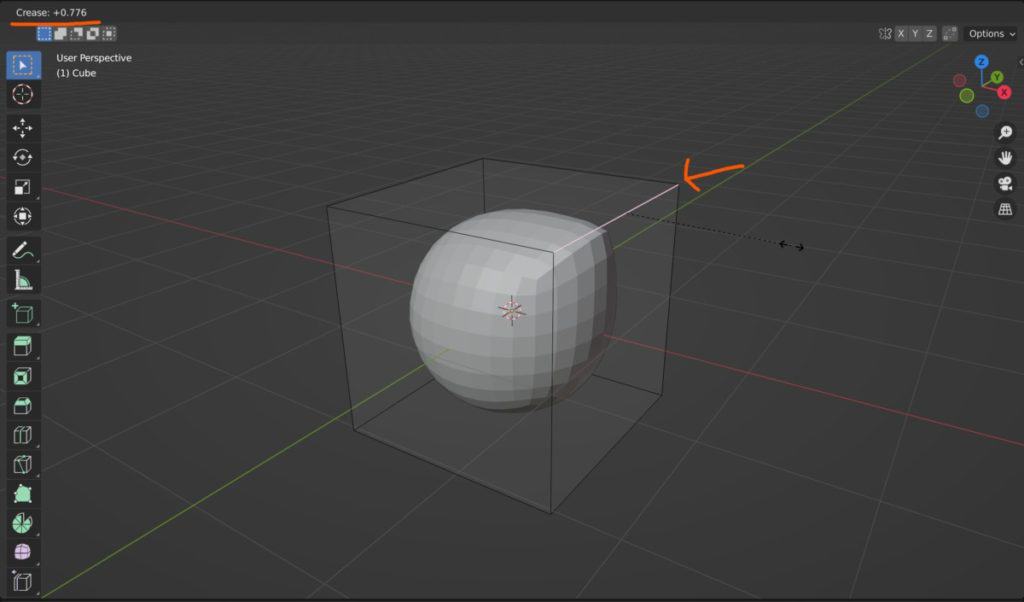
At this point, moving your mouse cursor will control the assigned crease value, which can be seen in the top corner of the viewport.
Moving the cursor left or right will both decrease and increase your crease value for the assigned edge.
The second method is to access the same tool via the direct hotkey. For the edge crease tool, the hotkey assigned to it is Shift + E, which activates the tool in the viewport.
The instructions for how to use the tool remain the same. Select the edge, use the hotkey, move your cursor left and right to control the crease value, and the left click to confirm the operation.
The third method is to control the crease values using the side panel in the viewport. Open up the side panel in the 3D viewport by pressing the N key.
If you are in edit mode, and your geometry has been selected, make sure that you are in the item tab, which should be the first option for the side panel.
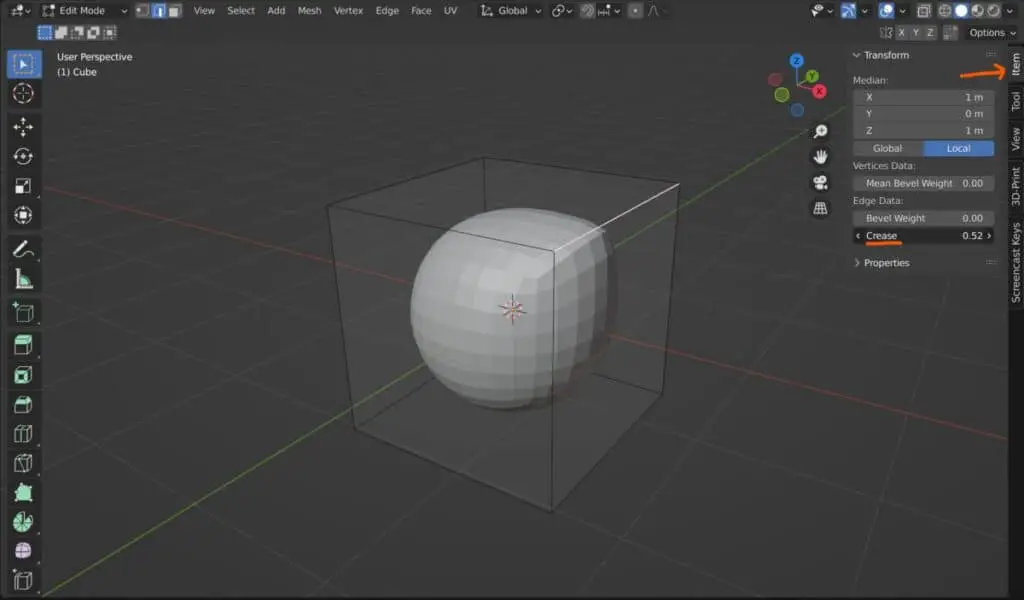
For the selected geometry the item tab allows us to control both the transforms and the control values of the geometry. The crease option is listed here as one of the control values.
In the side panel, you can assign a specific value to the crease attribute, granting you more control of its influence on the model.
Which Of These Options Is The Best For Assigning The Crease Value?
All 3 methods will work to assign the selected geometry a crease value, but which one should you choose for your modeling workflow.
Of the three methods, the quickest option, as is the case with most tools in Blender, is to use the assigned hotkey which straight away activates the tool.
This is not our preferred method though, as this type of functionality can be a tad janky in the viewport when moving the mouse cursor.
When we do use the hotkey, we like to type in the value that we want to assign instead of using the mouse. You can also use the shift and/or control keys to preview different amounts of creasing.
But if you are going to type in the value of your creased edge anyway, then you may as well use the side panel instead of the hotkey.
With the side panel, you are not working with a tool in the same sense that you are when using the hotkey. Moving the mouse cursor does nothing here, only defining the value in the side panel.
This is our preferred method because all you need to do is select your geometry and then assign it a numerical crease value, which you can see in the side panel. It is almost as fast as the hotkey, and easier to do.
How To Identify My Creased Edges?
If you are working with more complex objects, then you are working with more geometry as a whole. When you select an edge, the crease value in the side panel allows you to few if that edge has a crease.
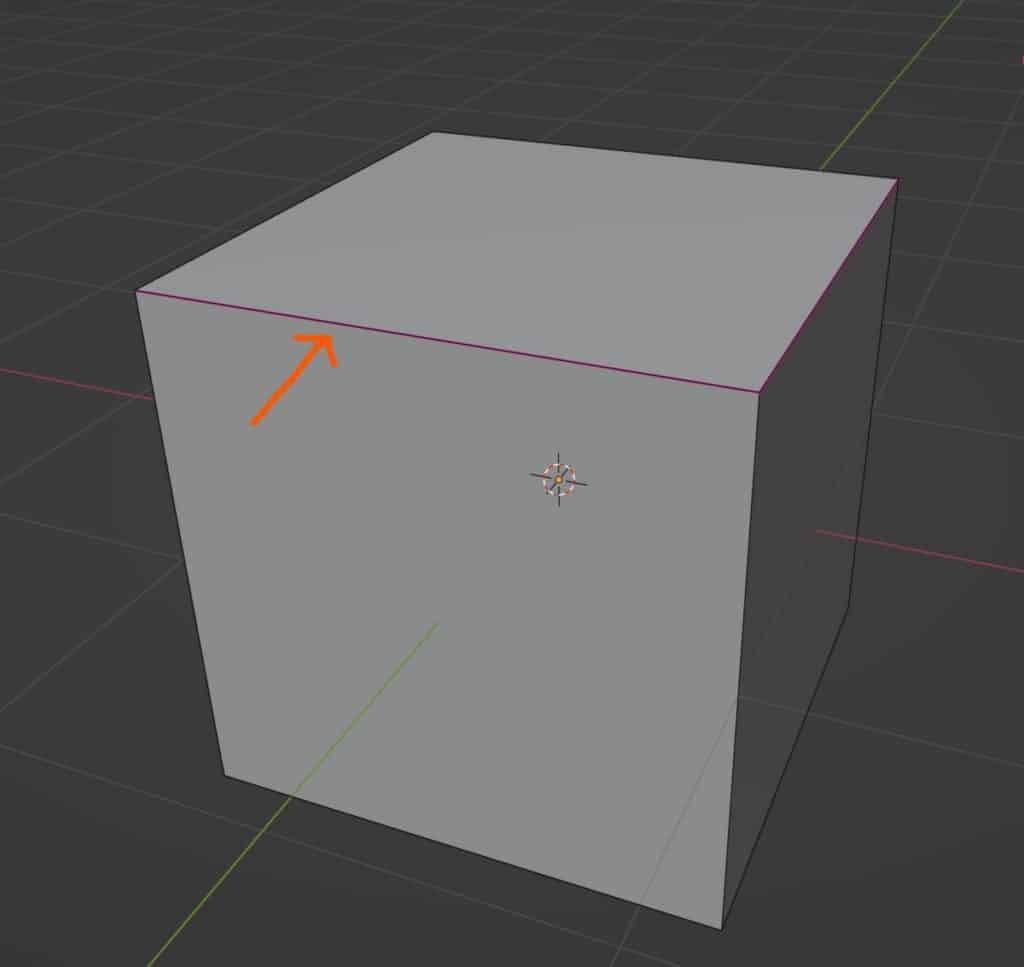
In the viewport, you will also have noticed that your creased edges receive a purple highlight as you increase the value of the crease.
The higher the value of the crease, the stronger the highlighted color of the edge will become.
Make sure that you do not confuse the highlighted colors that are assigned to your edges when using certain tools. Below we have a shortlist of tools that highlight edges in specific colors.
- Mark Crease (Purple)
- Mark Sharp (Light Blue/Cyan)
- Mark Bevel Weight (Dark Blue/Navy)
- Assign UV (Red)
Can I Assign The Crease Tool To More Than One Edge?
You can select multiple edges and even faces and adjust the crease value of your selection as a whole. If you use the side panel method the crease option will be renamed as Mean Crease when you select multiple edges. The value here is the mean average of all the selected edges.
You can control the value of these edges at the same time by adjusting the value, and it works in the same way as with a normal edge.
Once you begin adjusting the mean value, however, the individual crease values that you initially assigned will be overridden, so keep that in mind.
A Practical Example Of Using The Crease Value
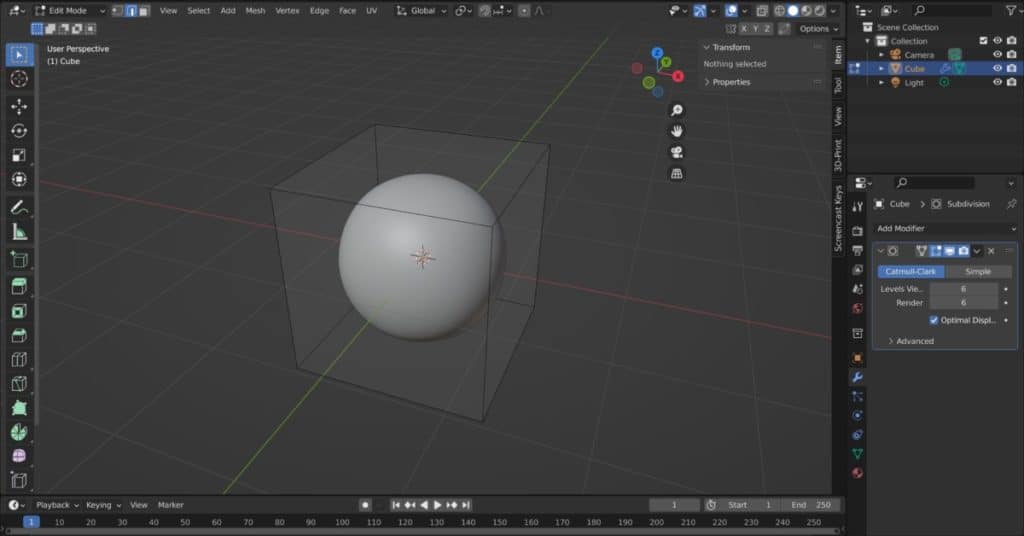
The crease value is a control attribute that changes the way other tools are able to affect to creased edges. A common use case for the crease tool is when combined with the subdivision surface modifier.
When using the modifier, our geometry is evened out and becomes more and more curved with sharp edges effectively taken out. A simple example of this is to use the modifier on a cube, transforming it into a sphere as seen below.
Let’s apply a crease value to the top face of the cube. Remember that we can assign a mean crease value to the selected geometry even if that geometry is a full face since a face is constructed by edges anyway.
The image below is an example of what happens when we set the mean crease value of the bottom face to be 1.
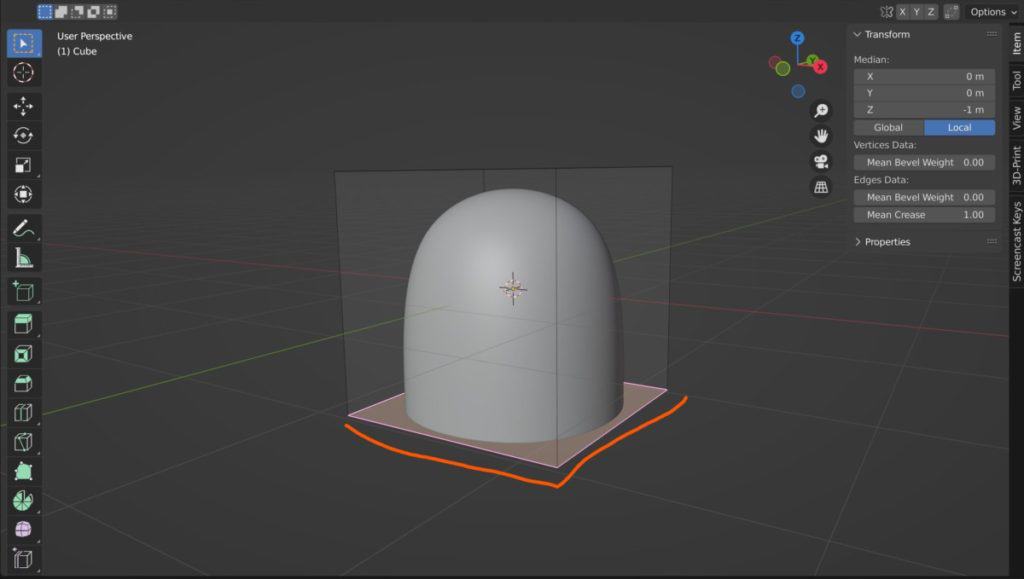
While the bottom half of the object is still spherical, the top half now has a different shape, with a flat, circular face on the top.
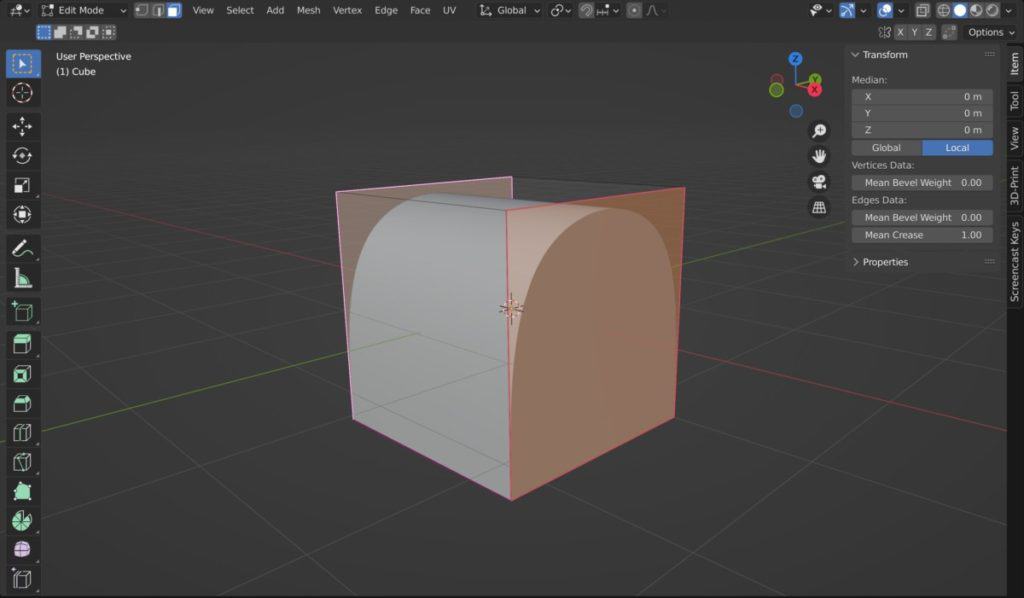
In the next image, we add the crease value to the faces on either side of the cube, again changing the shape to something new.
Thank You For Reading The Article
We appreciate you taking the time to read through this article. We hope that you were able to find the information that you were looking for. Below is a list of additional topics that you might be interested in reading.
- Different Ways To Keep Your Edges Sharp Using The Subdivision Surface Modifier
- The Purpose Of The The Mark Sharp Tool And How It Works
- The Reasons Why Faces Can Become Transparent In The Viewport
- Retopologizing Your Model The Fast Way
- Troubleshooting The Subdivision Surface Modifier
-
Efficient UV Packing: Blender Techniques
Strategies for packing UVs efficiently to maximize texture space in Blender.
-
Seams & Islands: Blender UV Mapping
Efficiently managing seams and islands for optimal UV mapping in Blender.
-
Master UV Unwrapping in Blender
Mastering UV unwrapping for detailed texturing in Blender.