Blender shortcuts, or hotkeys as they are otherwise known, are used to improve the speed and the efficiency of the artists’ workflow. You will find many assigned shortcuts throughout the different areas of the Blender interface, and more so than anywhere else in the 3D viewport when creating 3D models.
Below is a list of some of the most commonly used hotkeys when editing 3D mesh objects:
- Extrude (E)
- Bevel (Control + B)
- Inset (I)
- Loop Cut And Slide (Control + R)
- Delete Menu (X)
- Move (G)
- Rotate (R)
- Scale (S)
- Circle Select (C)
It is not a requirement to use hotkeys in Blender, as there are multiple ways to perform the same tool in most cases. But why SHOULD you learn blender shortcuts as a 3D artist?
Reasons Why You Should Learn Hotkeys For Modeling
As we have mentioned you can approach using Blender in a variety of different ways, choosing the workflow that is best suited for your style. Using keyboard shortcuts is just one approach to using the Blender interface to your advantage. So why should you learn j=hotkeys for modeling?
- Hotkeys are the fastest way to accessing a tool if you can memorise the keys required for each tool. For example, you can select the face of the Cube, press the E key, and instantly begin moving your cursor to extrude your geometry, without moving toward the menus.
- When using Blender for commercial projects, or when developing something for a client, time becomes the most precious commodity of all. Each time you use a hotkey you save a couple of seconds compared to accessing the same tool from the menu. These seconds build up as you are likely to access tools 100+ times throughout your project timeline.
- Some tools can be accessed from the tool shelf, which is easy enough to access. However the menus at the top of the viewport will have multiple submenus and many, many tools to sort through before you can sort through them and find the tool that you want to use. A hotkey will bypass these menus entirely.
- If you become really comfortable with hotkeys then you will learn how to assign new hotkeys to tools that don’t have hotkeys assigned to them. In fact, you can even assign multiple hotkeys to the same tool, and some act differently depending on the hotkey used.
What Other Shortcuts Are Used For Modeling?
In addition to the hotkeys already listed above, there are many other tools that are used in 3D modeling, and therefore many more hotkeys to learn. You only really need to learn the hotkeys for the tools that you use on a regular basis, which will be the ones listed above plus a few more.
Below we have a more comprehensive list of the hotkeys that you can use in edit mode when creating your 3D model…
- Select/Deselect All (A)
- Delete Menu (X)
- Grab (G)
- Grab And Lock To Axis (G > X,Y,Z)
- Grab And Lock To Plane (G > Shift + X,Y,Z)
- Rotate (R)
- Rotate And Lock To Axis (R > X,Y,Z)
- Rotate Trackball Method (R > R)
- Scale (S)
- Scale And Lock To Axis (S > X,Y,Z)
- Scale And Lock To Plane (S > Shift + X,Y,Z)
- Focus On Selection (Period)
- Box Select (B)
- Circle Select (C)
- Invert Selection (Control + I)
- Select Similar Geometry (Shift + G)
- Extrude (E)
- Inset (I)
- Bevel (Control + B)
- Loop Cut And Slide (Control + R)
- Add Menu (Shift + A)
- Vertex Menu (Control + V)
- Edge Menu (Control + E)
- Face Menu (Control + F)
- Unwrap Menu (U)
- Split Menu (Alt + M)
- Merge Menu (M)
- Fill (F, Alt + F)
- Normals Menu (Alt + N)
- Proportional Editing (O)
Using Quick Favorites To Access Your Favourite Tools
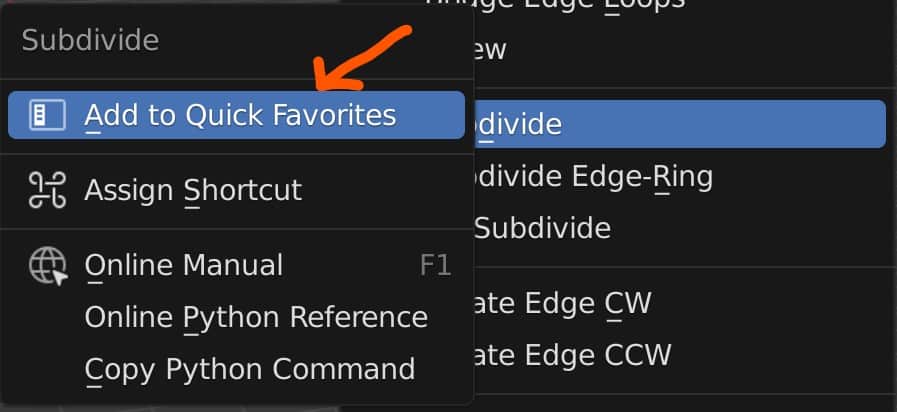
Some of your tools will not have assigned shortcuts, even though you may use them on a regular basis. An example of this is the subdivide tool, which is great for uniformly increasing your geometry density. Despite the fact that it is used often, it does not have an assigned shortcut and is instead best accessed with the right mouse button which takes you to the geometry context menu.
If you want quicker access to your tools that do not already have a dedicated hotkey, then you can add them to the quick favorites menu. The quick favorites menu can be accessed using the Q key but will be empty by default. To add a tool to your quick favorites, locate it in its own menu and then right-click to bring up the context menu, then select the option to add to your quick favorites.
Now when you press the Q key the tool that you added will be available in the quick menu. While this might not seem like an improvement over accessing the tools from their own menu (Using the menu hotkey).
Assigning A Hotkey To A Tool?
A more direct approach than adding your hotkeys to the quick favorites menu is to assign a hotkey to the tool itself if it does not already have one.
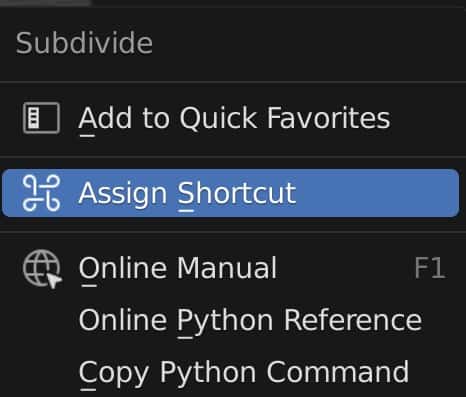
Let’s use the subdivide tool as an example, which does not have an assigned hotkey like many of the other tools. Adding a hotkey to a tool is almost as easy as adding it to the quick favorites menu.
Right-click on the tool in its respective menu to bring up the context menu. The second option here will allow you to assign a new hotkey to the tool directly.
A prompt will appear asking you to type in the shortcut, so use whatever hotkey you need and it will assign that hotkey. Be careful as this is very sensitive and even scrolling up on the scroll wheel will count as a shortcut.
We recommend looking through the keymap library first to see what keys are already assigned and find one that is available. Shift + J is an example hotkey not in use, so we can assign this to the subdivide tool.
Now we have a tool that has its own hotkey, where it did not have one before.
Thanks For Reading The Article
We appreciate you taking the time to read through the article. We also have many other Blender-related topics you may be interested in, some of these topics we have listed below for you to check out.
- What Are The Shortcuts For Navigating In The 3D Viewport?
- How To Assign A New Hotkey In Blender?
- Learn To Use Blender Tools Faster For Keyboard Shortcuts
- What Is The Hotkey For Adding A Mesh Object?
- Boolean Tool Fast Vs Exact Solvers
-
Edge Loops for Hard Surfaces in Blender
Utilizing edge loops for defining crisp hard surface details in Blender.
-
Blender Kitbashing: Complex Shapes Made Easy
Simplifying complex shape creation with Blender’s kitbashing approach.