There are many reasons why we use Blender, but perhaps one of the most common reasons is to create 3D animations. While we are building these animations, we are going to want to preview them in our 3D viewport. But sometimes the animation playback can be so slow that it doesn’t really seem to help with building the animation.
The following is a list of potential causes for slow animation playback in Blender…
- High level of geometry density
- Using the material or rendered view methods in the 3D viewport
- Heavily complex scenes
- Multiple animations occurring at the same time
- Low spec hardware
While simple modeling techniques are easy for most computers, creating animations takes things to another level. And so we need to understand exactly how our computer is able to calculate these animations and the different ways in which we can improve our animation playback when it begins to lag.
Why Is The FPS Of My Animation So Slow In The 3D Viewport?
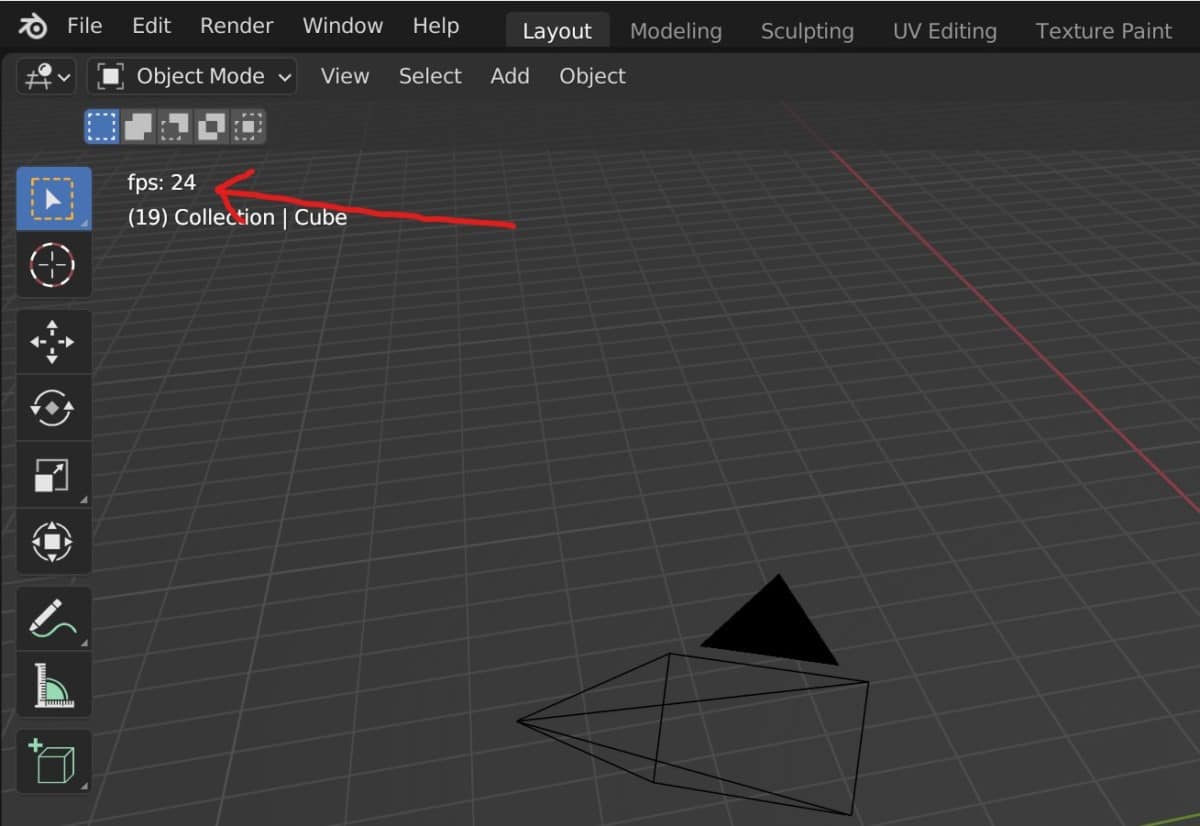
When you press play in the timeline, or the space bar, to preview your animation in the 3D viewport, you’ll notice in the top corner of the viewport a counter that displays the current FPS or frames per second of the animation that is currently being played.
This fps value will top out at whatever setting you have applied for this project in terms of your target FPS for the final render. For example, if you are targeting 60 frames per second for your animation, then the video playback in the 3D viewport is going to try and hit 60FPS as well.
You will find, however, that this is not always the case. The large majority of the time, it will normally top out at a much lower value depending on your scene. The more complex the scene is, then the lower this FPS is going to show, and the laggier your animation will be in the preview.
Too Much Geometry Cause Viewport Performance To Slow
If you have ever attempted it to create highly detailed scenes, then you will eventually notice that the orbiting and navigation tools in the 3D viewport begin to lag as the geometry density in the scene increases.
The same principle is true for animations, although not as much geometry is required in order to create the lagging effect.
When we press the play button for our animations, Blender has to calculate the positioning of each individual object and the geometry of that object. It also needs to calculate the animation data from the objects that have weeks applied to them, or just have simple animations Such as the manipulation of an object transforms.
The more the blender needs to calculate, the longer it’s going to take to finish that calculation, and it needs to perform these calculations in real time in order to play the animation in the preview. For example, it needs to calculate the positioning of each and every vertex while the animation is playing and needs to do so for each frame.
Does Animation Playback Affect The Final Render
You will be pleased to know that regardless of how poor your viewport playback may be, it will not have any effect on the actual render of your animation. This is because the animation playback in the 3D viewport is trying to do so in real-time.
By contrast, the actual animation that is going to be rendered will be calculated beforehand, frame by frame, and then once all of the frames are completed then you will be able to view your animation in full without any lagging.
Setting Up Blender To Use The Spacebar
When you open up a new project, you may have the opportunity from the splash screen to determine what the space bar does. One if the tasks that it can perform is to play and pause your timeline data allowing you to preview your animation.
Try pressing the space bar to see what happens. If it does not begin to play through the animation in the timeline, then you may want to reset what the space bar is used for. It may instead bring up the search menu, which will allow you to locate the various tools used in Blender.
To change the functionality of the space bar, go to the edit menu in the header of the blender interface and then select preferences at the bottom of the menu. This will open up the preferences panel. Go to the keymap tab and at the top, you will locate the spacebar function which you can set to either play the animation, use specific tools or open up the search menu. Select play in order to play and pause animations in the 3D viewport.
How Does Caching Work In Blender For Simulations?
While the majority of us would not use things like fluid simulations in our animations, those that do will find that the additional calculations can tank viewport playback.
Even on high end software animation playback can be slow and sluggish in Blender when we are using physics based simulations like winds or water based simulations using fluids.
Fortunately, Blender has a built-in tool for caching animation data. When working with these simulations. This tool works automatically and all you need to do is set up your animation settings in the particle’s tab of the Properties panel.
The first time you preview your animation after changing these settings, you will notice that the performance is very laggy as she would expect because Blender is trying to perform very complex calculations.
However, if you play through this simulation a couple of times, you will notice that a colored bar will appear across your timeline. This colored bar represents the caching effect of the simulation. Once the simulation has been cached, you can return to the start of the timeline and then attempt to run the simulation again.
What you will notice is that the performance improves considerably from the first time that you played through that fluid simulation. Caching allows Blender to store simulation data to your system memory, otherwise known as RAM. It can then access this data in close to real-time so that it can play through the animation as if it was fully rendered.
At the time of writing this caching tool only works with simulation data and is not applied when simply creating traditional animations.
How Do I Bake Animations In Blender?
A slightly more complex way of improving animation playback is to bake the individual actions that take place in your animations. This is an extremely effective way of improving viewport playback because it will calculate ahead of time, animation data and keyframes.
This is a substantial contrast to normal video playback, where each individual keyframe is calculated as a part of that animation. Remember, the more that needs to be calculated, the longer it’s going to take Blender to do so, which is going to impact the FPS of your video playback.
Every time you create a keyframe for animation, Blender creates what is known as an action. And allows you to bike individual actions that can improve your performance quality. If you want to bake an action, first of all, create the keyframe. Then with that object selected, go to the Object menu in the 3D viewport. Select the animation submenu and then select the bike action option.
This way that specific action will not be calculated during the video playback as it will have already been baked into the animation beforehand. This will allow you to improve your viewport performance, drawing animation playback depending on that specific action complexity.
When working with animations you will sometimes want to work with sound effects that you can add in Blender. A cool yet inexpensive kit that we like to use with our monitor is these RGB stereo speakers that are both portable and plug and plug play.
Other Reasons For Poor Viewport Performance
Besides the density of geometry in your scene, there are also other reasons why your pupil performance may dip when you are attempting to preview your animations. A common cause of lagging animation performance is the choice of the viewport method.
Choice Of Viewport Method
The viewport method is what you want to display in your 3D viewports. You can choose to display the wireframe of your objects, the solid data, so the wireframe as well as the faces. You can even choose to display the materials in your 3D viewports and even the lighting effects. You can choose which viewport method you want to use in the top corner of the 3D viewport.
Each viewport method displays more information than the one previous. So for example, the rendered viewport methods will display pretty much everything related to your scene from the object geometry to the materials. To the lighting effects. This means more data needs to be calculated in real-time to play through the animation. And as a result, the animation FPS will decrease in the viewport.
By contrast, the wireframe method will only display the vertices and edges of your geometry and will not even display the face data. This will yield the best performance results for animation playback, even though a lot of the information on the screen will be missing, you will still be able to make out the shapes of your objects and the animations that they are trying to perform.
Therefore, it can be useful to choose why frame mode as your method of viewing data in your 3D viewport. If your focus is on how the animations are behaving in your scene.
Low End Hardware Means Low End Playback Quality
We should not gloss over the fact that blender is dependent on the hardware that is being used as well as the software of the application. The more complex our tasks, the better the hardware that will be required to complete those tasks successfully.
For example, we have two computers. One computer has 32GB of RAM and an RTX 3080, while the second computer has 16GB of RAM and a GTX1070.
The result in experimenting with different types of animations is telling. In general, the 1070 system will begin to lag at a much earlier stage than the 3080 system. Less geometry density is required on the older 1070 system in order to begin creating the lagging phenomenon.
This does not mean that the higher-end 3080 system is immune to lagging animation data. In fact, this will be true for any setup that you can possibly create. The difference is that the higher end the hardware is, the more you can get away with before viewport performance is compromised during animation playback.
While it is important to have an up-to-date graphics card for rendering, perhaps the more important part of your computer hardware is going to be the amount of system memory that you possess, otherwise known as RAM. With our two test benches, we have a 16-gigabyte kit as well as a 32-gigabyte kit. And this perhaps has an even greater impact on viewport performance when previewing our animations.
For example, in a test animation that we performed, moving a car across a road, we found that with the 3080 system using the 16GB kit would result in an animation fps value of about 18 frames per second. When we doubled the amount of system memory to 32GB, however, we saw an increase in FPS to about 21.9 frames per second.
This demonstrates starts the amount of system memory that we have can positively impact how our animation plays back, so long as we are able to increase our system ram. However, we also find there is a limit to this effectiveness.
When we increased our system round to 64 gigabytes, the next tier up in terms of total RAM that we could use, we found that while the animation playback did increase again, it only increased by around 1 fps.
Using Multiple Objects In Your Scene
In addition to the total amount of geometry plays a part in how animation playback is affected. The use of multiple objects also plays a large role in how effective that playback can be. In fact, having multiple lower geometry objects can actually have a more profound effect on pupil performance than using a single high-density object.
This is because Blender needs to assess how each individual object is going to be affected in the animation itself. Even static objects that are not a part of the animation can impact viewport performance if they are visible within the camera.
Optimizing Playback For Faster Viewport Performance
So there are numerous reasons why you may find animation playback lagging in the 3D viewport whenever you press that play button. Fortunately, there are a few means of improving your animation playback in Blender, so let’s take a look at a few of these examples.
Skipping Your Dropped Frames From The Timeline
While this is the method that probably the fewest number of artists are aware of, it is also arguably the most effective at improving your viewport performance when playing animations. By default, Blender will try to play through each and every individual frame, calculating the data on each frame as it moves through the animation.
In doing so, it takes longer to calculate these individual frames and as a result of this we end up with viewport lag in a lot of scenarios.
Common sense would dictate that it would be much easier if we were to ignore the frames that we were having difficulty rendering in real-time. There’s a setting in Blender that allows us to do exactly this.
Go to the timeline panel in your blender interface. In the timeline’s header bar you will find a menu labelled playback left Click to open up this menu and you will see that we have a variety of different settings that we can change.
Most of these settings come in the form of tick boxes, but we don’t want to use any of these settings. Instead, we want to go to the very top of this menu where we have a menu setting for syncing.
By default, this sync setting will be on the play every frame option. Left click on the menu button to open up this menu and you will see that we have 3 options.
The first option is to play every single frame for the animation playback, which is the default and not the one that we want to use. The third option allows us to sync the animation data to whatever audio data we have imported.
When we sink our animation data to our audio data, we get a much better representation of the final result that we’re looking for. If audio is going to be used, however, this can actually result in even worse video playback in the 3D viewports compared to the animation setting that is currently enabled.
the second option in this menu allows us to skip frames that are to be dropped. By enabling this frame dropping option, Blender will not attempt to play through any frames that it finds difficulty with.
This may sound counterproductive as you get the impression that it would negatively impact the actual animation when played in the viewport, but in a lot of cases, this setting actually allows us to play through our animation much more smoothly. And the dropped frames in most cases don’t actually impact the animation itself.
Simplify Your Scenes Geometry
A more commonly used solution when it comes to improving animation playback is to enable the simplify feature in Blender to reduce the amount of geometry that is calculated in the 3D viewport.
By using the simplify tool you can reduce the amount of geometry that is used, but not reduce the amount of geometry that is rendered. So the structure of your models remains the same.
But Blender will calculate effectively lower Poly versions of those models when attempting to play the animation in real-time while working in a 3D viewport.
To locate these simplify options, go to the render tab in the properties panel and then Scroll down until you find simplify. There will be a box next to the simplify option ticket to enable it.
To simplify it all. Press the down arrow to open this tool up and she will see that you can control several factors such as the Max number of subdivisions that are used in the viewport compared to the actual render. As well as options for reducing child particles for things like hair physics.
Would you sing these values to very low levels? Can really help to improve the video playback of your scene, as there’s far less to be calculated after applying the simplify tool. This is a great way of being able to preview your scene without altering it too much.
Getting Rid Of Redundant Objects
As we previously mentioned, having a complex scene with a lot of objects can be a primary cause of viewport lag with animation. A simple solution to this is to just hide some of the inanimate objects in your 3D viewports.
Go to the outliner panel and beside the name of each individual object and collection you will see an eye icon. Click on the icon and it will hide that object. Alternatively, you can select the object in the 3D view port and then press the H key, which will also hide that object.
Even objects that are not a part of the animation itself. Will impact the calculations used to view the animation in the free D viewports. Therefore, if the purpose or previewing your animation is to simply test that the animation is behaving correctly, then there is not much need to view the other objects in your scene at that point.
Therefore, getting rid of these redundant objects can be a useful method for improving animation playback.
The one fault with this solution is when you want to preview your animation as a whole. In the case where you actually want all of your objects to be in your scene while previewing the animation, this solution is not going to be the best choice.
Using Low Poly Versions Of Your Assets
Another solution that you can consider is to create low Poly versions of each asset. In particular, for your inanimate objects, low Poly versions can be used to help improve viewport performance during animation playback, as there will be less geometry on screen.
You can then swap out your low Poly models with high poly variations that have more detail. Doing so allows you to preview your animation in a very similar state to what you would expect from the final render without having to hide any of the inanimate objects outright.
You could also take this method and create low Poly versions of your animated objects. However, keep in mind that the amount of geometry and objects possesses impacts how well it can be animated, so make sure not to go too low with your topology if you consider using low Poly versions of the animated objects.
Thanks For Reading The Article
We appreciate you taking the time to read the article and we hope that you were able to find the information that you were looking for. Below we have compiled a list of additional topics that you may be interested in reading based on the article above.
- How To Render An Animation In Blender 3D?
- What Are The Shortcuts For 3D Animation?
- Can You Use Blender For Animation?
- The Pros And Cons Of Using Blender
- Just How Powerful Is Blender Anyway?
-
Abstract Sculptures: Blender Art Challenge
Experimenting with abstract sculptures for artistic expression in Blender.
-
Nature-Inspired Architecture in Blender
Integrating nature-inspired elements into architectural designs in Blender.
-
Superhero Costumes Designed in Blender
Designing superhero costumes with flair and functionality in Blender.