If you are in the field of game design either as part of a company or as an independent developer then you will likely need to use multiple applications to create the assets for your game or project. This also means that you have to know how to transfer data from one application to another. So how do you export a 3D model as an FBX from Blender to use in your Unity game project?
To export as an FBX from Blender, 1st select the objects that you want to export, then go to File > Export > FBX. In the file browser that pops up set your parameters so that +Y is up and +Z is forward, then define if you want to export parameters, materials etc. Set the asset folder of your Unity project as the destination for the export and click the export button. Then go to Unity and you will see your FBX file in the project folder.
There are many issues that can occur when exporting a model, or collection of models, from one application to another. These issues are normally a result of errors made in Blender either with the object itself or the chosen export parameters. Let’s dive into more detail about how the export process works and what to do if we find any issues.
By the way, if you want to learn more about the different file formats that you can use for exporting assets, check out our article here.
Why Is FBX A Good Export Format To Unity?
The FBX file format is a good option for exporting 3D models from Blender to Unity for several reasons. For example, one reason is that FBX is a common and standardized format that can store various types of 3D data, such as geometry, materials, textures, animations, and more. This means that FBX files can preserve most of the information and features of your Blender models when you import them into Unity.
Another reason is that FBX is a compatible and interoperable format that can be easily imported by Unity and other 3D applications and platforms. This means that FBX files can reduce the risk of errors or glitches when you transfer your models between different software or devices.
A third reason is that FBX is a flexible and customizable format that allows you to adjust the settings and options when exporting or importing your models. This means that you can control the scale, rotation, axis, units, smoothing groups, and other aspects of your models to suit your needs and preferences.
The fourth reason is that FBX is a reliable and consistent format that does not depend on any specific software or version to work. This means that FBX files can avoid the problems of proprietary formats that may require certain software or plugins to be installed on your computer or may become outdated or incompatible over time.
FBX is a supported and integrated format that Unity natively imports by using the Blender FBX exporter under the hood. This means that you can simply save your .blend file in your project’s Assets folder and Unity will automatically import it as an FBX file without any extra steps or hassle.
What To Do Before You Export Your Game Model?
If you are exporting a game model for the first time or are just not sure about the process, then we recommend starting off exporting objects to a test project before moving on to the real thing. Before is a short but important checklist of what we need to do before we begin the process of exporting.
Applying The Rotation And Scale Of The Model
The most common issues that can occur are incorrect rotation and scale of the object, which are normally the result of not applying the transforms in Blender. If you look at your object transforms in the side panel, you should see the rotation value set to 0 on all three axes, and the scale values all set to one.
While not as important, keep the location set to 0,0,0 as well and have the geometry close to its origin point. If any of these options are not set to the default values then this will alter the way the model looks when brought into Unity.
To fix this, use the hotkey combination of ‘Control + A’ to bring up the apply menu with the object selected in object mode, you will see a list of transforms that you can apply. Select the option labeled ‘Rotation and Scale’ to apply each of these transforms.
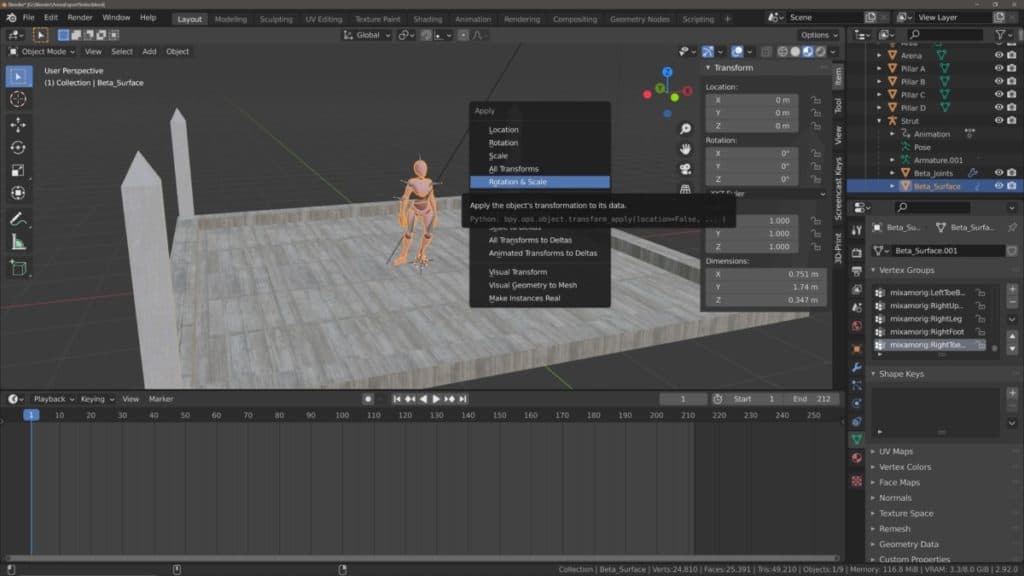
The rotation values of the applied object should now read as 0,0,0 and the scale values should read as 1,1,1 in your side panel, but the appearance of your model should be exactly the same as it was before you applied it.
What If You Are Going To Export An Entire Scene Of Static Objects?
If there are multiple objects in your scene you can export them all in a single FBX file. The process for applying the rotation and scale of the objects is the same, but you would instead select all the objects together and then apply their transforms all at once rather than selecting each object one at a time.
If those objects are static meshes used as part of the scenes environment, then you may not be planning on using those objects in another capacity and may want them in Unity exactly as they are in Blender. In this case, you can apply all the transforms of your meshes so that they all have the location value 0,0,0. This won’t move the object meshes, only the origin points get placed back to the center, which can make things simpler in Unity.
Do You Have A Suitable UV Map For Your Objects?
All solid objects that you will use as potential assets in games will require the use of materials, which can be created either in Blender or in Unity. Most of these will also require textures and as a result, may also require a UV map.
A UV map is a 3D object that is cut apart and mapped out onto a 2D image editor, as a means of being able to more easily map a texture from a png or jpg onto the 3D model.
The UV map needs to be well structured to prevent artifacts on the textures when imported to the game engine. If you are assigning the texture in Blender, you should be able to preview the result before you export and make changes to your UV map where needed.
Use Eevee When Creating Materials For Video Games
Not only can you create objects in Blender but also the materials for those objects as well. Blender has two render engines for previewing how objects appear under user-controlled lighting conditions. If you decide to create materials for your objects in Blender you should use the Eevee render engine to create those materials.
Eevee is an online renderer which means it allows you to view and navigate your scene in real-time without having to wait for the engine to process the image. It achieves this at the cost of realism and the results are generally less spectacular.
However, this is how game engines have to work as well, producing the target image in real time for the end user. The Cycles Engine on the other hand is considered an offline renderer as its focus is on realistic lighting and materials at the cost of render time.
Basically, you should create your materials using the Eevee render engine because it more accurately imitates what you are likely to see in your game engine.
Avoid Using Certain Nodes In Front Of Your Textures
If you have used Blender for any period of time then you will likely be aware of the node system used to create materials. A part of this process involves using texture nodes to create patterns for the materials and plugging them into the primary shader of the material.
It is common to use other nodes as well to adjust your textures and materials in various ways, however having certain nodes in between the texture and the shader can cause issues with the final result, such as with the use of the color ramp.
Why is this the case, well in Unity the textures will come with the model and the material but they will not be automatically applied. We will have to reconnect the shader to the material in Unity itself and that means that anything we have in between the texture and shader nodes in Blender may not carry over.
When creating a material in Blender for use in a game engine, it is recommended to keep the material setup clean and simple as it will all be reconfigured based on the engine that it will be sent to anyway.
Orientate Your Object Correctly
Going back to the model itself if you have an easily identifiable front side for your object (such as with a character model) then you will want to make sure that the model itself is facing forward in Blender.
This is not a strict requirement and is more recommended to prevent confusion when exporting our model to Unity.
For future reference, Blender uses a left handed coordinate system, which means the +Y direction is considered the forward direction, and +Z is the up direction. Unity on the other hand is a right handed coordinate system where +Z is forward and +Y is up. We will deal with this in the export parameters.
Make Sure That All Of Your Objects Normals Are Facing The Correct Way
Along with incorrect transforms this is one of the more common issues that artists and game developers will face when exporting a model from Blender to a game engine like Unity. A normal is a line that is perpendicular to vertex or a set of vertices looped together (face).
The normal defines which side of the vertex, or face, is considered the front side. For objects used in games, normals are very important as the game engine will only render the front side of the geometry, in a process referred to as backface culling.
If the normals of your geometry are facing the wrong way, then you will find parts of your model become invisible when you export it to Unity.
There are multiple ways in which we are able to both identify and deal with incorrect normals in Blender, and you can learn more about it in our article on normals here.
The quickest way to deal with normals though is to select your entire model in edit mode while in Blender, and use the hotkey combo of ‘Alt + N’ to bring up the normals menu and then select the recalculate outside option to fix the normals.
So to sum up the above as a small checklist of what we need to do before we export…
- Apply Rotation And Scale Of The Objects
- Apply Location If Exporting A Full Environment
- Use Eevee To Create And Preview Your Materials
- Make Sure The Model Has A Usable UV Map
- Keep Your Materials Nice And Simple
- Orientate Your Object To Face Forward In Blender
- Make Certain That All Of Your Object Normals Are Correct
What To Do During The Export Process From Blender?
Once you have gone through the checklist above you should be able to move onto actually exporting your model or your scene. The FBX format is an industry standard method of transferring data of 3D objects even in a professional setting, and so most applications are able to work with this file format.
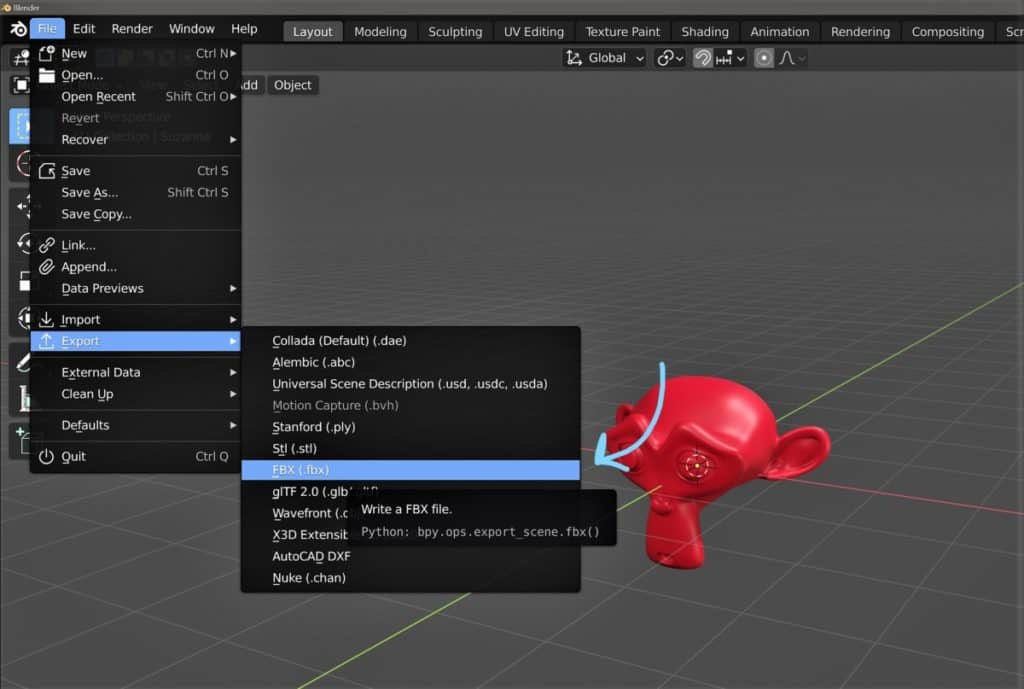
To export via the FBX method, go to File > Export > FBX to bring up the file browser for the export.
If you do not see the option then it is because the add on for the FBX format is not enabled. Many of the import/export formats are not a part of the base code in Blender and their functionality derives from add-ons that are used to expand on Blender’s core range of tools.
Normally the add-on for importing and exporting FBX files is enabled by default anyway so this should not be a problem. However, if you do not see the option then you can go to Edit > Preferences > Addons and type in FBX in the search bar, then tick the box for the FBX add-on.
You should now be able to export your model as an FBX, so make sure what you want to export is selected and follow the process again to get yourself to the export menu in the file browser.
As you can see from the Image above, you can use other file formats to export your models to Unity. Check out ou article on exporting with these file formats here.
The Parameters In The Side Panel
When the file browser opens for the export you should see a side panel that lists the parameters for your export format, if not move your mouse cursor into the file browser and press the ‘N’ key to make these parameters visible.
Setting The Path For Textures
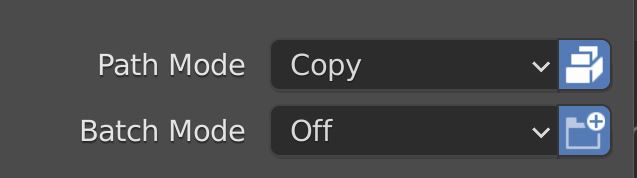
The 1st parameter that you will be able to change is the path mode, which references the subdirectories that are connected to the exported object. This basically means the texture maps that are used to create the materials for the base color, roughness, etc, and is an important step for getting your textures into Unity correctly.
The default setting is on auto, but for our recommended method set this option to copy from the drop-down list after you select it. There is also a button that is directly next to the drop down for the path mode. Enable this button so that it is highlighted blue as it will allow you to embed your textures into your FBX file.
The next option below that is for assigning a batch mode. This will divide up your file into smaller files based on the type of batch selected, for example, to save each collection as a single file or even each scene.
This may be useful when exporting entire scenes or environments over but when exporting a small number of objects it’s ideal to keep this option set to off.
Selecting The Objects That You Want To Export
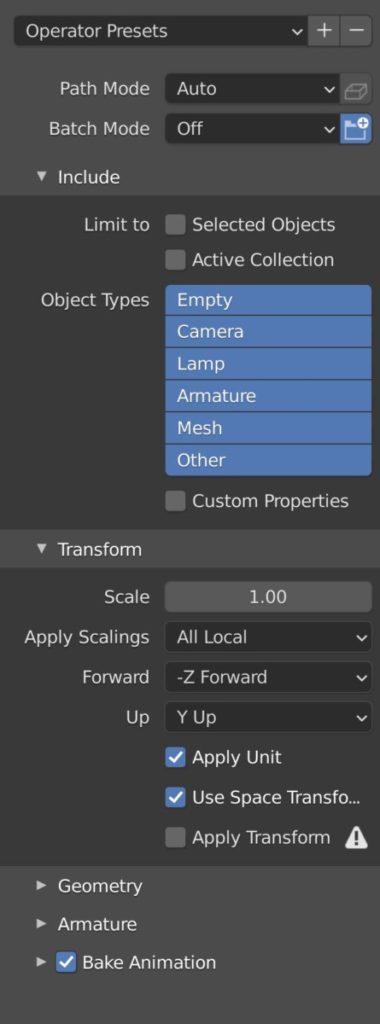
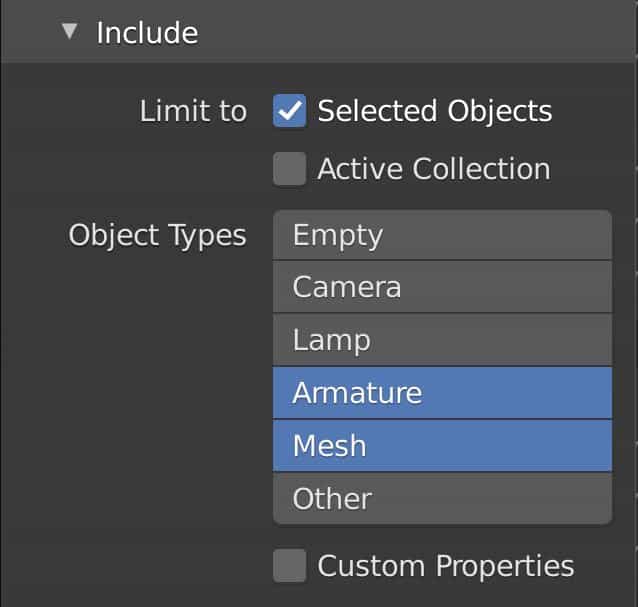
You then have several tabs that you can access, the first of which is labeled as the ‘Include’ tab and allows you to control what object types will be exported. Click on the label to open up the parameters in the side panel and the first option you will see is to only use selected objects.
We normally have this option ticked and have the objects that we want to export already selected so that we have full control over our export.
You can also limit to the active collection only which is useful if your collection is a series of smaller models that are used to create a larger object.
An example of this would be to create a variety of car parts such as the exhaust and engine and store all of these parts in a collection labeled as ‘car’.
This is useful if the objects of a collection are all related to each other in some way and are a part of a larger object used in Unity.
You can also decide if you want to limit your export based on object types. Again if you have enabled the selection only box then you don’t need to do anything here as your selection will be the only thing exported. If not then you can define what object types you want to export, and this is normally going to be just your armature and mesh objects, as the other object types are not needed since they will be provided by the game engine.
Getting The Correct Transforms And Orientation
The next tab allows you to edit the orientation of your model and how the transforms will be converted when the model is exported.
The scale option is set to 1 by default and should be kept this way in most cases.
The apply settings should be kept to the ‘all local’ option.
The forward and up axes should be set to whatever the orientation is for the software that the file will be exported to, in this case, the Unity engine. For the forward direction, we set the axis to positive Z and for the up direction, we set it to positive Y.
Note that this can sometimes result in the correct rotation values of 0,0,0 in unity and sometimes it can import with a Y value of -180 degrees. The problem is that this is inconsistent in that sometimes it is correct and others it isn’t. If you come across the issue then set your forward axis to negative Z to correct it.
Nest we have three tick boxes below, the first is used to take into account the defined units of measurement in Blender for the export. For example, if the size is based on meters in Blender then this will be used to determine the size when imported into Unity.
If Blender units are used instead of metric or imperial measurements then the values will be kept as they are and will be converted in Unity based on the project settings.
The second tick box allows us to use the global space transforms for the object’s rotation data, and the third tick box allows us to bake in the transform data and apply it as the default for our game engine. Normally we would have all three of these boxes ticked to make sure our objects are orientated correctly when imported.
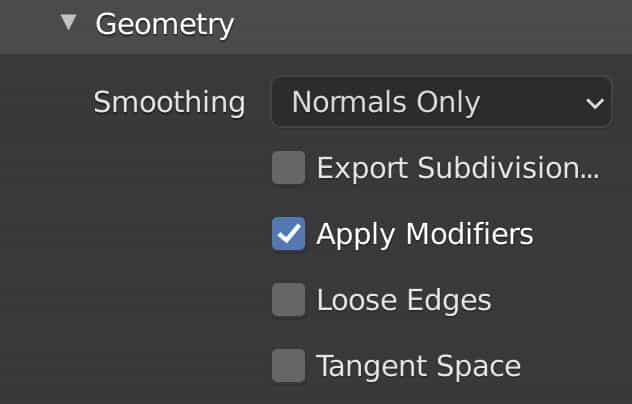
Setting The Correct Geometry Settings
The Geometry tab controls additional data with regards to our mesh objects’ geometry and structure. We can for example export smoothing data for our normals or for the geometry itself. Normals define the visibility of faces in game engines and it’s important to get these right before hand.
The options below allow us to do things like apply our modifiers or export our subdivision as an FBX subdivision. The preferred workflow here is to apply your Subdivision surface modifier in Blender first and then export with all of these settings as they are, which means having the smoothing set to normals only, and the apply modifiers option as the only ticked box.
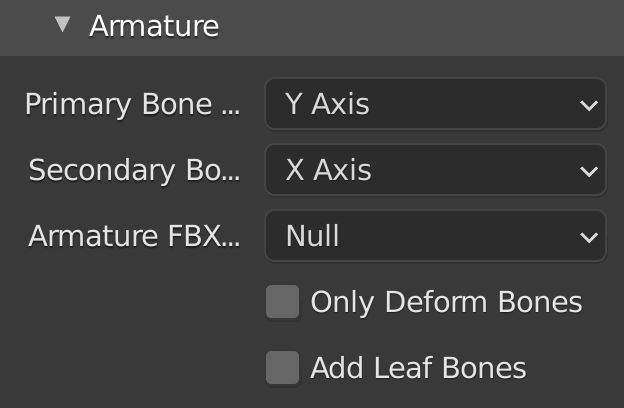
What If You Have A Rig For Your Model?
If your object is not intended as a static mesh then you will likely have a rig assigned to that mesh so that it can be animated.
An armature is an object type that acts as the parent rig for a mesh model and is therefore required in Unity in order to maintain any animations created using the rig.
Most of the settings in the armature tab are fine as they are, however, the one thing that we recommend changing is the option to add leaf bones which is by default enabled.
We will want to disable this option as leaf bones have no use in a game engine like Unity and so we only end up reporting unnecessary data.
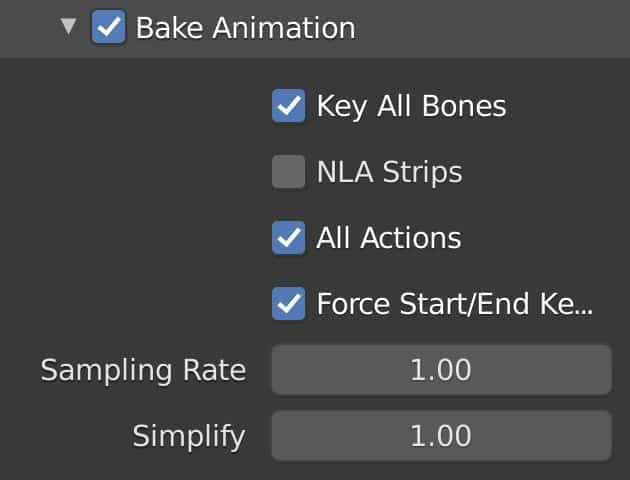
What About The Animation Tab Then?
The last tab in the export settings is for the animation parameters tied to the mesh object. Not all objects require a rig to animate but all of them require keyframe data.
The tab itself is a checkbox that we can enable or disable, which is handy as static meshes will not require animation data and in these cases, we can turn this tab off entirely.
If your model does have an animation, however, make sure that the box next to ‘bake animation’ is ticked. As for the parameters inside the tab again most of these are fine as they are. The only one that we will probably want to disable it for the NLA strips unless you used them in Blender.
At this point, you should have gone through everything that you needed to, meaning you can move on to choosing the location for your export.
Where To Export Your FBX Model To?
This is more important than you may think, as sending your FBX to the correct location can really streamline your workflow. We have two recommendations here based on the use case of the FBX file.
Using The FBX For A Single Project?
If your model or collection of models will only be used for a single project, then why not save directly to the project itself and have your models ready to go.
For this to work your Unity project already needs to exist on your system. Every new project will have its own asset folder, so that will be the target for the FBX file. Locate your folder where you store your Unity projects and choose the specific project to send the FBX to.
Open up the folder for the project and you should see a folder labeled as ‘Assets’, select this folder and that will be the location for your exported FBX file. We will need to create some subfolders for our materials, textures, and meshes but we can do that in Unity.
When you are ready to complete the process just click on the Blue button labeled ‘Export FBX’ to finish.
Using The FBX For Multiple Projects?
In the case of requiring a model for more than one project, we should not export directly to a single project even if it is the one we are currently working on.
Instead, we should find a location that is easy to remember and easy to reach. The first recommended location is the desktop. Simply create a file on your desktop named assets and then save the FBX in that file.
This is preferred if you want to use the FBX file in more than a single application and you need to be able to access the file quickly regardless of the application that you use.
The alternative option is to go to your folder where you store all of your Unity projects and create an assets folder there instead.
This option is best suited for when you want to use the FBX across multiple Unity-based projects as it becomes very easy to find.
When you are ready to complete the process just click on the Blue button labeled ‘Export FBX’ to finish.
Importing Your Model Into Unity
Once you have exported your model from Blender you will then be able to import it into your Unity project. This part is slightly different depending on what location you choose to send your exported FBX file to.
If You Saved Your FBX directly Into The Project Asset Folder…
When you open up your project and go to your asset folder the exported objects will automatically load into your project. You can then drag and drop your model or scene directly into the viewport and begin positioning it, it’s as simple as that.
If You Saved Your FBX In Another Location Other Than Your Asset Folder…
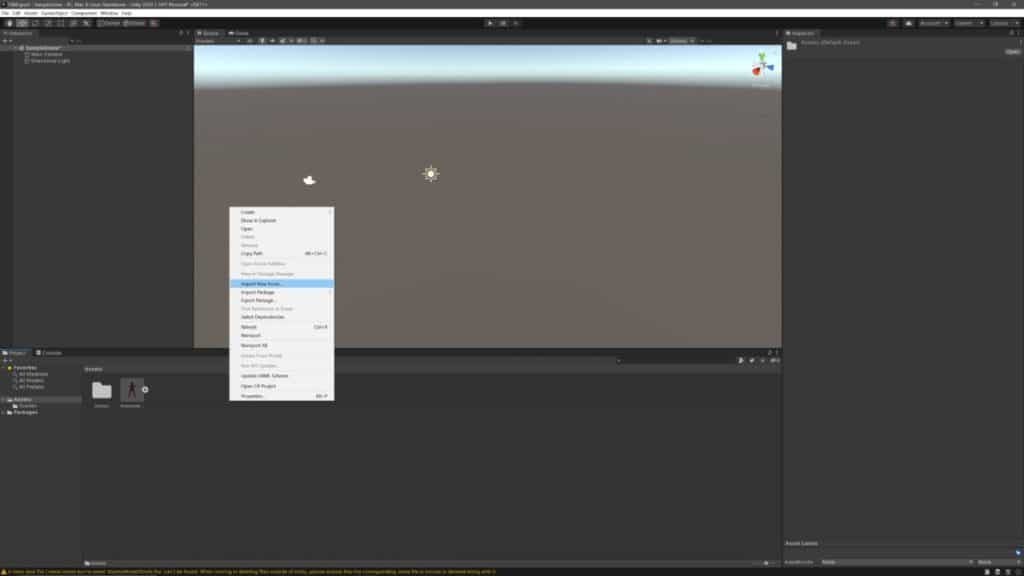
This scenario requires the additional step of importing your FBX file into your current project.
In your asset folder, right click to bring up your options menu and select the option labeled as ‘Import New Asset’, then locate the FBX file and import it into your project.
If everything has been done correctly,, you should see the object appear in your asset folder available for use. If you have any issues, refer to the checklist above and double check that everything has been done correctly.
For example, if you import the FBX but don’t see the model, then you may not have selected it for the export.
Checking That Everything Has Imported Correctly
When you have imported your asset, drag and drop it into your scene and first check to see if the geometry is 100% visible. Don’t worry if the textures don’t show at this point we will deal with them last. The orientation of the object should be correct with the model facing Z forward.
The rotation values should all read as 0,0,0 across the three axis and the scale should be set to 1,1,1. If you have rigged and animated your model you will need to check these as well.
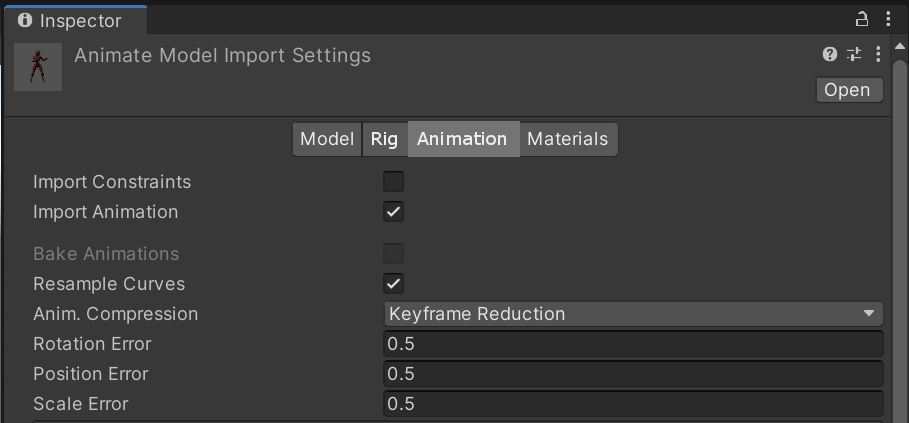
The instanced object in the viewport will not have the animation data visible in the inspector panel. What we will need to do is click on the model in the asset folder to bring up the files import settings.
You should see four tabs at the top of the inspector with the following labels:
- Model
- Rig
- Animation
- Materials
If you select the animation tab, you will have an additional viewport pop up at the bottom of the inspector where you will be able to preview the animation.
As for the materials and textures we need to extract them from the FBX file in order to use them properly and edit them in Unity.
If you have only imported materials and not textures with your model, then some of the basic properties of that material, such as the base color, will be visible on the model. However to get full control we need to extract the materials and textures as we just mentioned.
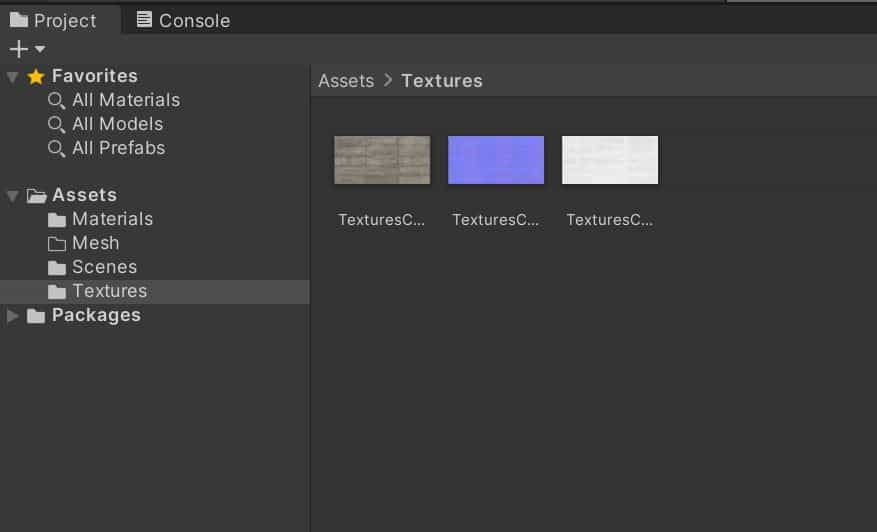
Setting Up The Sub Folders In Our Asset Folder
In the asset folder, we will need to create a few additional folders for organizational purposes. To create a new folder right click with the cursor in the asset folder to bring up the options menu. Go to the create option and select ‘folder’ at the top of the list.

Name the new folder as your object folder, to store all of your models in. Then repeat the process two more times, creating a folder for your materials and a folder for your texture maps.
Go back to your exported object and restore the import settings in the inspector, then select the materials tab.
In this tab, you will find two buttons labeled as ‘export materials‘ and ‘export textures‘. First export the materials and send them to the material folder that you created. Then do the same thing you the textures, extracting them to the textures folder.
Note that if there are no materials or textures available to be extracted, then these two buttons will appear greyed out.
You should now be able to edit your materials and apply texture maps to them. select an object in your viewport and then click on the little arrow below materials in the inspector, which brings up all the parameters for the material.
You may find that the texture is still not applied and we only see the albedo color. Now though we can go to our texture folder, then drag and drop our albedo map onto the empty square nest to albedo, to assign the texture map to that parameter. The texture should now be visible on the model like it was in Blender.
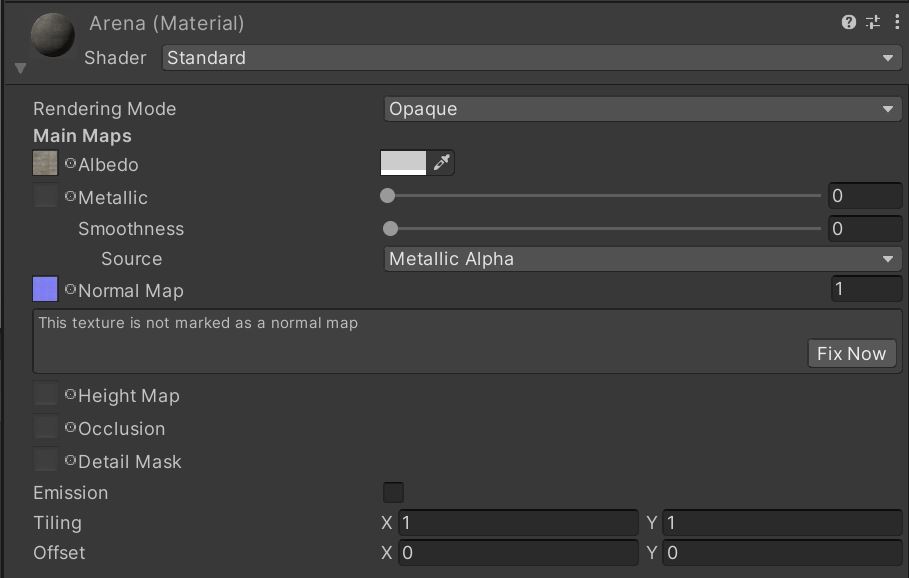
We can do this with the other maps as well, for example, we can drag and drop our normal map into our material.
Disadvantages Of Choosing FBX
Despite its widespread usage in the 3D industry, the FBX format has its share of disadvantages stemming from its proprietary nature, limited material and texture compatibility, and issues with complex animation and rigging.
Being aware of these challenges can help users make informed decisions and develop efficient workflows when dealing with 3D model exchange.
FBX is a closed, proprietary format owned by Autodesk. This non-open standard nature creates several issues.
For example, some software might not fully support FBX due to its proprietary nature, leading to data loss or corruption during import/export processes. Most game engines do fully support it, but always check to make sure.
Autodesk controls the development and updates of the FBX format. Updates might not always keep pace with the needs of the user community or be compatible with all software.
Another issue can occur when exporting more complex materials. While FBX can handle basic material and texture data, complex or custom shaders often present challenges.
Complex shaders or materials native to one software may not export correctly through FBX to another software. The result might be missing textures or incorrectly-displayed materials.
Occasionally, textures may need to be reconnected manually after import, especially if file paths change during the transfer, which can be time-consuming.
-
Animation-Ready Hard Surfaces in Blender
Preparing hard surfaces for animation with optimized topology in Blender.
-
Symmetry for Hard Surfaces in Blender
Ensuring symmetrical perfection in hard surface models with Blender.
-
Detail with Shrinkwrap: Blender Modelling
Achieving intricate detailing with Blender’s Shrinkwrap modifier.