One of the first areas of Blender that you begin to learn as an artist is the 3D viewport, where all of the 3D magic happens. Different objects in the viewport have different modes accessible to them but all objects have one mode in common, object mode.
Below is a list of some of the mode important Blender shortcuts that you will need to learn when working in object mode:
- Grab (G)
- Rotate (R)
- Scale (S)
- Delete Object (X)
- Add Object (Shift + A)
- Duplicate (Shift + D)
- Join (Control + J)
- Hide Objects (H)
- Apply Transforms (Control + A)
Regardless of what your project is if you require the use of the 3D viewport then you will also likely require many of the tools listed above. Using Blender shortcuts can help to streamline your workflow when in object mode.
The Basics Of Using Hotkeys In Blender
Hotkeys, or keyboard shortcuts as they are otherwise known, are single keys or a combination of keys that are pressed to activate a specific tool. Shortcuts are used in most well-known creative applications in 3D modeling, texture design, video editing, and beyond.
A hotkey can be assigned to a tool if it is not required for any task that is considered rudimentary fundamental to running the software or the device.
For example in Blender the G key is used in object mode to pick up selected objects in the 3D viewport, allowing you to change their location in the scene.
The Use Of Shift, Control, And Alt
There are normally more tools in any one area of the Blender UI than there are usable keys on the keyboard, so many hotkeys are actually a combination of two or three keys.
In addition to the primary key, you may also need to use a secondary key as well. These secondary keys are Shift, Control, and Alt on a windows device and Shift, Command, and Option on a Mac device.
The correct way to use these keys is to hold down the secondary key, and while that is held down press the primary key to activate the tool.
For example, if we press the A key by itself in the 3D viewport, we select all of the objects in our scene. However, if we hold down control and press A then we can open up the apply menu instead.
Using Parameter Keys
The initial hotkey is used to activate a tool, so by pressing the G key you can enable the move tool to change the position of the selected object, and when you are done you press the left mouse button to confirm the change.
While the tool is active however you can use your hotkeys to change the parameters of the tools that are being used, to change how the tool itself affects the object or scene.
With the grab tool you are able to move the object in 3D dimensions, but if you want to you can then press the X, Y, or Z keys to lock the grab tool to a single axis.
The Use Of Universal Hotkeys In Object Mode
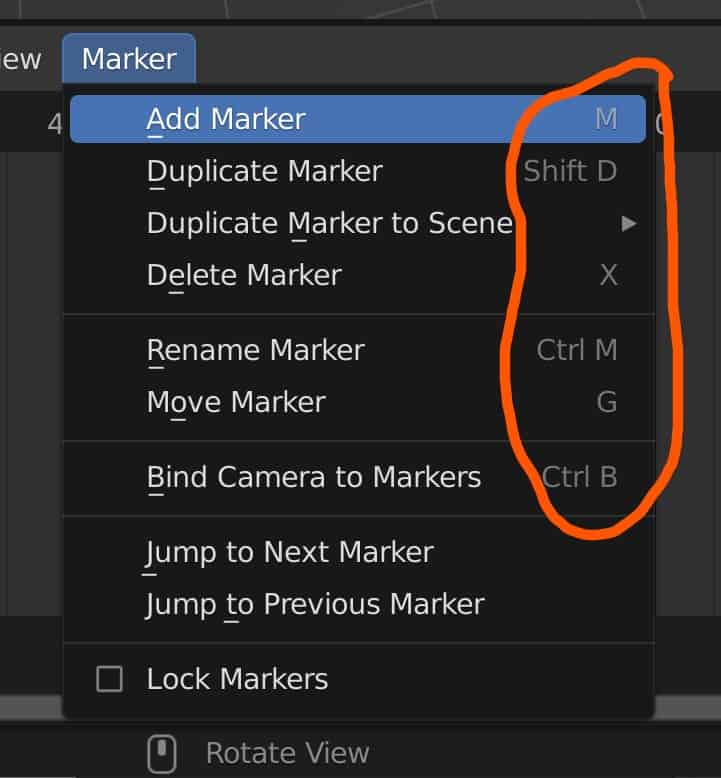
All hotkeys are cursor sensitive, which means that the effect of a hotkey changes based on where your mouse cursor is in the UI. Pressing M in the 3D viewport will activate the move to collection menu while pressing the same hotkey in the timeline will add a marker.
This is true for all hotkeys, where the keys function is relative to the panel where the mouse cursor is located in. Some keys however do the same thing, just in different panels. For example, the hotkey Shift + A is used to open the add menu in the 3D viewport, but it also opens the add menu in the node editor or the compositor.
We can refer to these hotkeys that perform similar actions in multiple panels as universal hotkeys, and they exist to make memorizing keys much easier for the end-user.
A Comprehensive List Of Keys Used In Object Mode
While the above list at the top of this article displays the key shortcuts that you will need to know, it is simply the tip of the iceberg even in object mode alone.
Below is a more comprehensive list of the hotkeys that can be used in object mode and what tools they are associated with…
- Select all (A)
- Deselect all (Alt + A)
- Box select (B)
- Circle select (C)
- Select Multiple (Shift + LMB)
- Context menu (RMB)
- Orbit (MMB)
- Pan (Shift + MMB)
- Zoom (Scroll Wheel)
- Dolly Zoom (Control + MMB)
- Delete Object (X)
- Add Object (Shift + A)
- Rename Object (F2)
- Grab (G)
- Rotate (R)
- Trackball Rotation (R > R)
- Scale (S)
- Lock To Axis Transform (G, R, or S > X, Y, or Z)
- Lock To Plane Transform (G, R, or S > Shift + X, Y, or Z)
- Tool Access Menu (Shift + Spacebar)
- Tool Shelf (T)
- Side Panel (N)
- Hide Objects (H)
- Hide Nonselected (Shift + H)
- Unhide (Alt + H)
- Join (Control + J)
- Parent (Control + P)
- Clear Parent (Alt + P)
- Apply Transforms (Control + A)
- Clear Location (Alt + G)
- Clear Rotation (Alt + R)
- Clear Scale (Alt + S)
- Appended Duplicate (Shift + D)
- Linked Duplicate (Control + D)
- Move To Collection (M)
- Insert Keyframe (I)
Where To Find Your Keymaps In Blender?
If you want to locate the hotkeys in Blender itself, then there are two ways that you can do so. If you are looking for the hotkey to a specific tool, then the best method is to locate the tool in the menu where it is stored in.
When viewing the menus, you will have a list of available tools in white text, and to the side, you will have the corresponding hotkeys in greyed-out text. If there is no grey text next to the tool, then there is no hotkey associated with that tool.
The second method is to use the keymap library where the data on all the hotkeys that are used in Blender are stored. To access the library go to Edit > Preferences > Keymap. Here you will find every hotkey that is used in every area of Blender.
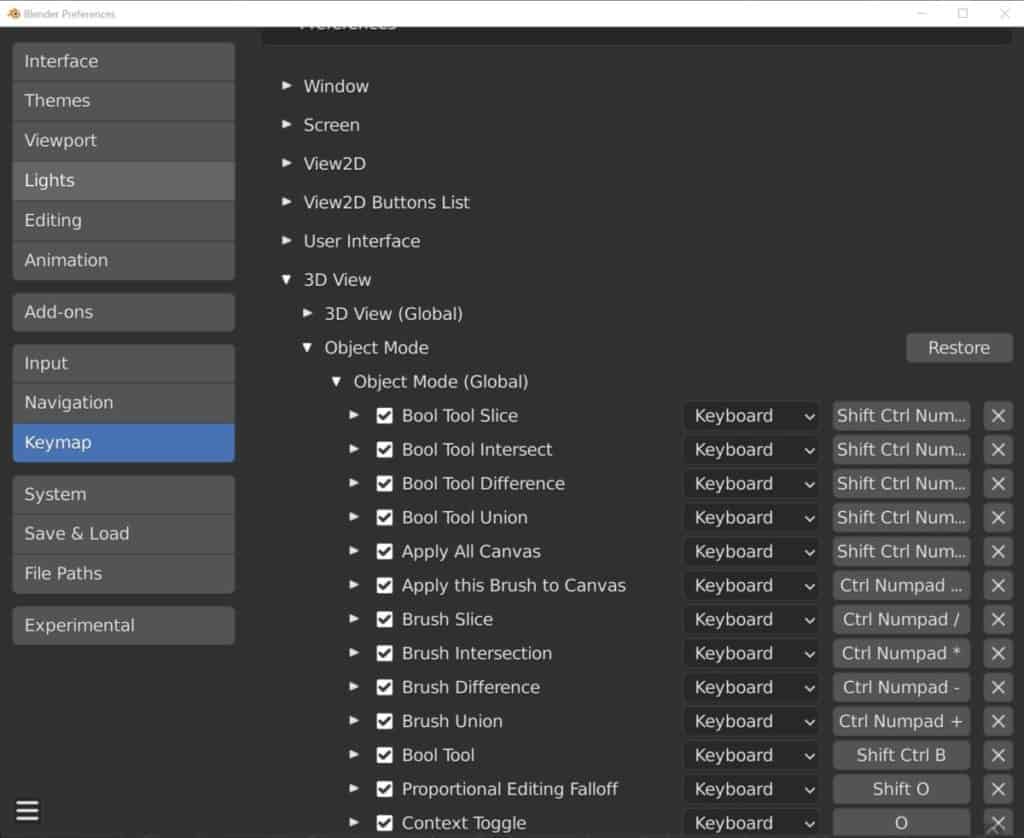
For hotkeys relating to the 3D viewport, go to 3D view > Object Mode to view the hotkeys that are used in this mode.
Thank You For Reading The Article
Thanks for taking the time to read through our article on using hotkeys in edit mode. Below we have gathered a list of additional topics that we think you may like to read…
- What Is The Hotkey For The Add Mesh Tool?
- What Is The Hotkey For The Subdivide Tool?
- How Learning Hotkeys Will Speed Of Your Workflow?
- Assigning A New Shortcut To A Tool
- What Are The Shortcuts For 3D Animation?
-
Skin Texturing: Subsurface Scattering Techniques
Mastering skin texturing with Subsurface Scattering techniques in Blender.
-
Anatomy Modelling: Blender Muscle Guide
Sculpting anatomically accurate muscles with Blender’s powerful tools.