When you are learning to use a 3D modeling platform such as Blender 3D, there are going to be certain tools that you’re just not going to need to learn. And then there are going to be tools that you absolutely must learn. One of these tools is the ability to duplicate your objects.
To duplicate an object in blender, select the object and go to the objects menu. Then select the duplicate option. This will create a second version of that object in the viewports, which you will then need to move and transport to another location. Alternatively, you can use the shift + D hotkey to create your duplicate directly in the viewport.
This is the traditional method for creating duplicates of your objects in Blender, but did you know that there is an alternative method to duplication as well as the ability you copy and paste models and even duplicate the individual vertices, edges, and faces of a specific object.
How To Create New Objects From Existing Ones Using Duplications?
Sometimes you will be creating scenes that require using the same object multiple times. Rather than creating the same objects from scratch again and again and again, it’s simpler to just duplicate the object that you have already created.
For example, in this scene, I have a family of Suzanne’s. I could just add them in or I could use the duplicate tool.
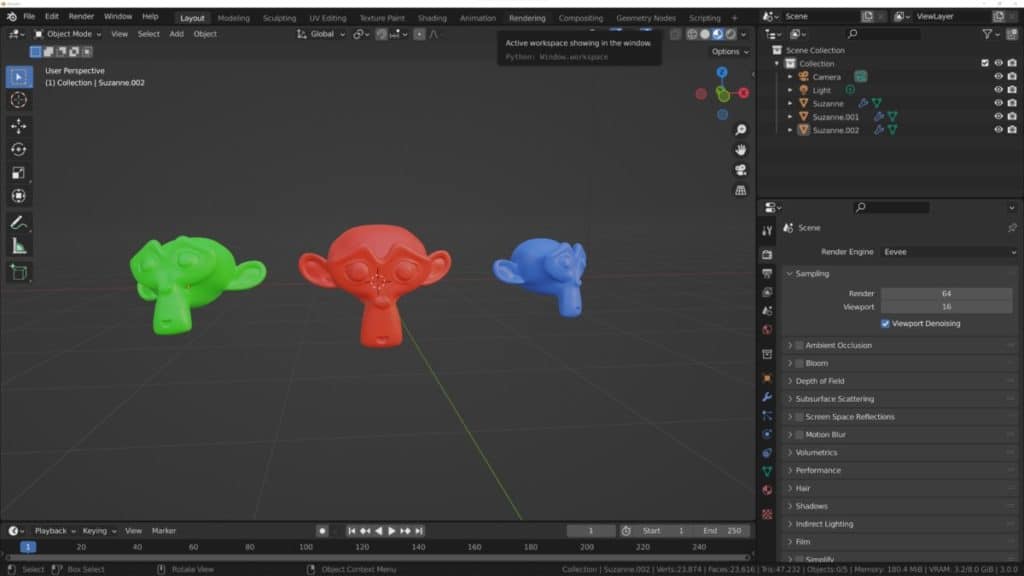
With the duplicates tool, we are able to create a second version of a selected object, inheriting everything about that object from its look, its topology, and its materials. To create our duplicates, we can go to our objects menu in the 3D viewport and then select the duplicate option.
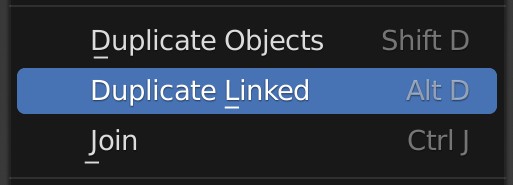
You will notice that there are two duplicate options here in this menu, duplicate objects and duplicate linked. The one that you want to choose is the duplicate objects option for now.
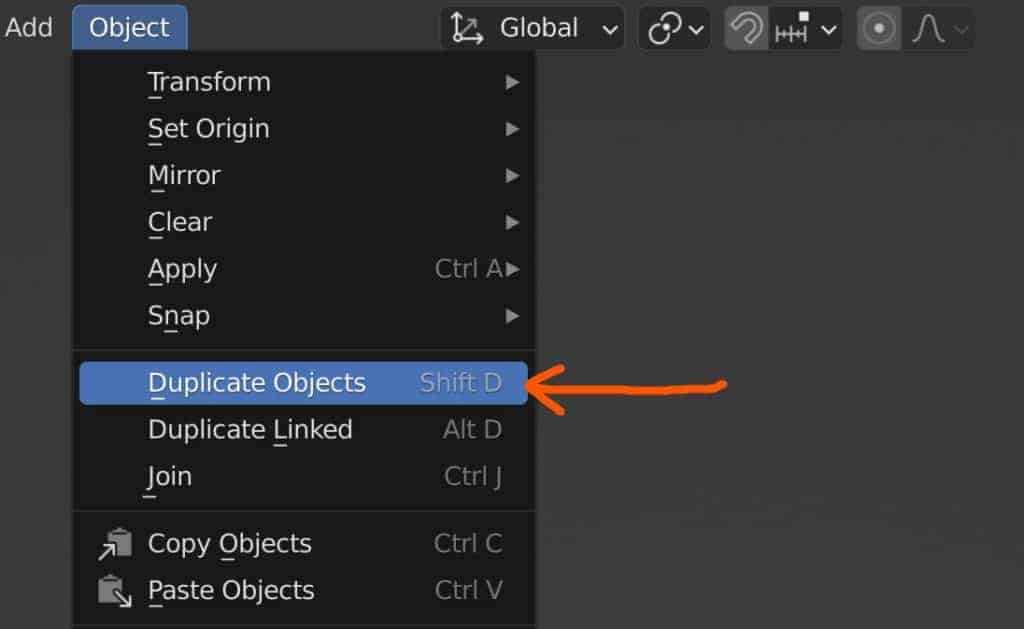
If you don’t want to access the duplicate tool from the menu, then you can use the dedicated hotkey which is for the standard form of duplication and is Shift.+ D on your keyboard.
In both cases, once we use the duplicate tool, we will need to move our new duplicated objects to a new location as they will be created overlapping our existing object.
It is easier to do this with the hotkey since as soon as we are able to create the duplicate, we are also able to move it without having to press any additional buttons.
The Two Main Methods Of Duplicating Objects, Appended And Linked
The second option for duplication that you will have noted as well is the duplicate linked option found in the Object menu. This will also allow you to create a duplicate version of your existing selected objects. However, there are a couple of key differences between the traditional form of duplication known as appended duplicates and the linked duplicates here.
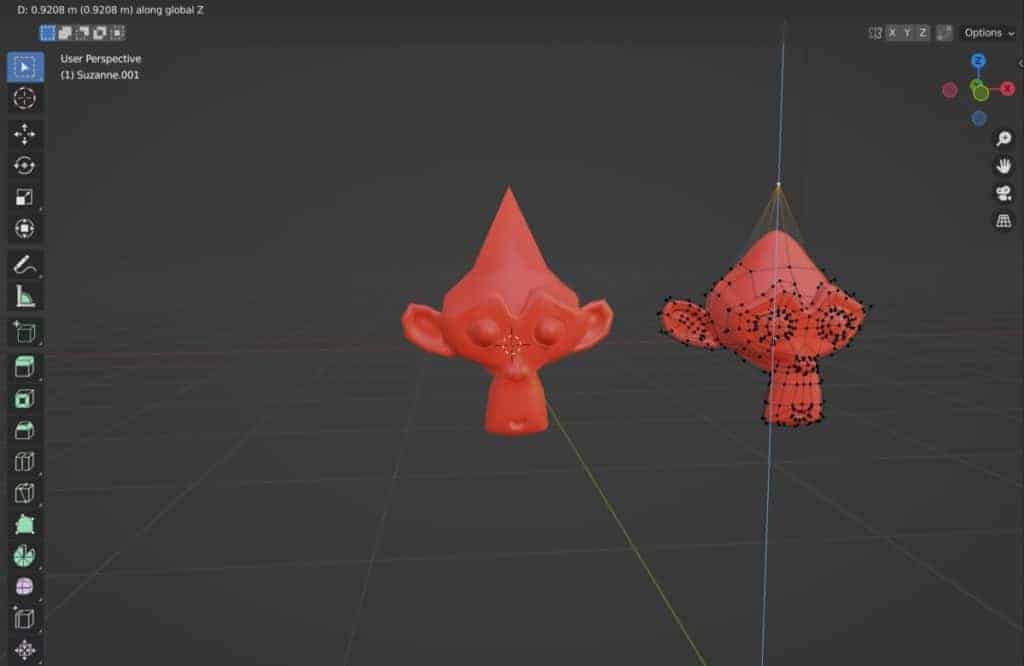
One thing that is similar between both appended and linked duplicates is the fact that the transforms are separated. Manipulating the transforms of the duplicates is not going to affect the original or vice versa. This may seem like a bit of a given, but when we actually use linked duplicates, it’s not the case for some of the other factors of our model, such as its shape.
If we enter edit mode for our linked duplicates, and then we attempt to change the shape of that model, we will notice that the shape of the original object will change in the exact same way. If we were to select the original object after creating a linked duplicate, we would have the same effect where changing the original object would also change the linked duplicates.
To understand this, we need to understand the various object data blocks that exist in Blender. The ones that we need to be aware of right now are the object data blocks, mesh data blocks, and material data blocks.
When we create an appended duplicate, the duplicated mesh will have its own object data and its own mesh data. However, the appended duplicates will share the same material data as the original, so they have the same material.
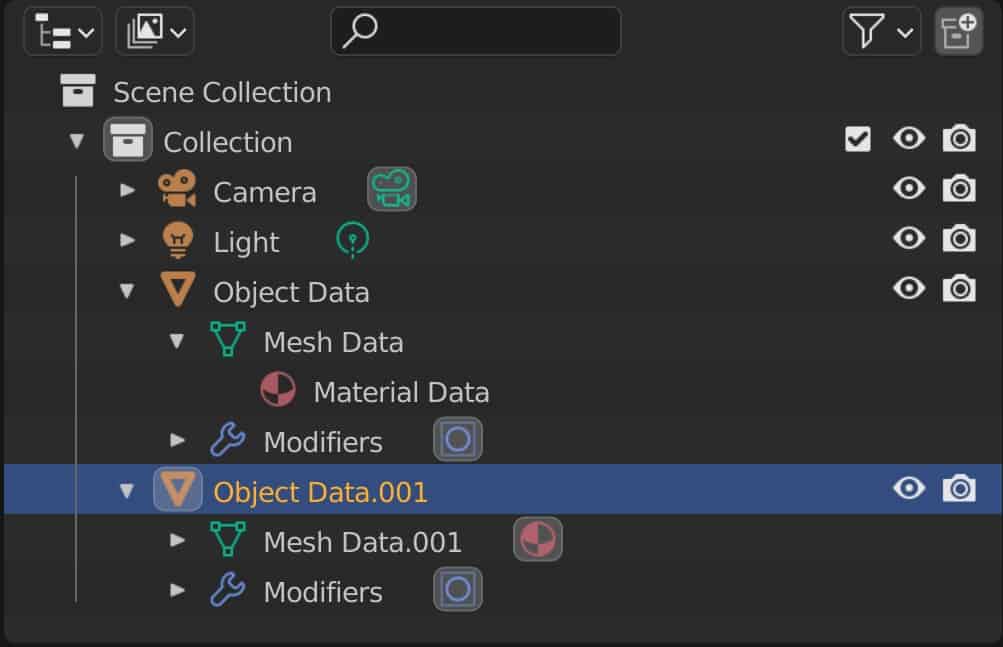
The link duplicate will have its own object data unique from the original. However, it will share the same mesh data. So what is the difference between object data and mesh data? Well, object data is all of the information surrounding the relationship of an object to the 3D space around it. For example, the transforms of that object.
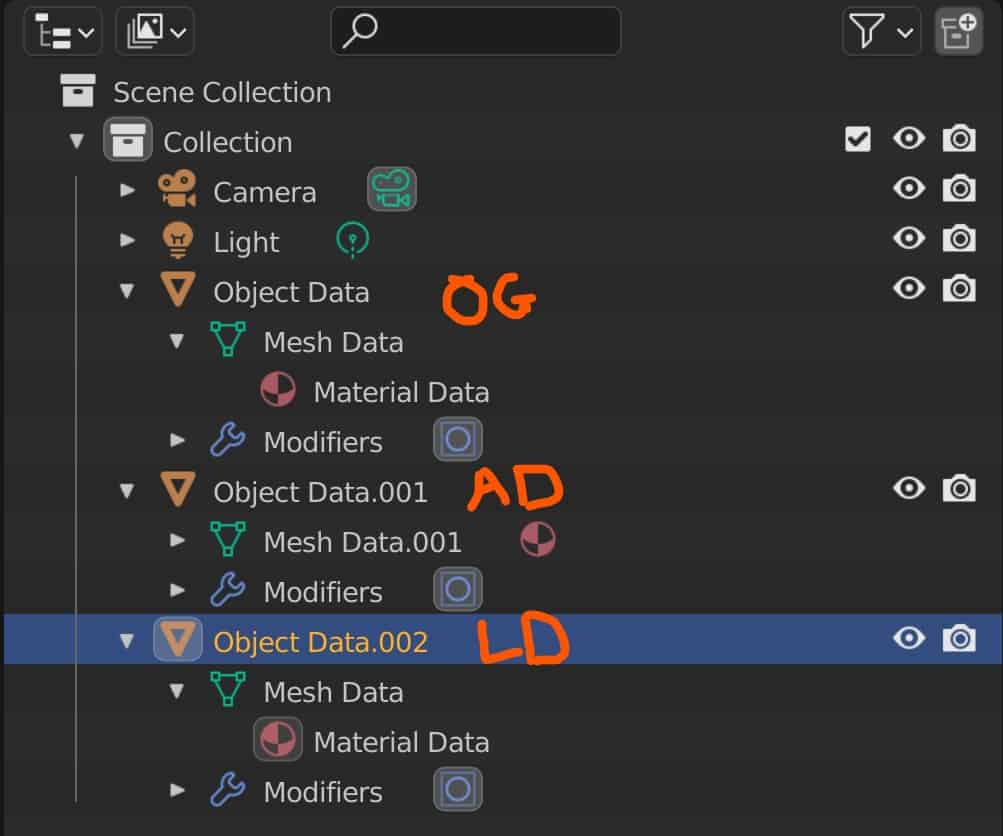
The mesh data, on the other hand, relates to the actual geometry used to create the shape of the model. In the case of linked duplicates, the mesh data is shared between the objects and so when you edit one object, you are editing the mesh beta rather than the object itself.
This is why when we edit one object then the linked object will be edited as well. However, because they have their own object data, manipulating the object data of your original object will not make any changes to the linked duplicate.
Like the appended duplicate tool linked duplicates have their own hotkey to use the tool in the 3D viewport without having to go to the menu. The hotkey for linked duplicates is Alt + D.
Creating Multiple Duplicates Fast With The Array Modifier
If you are creating a scene that requires you to build up a large array of duplicate objects very, very quickly, then using the duplicate tool is quick enough, but there is a faster method.
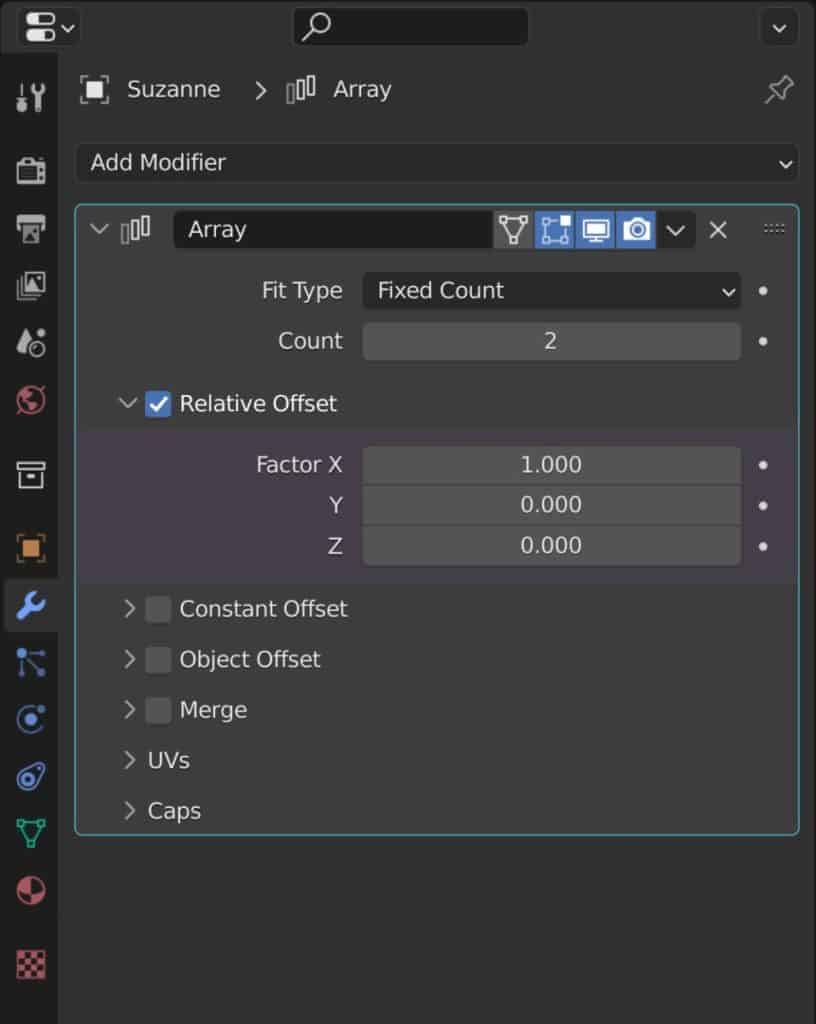
That method is to use the array modifier, which is effectively the procedural version of the duplicate tool. With the array modifier, we are able to create as many instances of our base object as we require.
Go to the modifiers tab for the main object and then select the add modifier button to open the menu. Under the generate section selection, it should be at the top of the list based on alphabetical order.
The Fit Type
You will be able to control certain parameters to dictate exactly how you want the array to work. For example, you can control your array with the fit type.
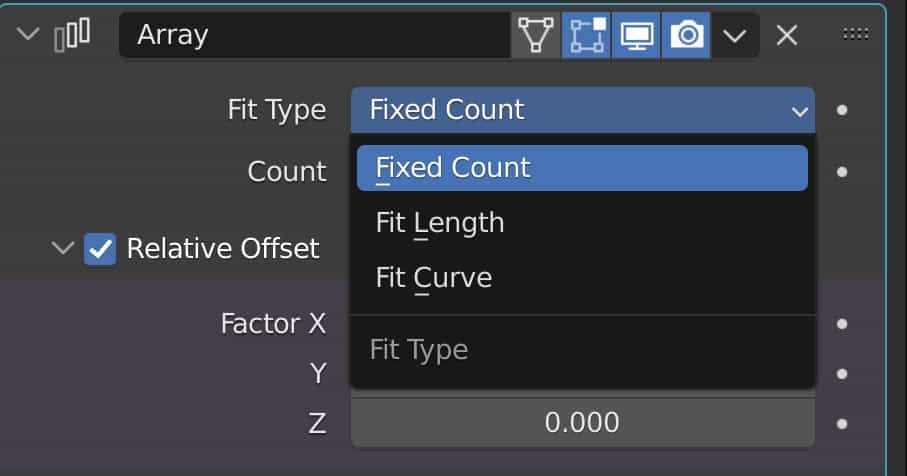
The default setting is for the count option, which will allow you to use a numerical value to decide exactly how many instances of an object you want. This value is located directly below the type option.
The second fit type is to choose the fit length option. With this, you can define a distance and then Blender will create an array of objects that all fit within that specific distance. Again, this value will be found directly below the fit type.
With the fit curve option, you are able to create an array based on a curve object that you create in Blender. You can manipulate the curve object to go in any direction that you want, and then use the array modifier so that you can fit your objects onto that curve.
If you want to learn more about Blender you can check out our course on Skillshare by clicking the link here and get 1 month free to the entire Skillshare library.
A good example of using this would be when you have a car model and you want to create a road, where you have a series of cars that are positioned along that road, you can use a curve to create the road and you can also use the same curve to map your array of cars onto the road.
Instead of a numerical value, you will have to define the curve that this modifier is going to use for the array, located directly below the fit type.
The Offset Types
Other options here include the offsets, the relative offset, for example, allows you to manipulate the distance between each instance based on the free axes XY and Z.
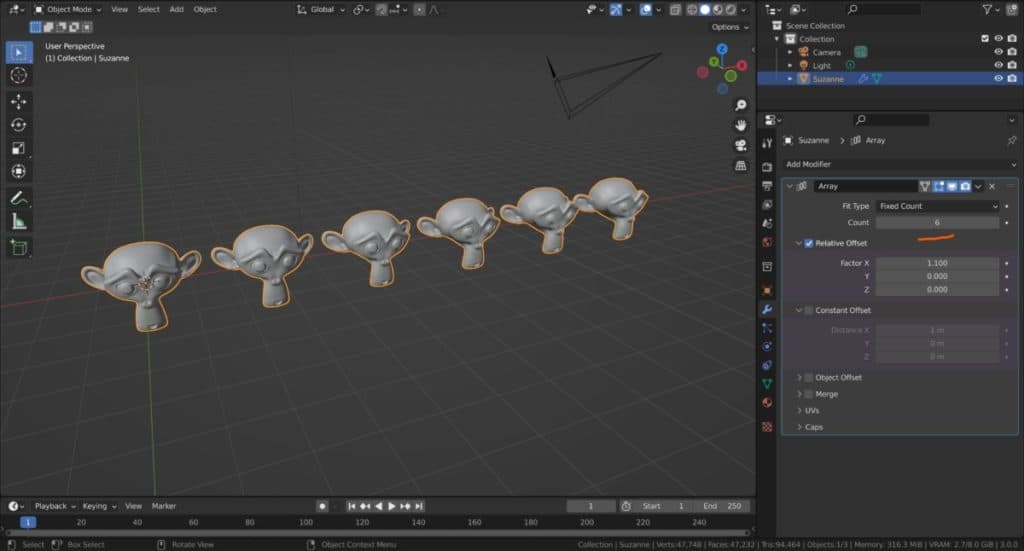
When using relative offset, the values are based on the size of the object itself. So if you use a value of 1 on the X-axis for Susanne, then you will notice that there is practically no space in between the ears.
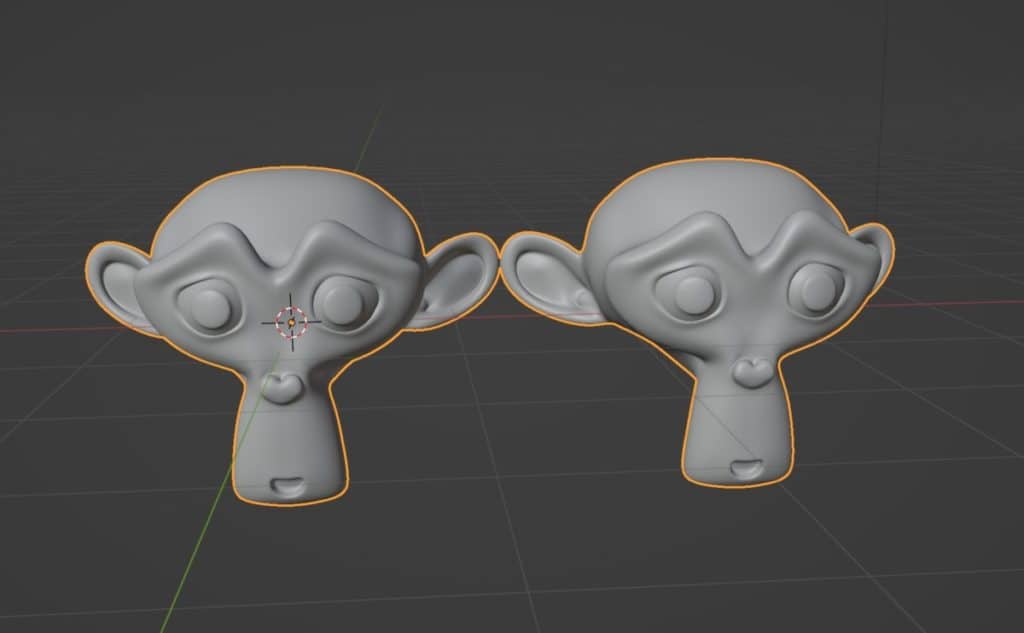
The objects are not overlapping, but there is no distance between them. However, increasing this value will increase the distance between the two objects or the array of objects on that specific axis, if that value is over 1. If the value is less than one, then the objects are going to begin to overlap on that specific axis.
The constant offset on the other hand will allow you to vary the distance of the array based on the actual distance in the 3D viewport and not the size of the model. The constant offset changes based on the units of measurement used.
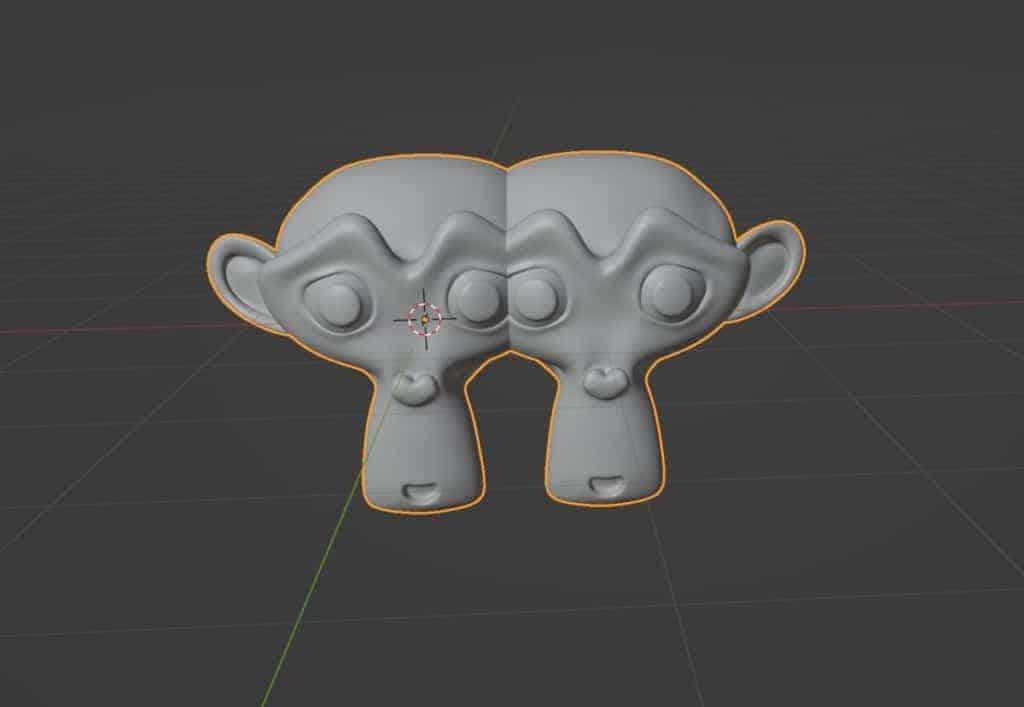
By default you will be using blender units, so a value of one on the X-axis will move your array across by one blender unit. In the case of a cube, what this means is that the offset will actually overlap the array because the cube is two blender units across, so we will need to use a value of at least two on one axis, Say the X-axis in order to prevent overlapping from occurring.
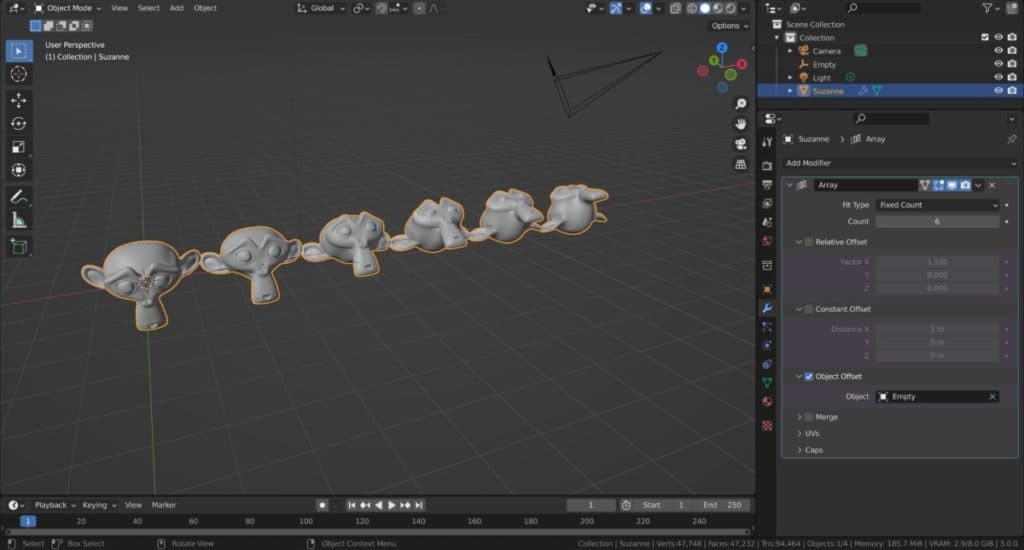
Then we have the objects offset option which allows you to create your array based on an additional object which is normally an empty object. For example, you can position an empty in your scene and then assign the object offset to that empty.
As you move and manipulate the empty object, you can control the array that you have created.
Can You Duplicate Objects And Geometry In Edit Mode?
Not only are you able to duplicate whole objects in object mode, but you can also duplicate your geometry in edit mode. For example, if you were to go into edit mode for the UV sphere and then hit the Shift + D key, you will be able to create a duplicate of your UV sphere but in edit mode.
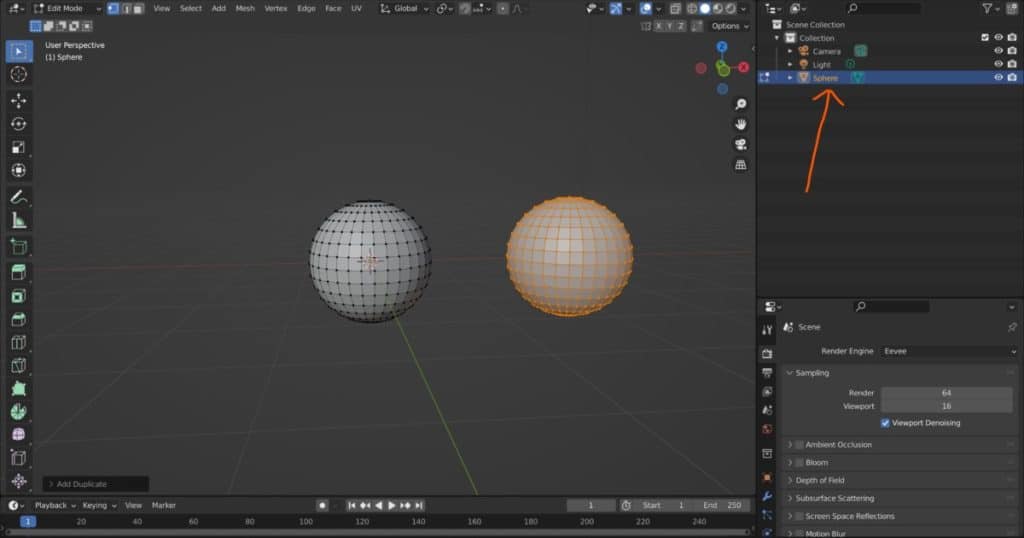
You will still need to position your duplicated geometry, but when you do you will find that you have two UV spheres. However, there is a key difference here.
Even though you have two UV spheres, because you created them in edit mode, these two UV spheres are actually a single object.
If you hit the TAB key to go into object mode, you will find that both of these objects are manipulated at the same object origin, and in the outliner panel, you will also find that no new objects have been created, which is what happens if you were to use the duplicate options in object mode.
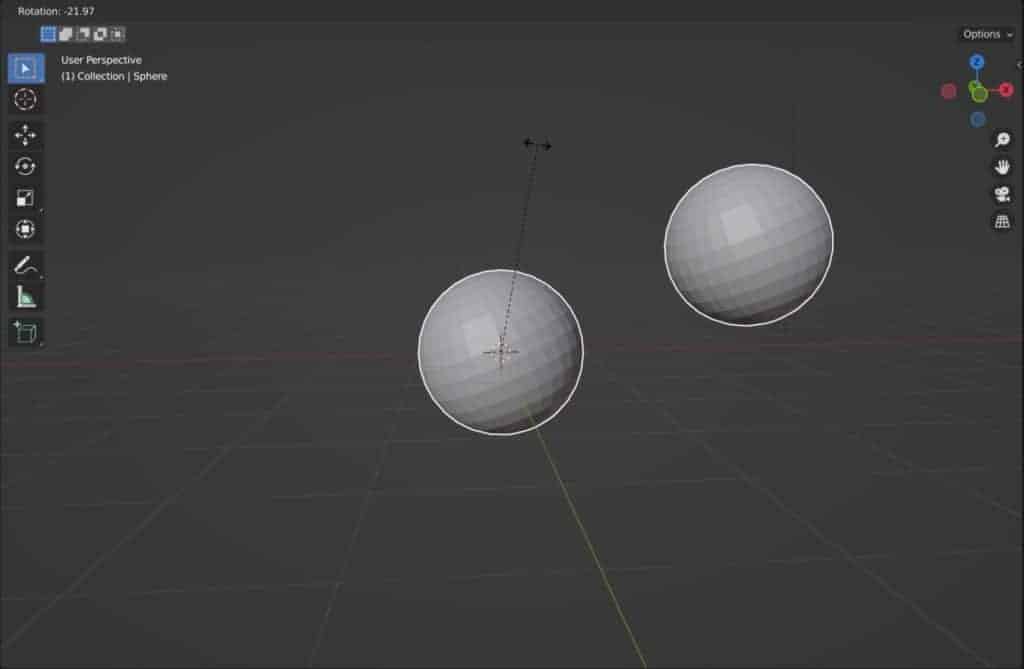
You don’t have to select all of your geometry though in Edit mode and duplicate it all at once. You can just select a part of your object in edit mode and then you can use the Shift + D tools to create a duplicate.
Using Copy And Paste As An Alternative Way Of Duplicating Objects
While it is not used nearly as much as the traditional duplicate tools, Blender does have its own copy and paste system for objects in the viewport.
What you can do is you can select an object in object mode and then use the hotkey Control + C to create a copy of your object.
Then you can use the hockey Control + V to paste that object into the 3D viewports. This will create a duplicate at the same location. However, there is a key difference here between copy and paste and the other methods of duplication.
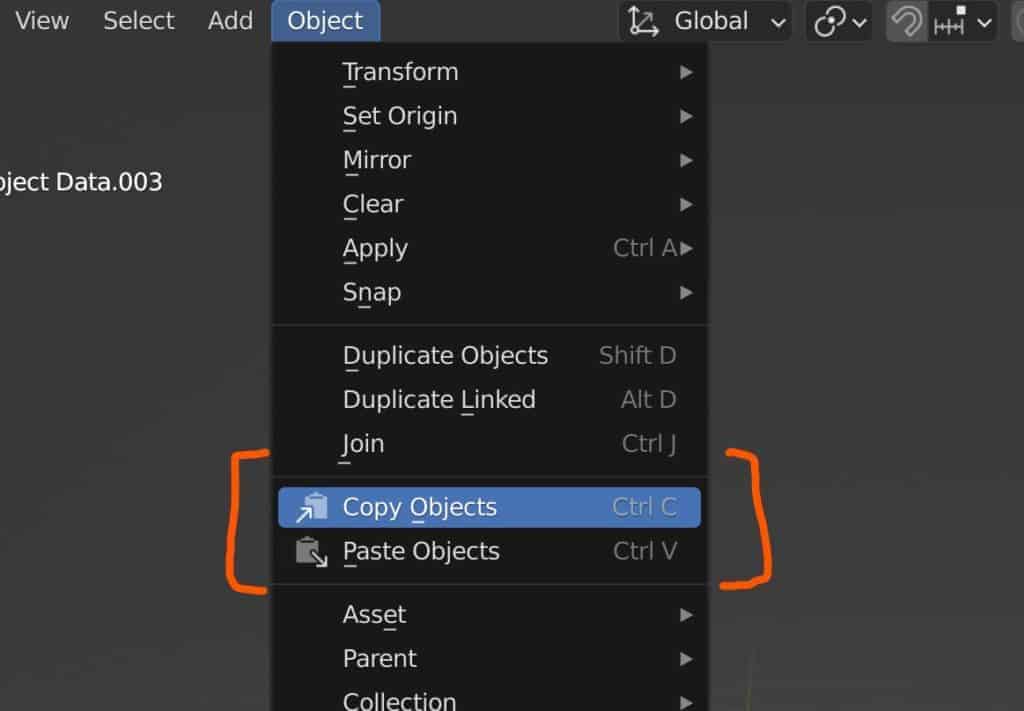
With the linked duplicate option we are able to duplicate an object so that it has its own object data, but shares the mesh and material data. For appended duplicates, we will have our own object data, our own mesh data, but will share the material data.
When copying and pasting, we will share nothing, so we will have our own object data, our own material data, and our own mesh data.
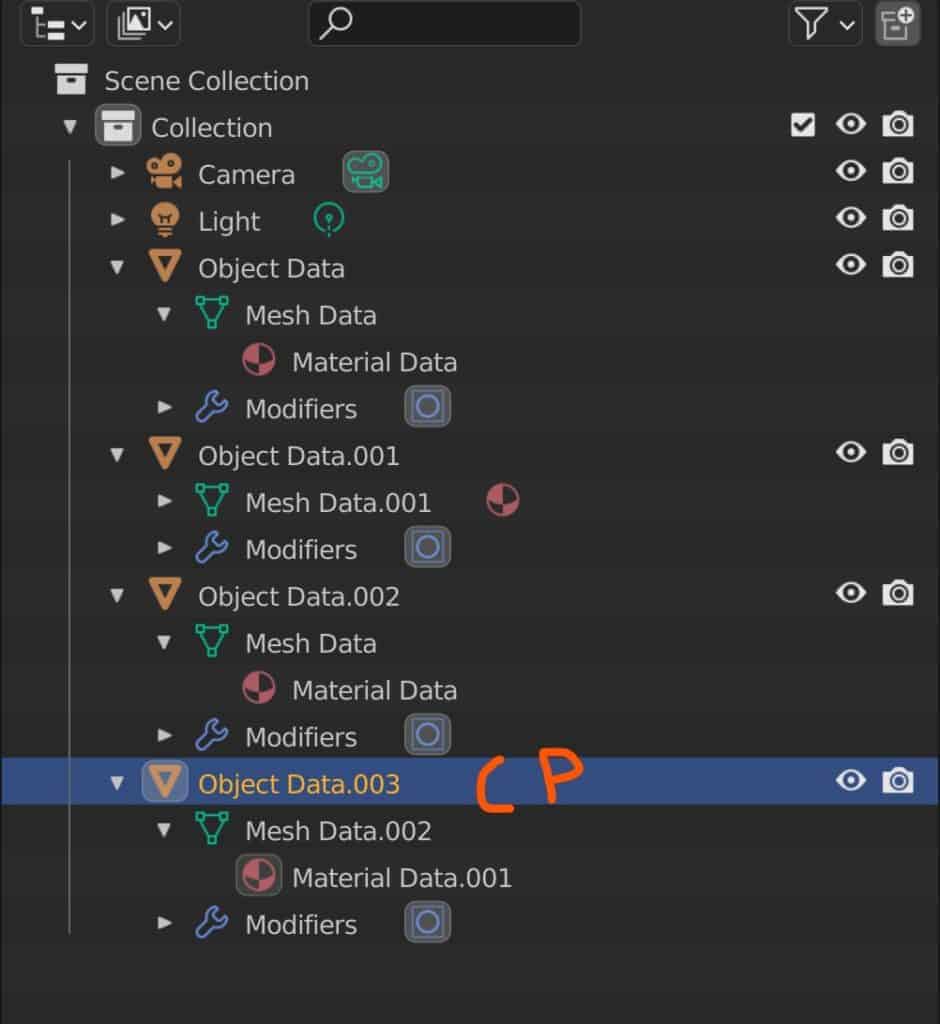
So copy and paste allow us to create an instance of the original model that is unique. When we edit the object data, the object data is independent, so it doesn’t affect the other objects.
When we manipulate the mesh shape of our pasted object, we can do so without it affecting the other objects, and even with the material data, we have separate materials. So if we change the color of our pasted object, it will not affect the original.
How To Separate Objects That Have Been Linked?
There were times when you may decide to create a linked duplicate sharing the mesh data. However, you may then decide that this is not what you wanted to do, and you will want to actually create separate mesh data for your duplicate object. So the question is how can you separate objects that have been linked duplicated?
To perform this separation, go to the objects menu for your linked duplicate. Locate the relations option halfway down this list.
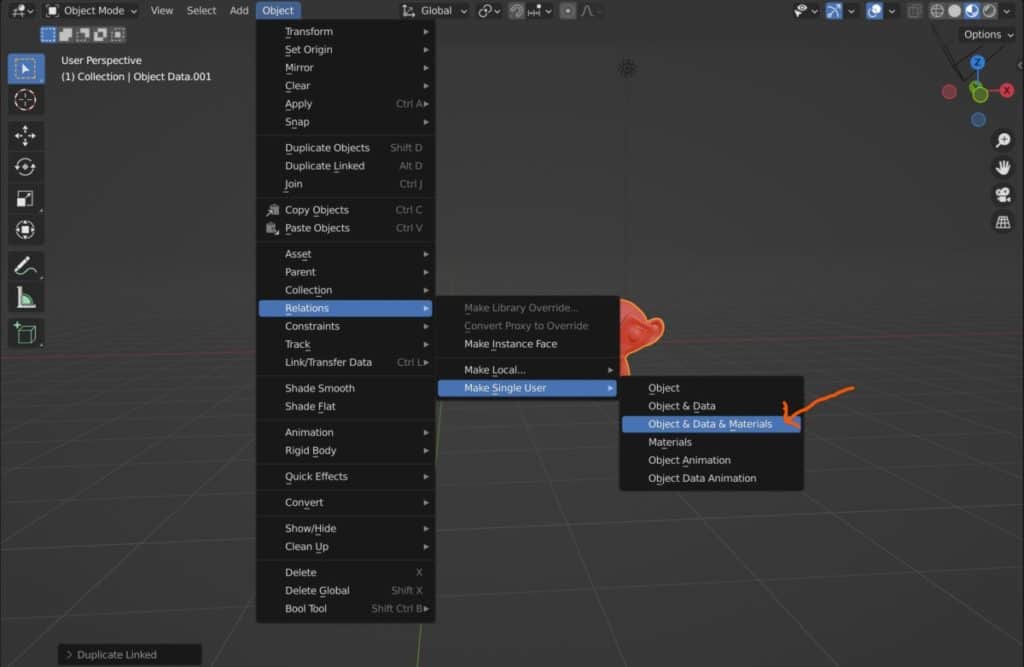
Open up this menu and you will see that you have the ability to make a single user. Hover over this and you will be met with another menu.
From this menu, choose the object and data option. This will separate your mesh data from the original object. Thus converting your linked duplicates into appended duplicates instead.
Separating Objects Created In Edit Mode
Going back to our example where we created extra geometry by duplicating it in edit mode with the UV sphere. What if we did this by mistake? It’s not something that’s unheard of, and it’s actually something that I have done before where I have created a duplicate of a model in edit mode when I intended to do the same thing in object mode.
Blender allows us to separate our geometry into multiple objects. In the example of our duplicated geometry, we can use the L key to select an island of our mesh, which in this case would be the duplicate of the UV sphere. With that geometry selected, we can then hit the P on our keyboard, which will open the separate menu.
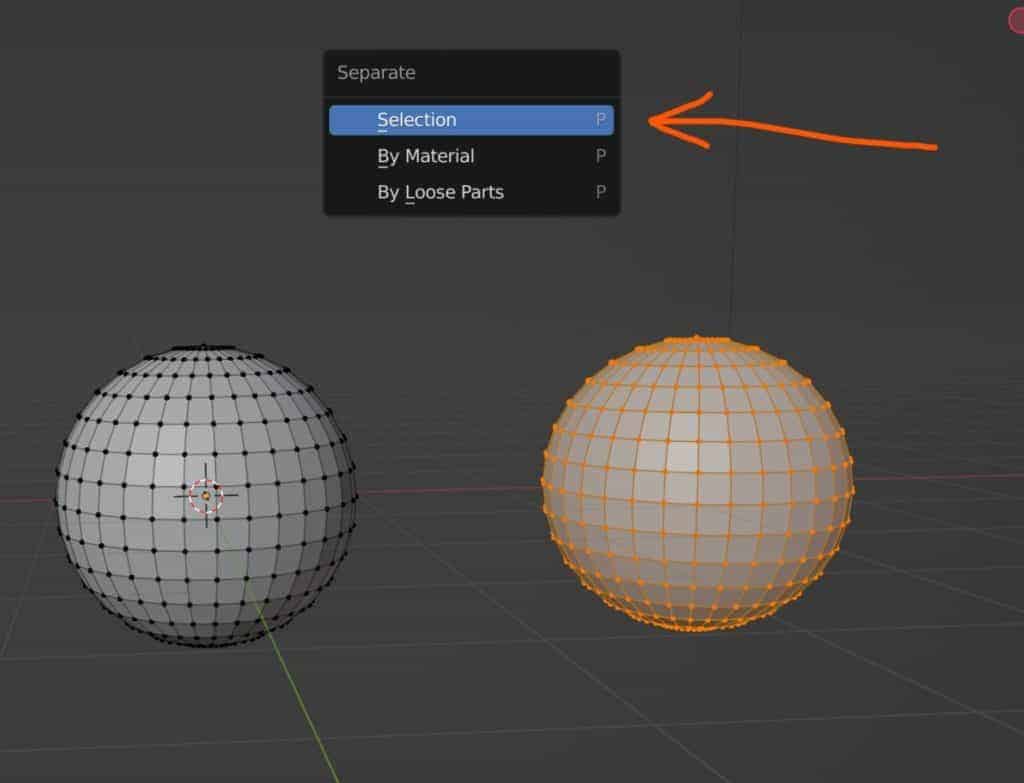
We can choose to separate either via our selection or via loose parts. We can also do so by material as well, but in the case of our duplicated geometry, this won’t be very useful.
If you have selected your island, then you can just use the selection method. Alternatively, you can use the loose parts option and the result will be the same.
The geometry will split into multiple objects based on the method used for splitting that geometry.
Thanks For Reading The Article
We appreciate you taking the time to read through the article and we hope that you have been able to locate the information that you were looking for. Below we have compiled a list of additional topics that are available for you to view and learn more about Blender.
- The Best Method For Improving Your Skills In Blender Is…
- Cleaning Your Objects Geometry After Using A Boolean
- Joining Our Vertices To Create Better Geometry
- A List Of Reasons To Use Blender
- Making A Simple Character Model
-
Optimize Render Settings in Blender
Optimizing Blender render settings for quality and efficiency.
-
Node-Based Compositing in Blender
Exploring the power of node-based compositing in Blender.
-
Compositing Masks in Blender Explained
Demystifying compositing masks for creative control in Blender.
