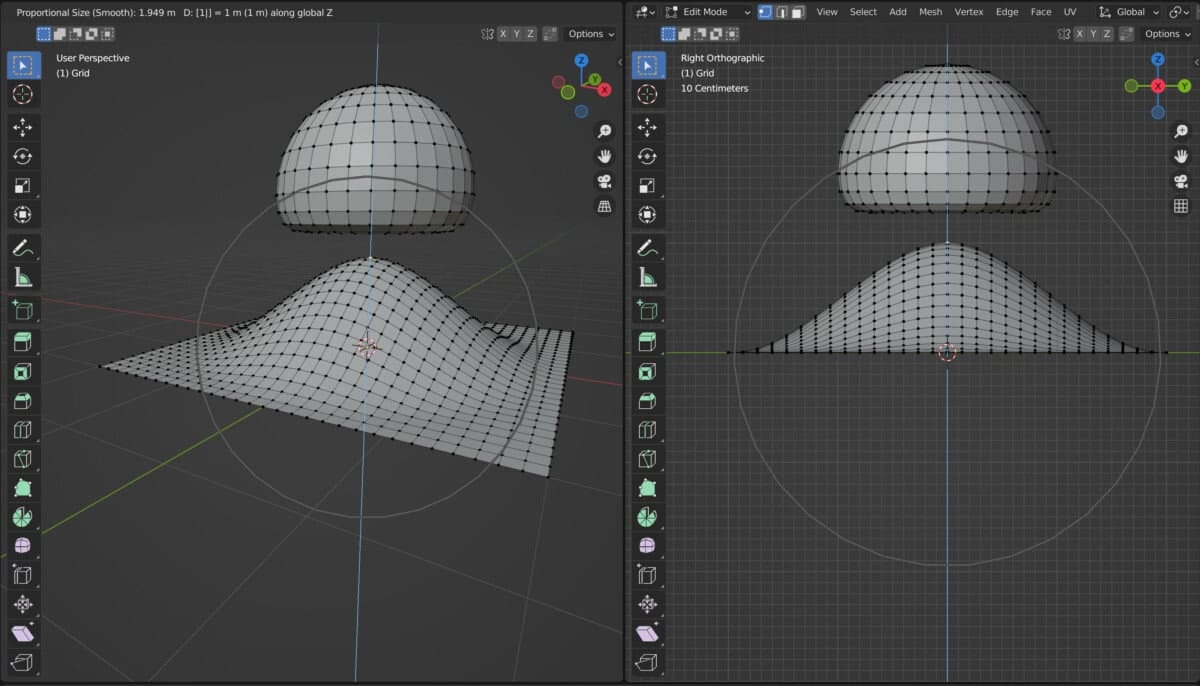
Traditional editing requires us to select a form of geometry, like a vertex, and then use the grab tool to reposition that geometry to reshape the model. However, grabbing a single vertex can create unappealing shapes as the surrounding faces are stretched.
Proportional editing creates a field around the selection that allows the user to influence surrounding geometry based on an adjustable falloff value, allowing the user to create more natural shapes through editing. The tool can be activated by pressing the O key on our keyboard.
Learning how to use proportional editing requires you to understand how falloff works. This will determine the way in which your surrounding geometry is manipulated by the grab tool.
In Which Mode Can I Use Proportional Editing?
A lot of tools are only accessible within a single mode of the 3D viewport. For example, the extrude and inset tools are only available when in edit mode for a specific object.
Proportional editing is available in both object mode and edit mode. In object mode, it can be used to manipulate multiple objects at the same time when grabbing, rotating, or scaling a single model.
The idea of using proportional editing in object mode is so that other objects are influenced to varying degrees based on their proximity to your active selection.
For example, if we were to have two main objects in our scene, a cube, and a UV sphere. We select the cube and then increase the radius of our proportional editing circle until our grab tool influences our UV sphere.
The larger the circle of influence, the more the second object will be influenced by our tool, despite the fact that it is not a part of the selection.
However, the primary use case of our proportional editing tool will be in edit mode, where we will select specific geometry such as a vertex, edge, or face. Then we will use proportional editing to manipulate the geometry surrounding our selection.
How To Enable Proportional Editing?
As with many tools, there are at least two ways to enable proportional editing in Blender. The first method is to activate proportional editing using the button located in the header bar of the 3D viewports.
This button looks like a small circle and can be found towards the center of the header bar. It will be found just to the side of our snapping options.
Left-click on the button to enable proportional editing, and then if you hover your mouse over the 3D viewport and activate one of the three transform tools, you will notice that there is a tinted circle that surrounds the mouse. This represents the area of influence for our proportional editing tool.
An alternative method to using proportional editing is to use the hotkey. The hotkey to enable proportional editing and disabling the tool, is the O key.
Adjusting The Area Of Influence
The easiest way to adjust your proportional editing is to manipulate the area of influence. This appears as a circle that surrounds your cursor.
The idea here is that any objects that fall within our circles’ area of influence will be affected by proportional editing when working in object mode.
We have several objects lined up in our scene to quickly display this. We also view our scene from a top-down orthographic view.
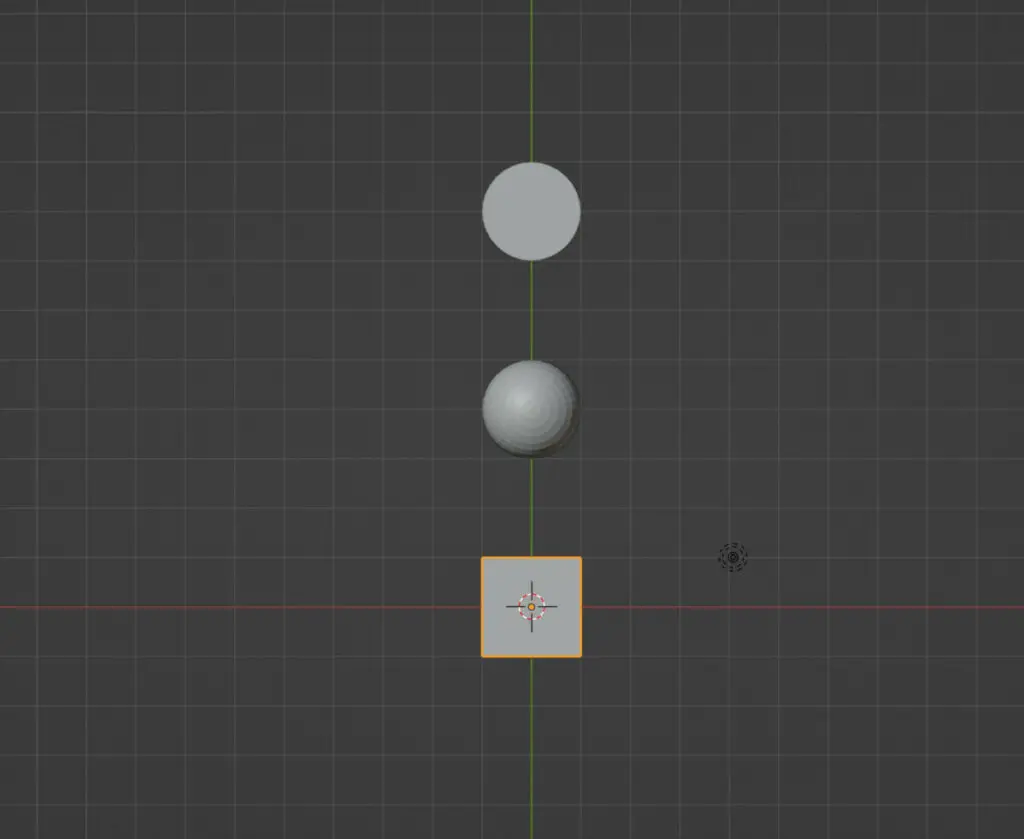
The easiest way to display how proportional editing affects other objects will be with the rotate tool. So activate the rotate tool, which will also display your area of influence if you have proportional editing active.
Simply rotating our cube objects, which is the active selection, will not impact our UV sphere or cylinder in this example because the area of influence is too small.
With the proportional editing tool active, we can use our scroll wheel to increase this circle size.
Scrolling up on your middle mouse button will decrease the size of your circle and therefore decrease the area of influence.
Scrolling down on your middle mouse button will increase the size of your circle and increase the influence area.
Objects will not fall into the area of influence until their object origins do. In our example, we will Scroll down on our middle mouse button to increase the area of influence so that the second object just about falls inside of our circle.
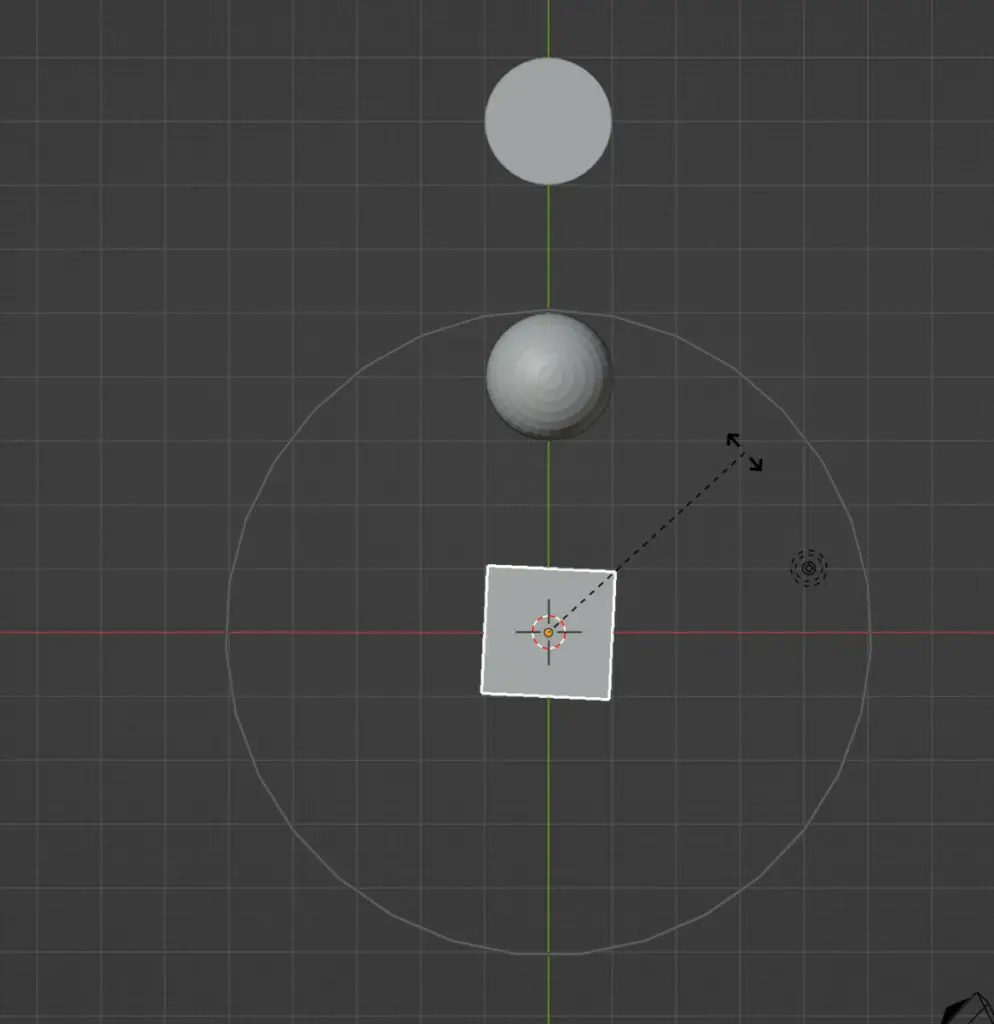
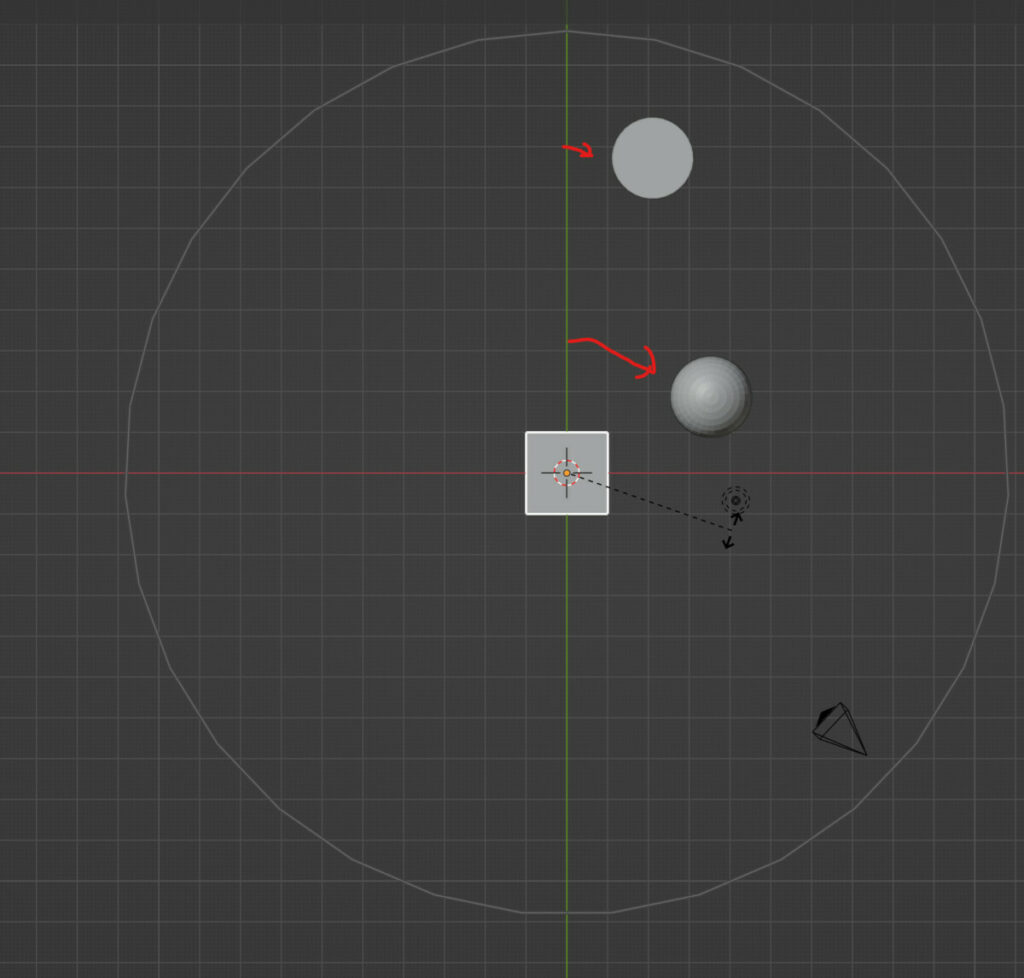
If we then use the rotate tool to rotate the cube object, we will notice that it affects the UV sphere. However, this effect appears to be minimal by comparison.
Due to the falloff being used by proportional editing, the closer an object is to the center, the more heavily influenced it is by our transform tool. Therefore, because our UV sphere is on the edge of our circle, it is not influenced as strongly as our cube objects.
For example. This is how it would look if we were to rotate our cube by 90 degrees on the Z axis.
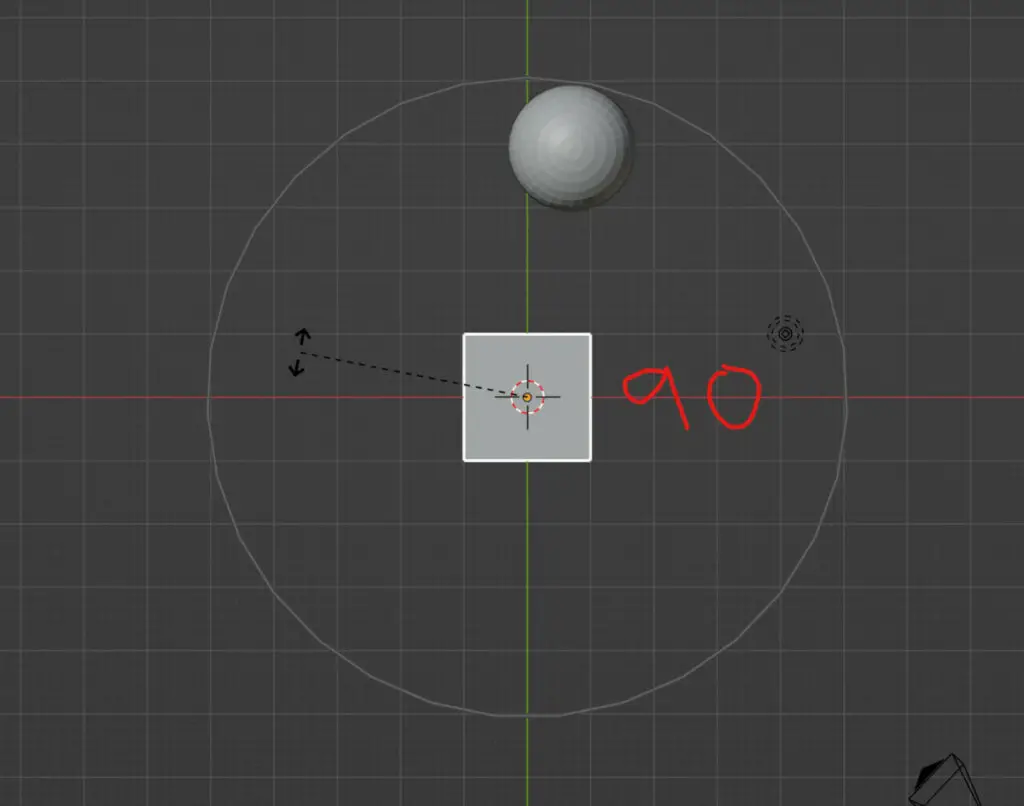
You can see that wall proportional editing is having an affect on our UV sphere. It is not a very strong one.
Now let’s try increasing the area of influence even further. Let’s say just before we reach the objects origin of the third object.
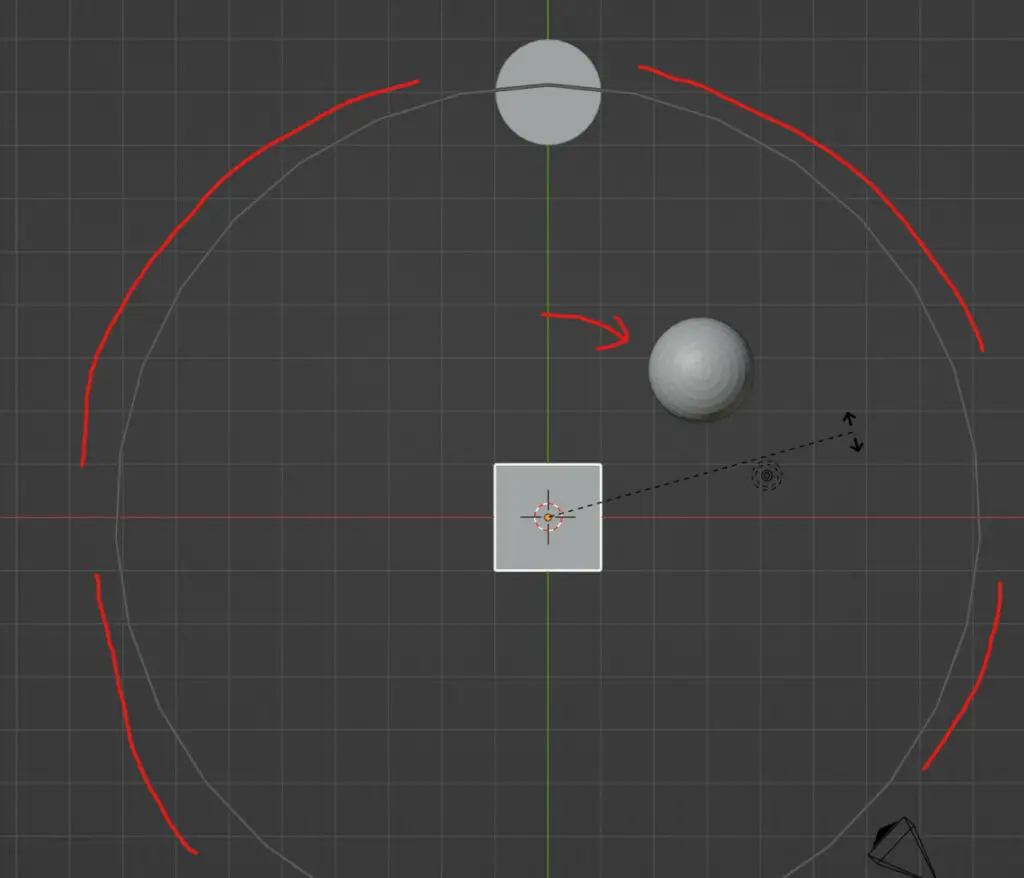
The third object remains unaffected because its objects origin does not entirely fall within our area of influence. However, the second object has moved considerably more than it did initially.
This is even though the cube has been rotated by the same amount, but because the UV sphere now falls closer to the centre than it does to the edge of the circle, it is receiving more influence from the proportional editing tool.
Finally, if we were to increase the area of influence just beyond our third object and then rotate, we would get an even more precise idea of how influence is being affected by each object.
How Does Falloff Work With Proportional Editing?
The reason why objects that are closer to the center of the circle are influenced more than those to the edge of the circle is that proportional editing uses falloff.
Without falloff, it can’t be referred to as proportional editing and would behave almost the same way as just selecting multiple objects.
Think of falloff in the traditional sense as a range between one and zero; one represents the very center of our circle. This is where the influence is going to be strongest.
Silver represents the very edge of the circle where there is no influence from the proportional editing tool.
If a circle has a radius of two meters and then you have an object that is 1 meter from the center, then it would have an influence of approximately 0.5.
This is only assuming that the falloff works as a linear scale, but there are, in fact, different types of falloffs that would change what the approximate value would be.
To access the various ways we can adjust our falloff, we have a menu located next to the proportional editing button in the header of the 3D viewports. Left-click on this menu to open up our falloff menu.
You should find the following options here in the falloff menu:
- Smooth
- Sphere
- Root
- Inverse Square
- Sharp
- Linear
- Constant
- Random
How Do The Various Falloff Types Work?
To best display how falloff works with proportional editing, we will transition from object mode to edit mode. For this example, we will be using a subdivided grid so that it has plenty of geometry.
We then go to select the central vertex of this grid and display how proportional editing affects our selection.
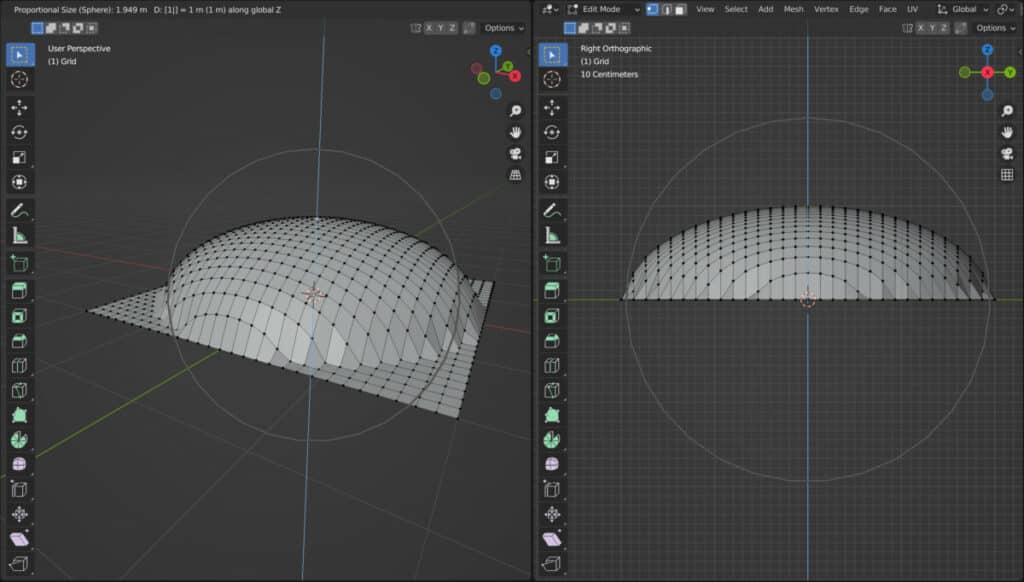
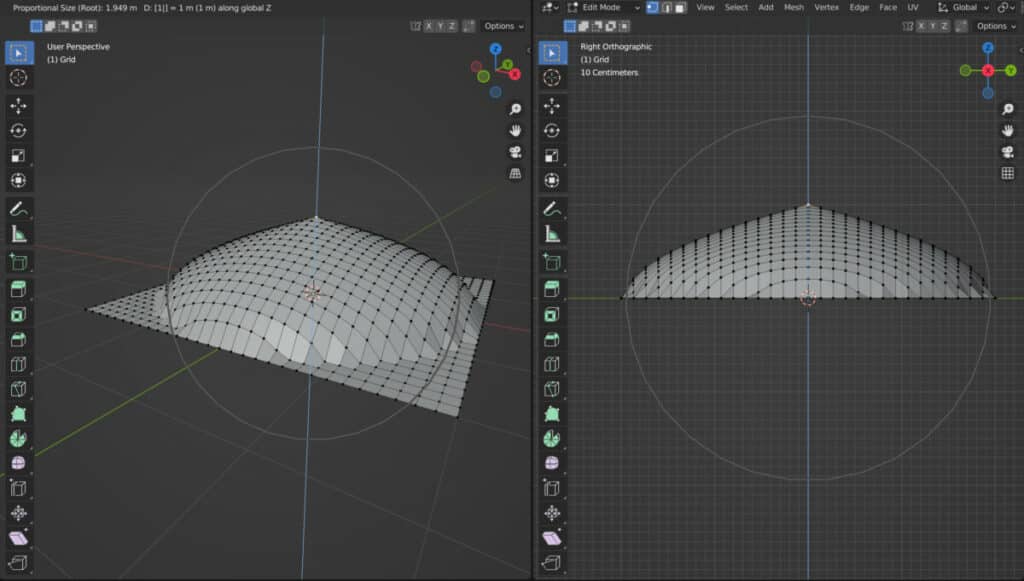
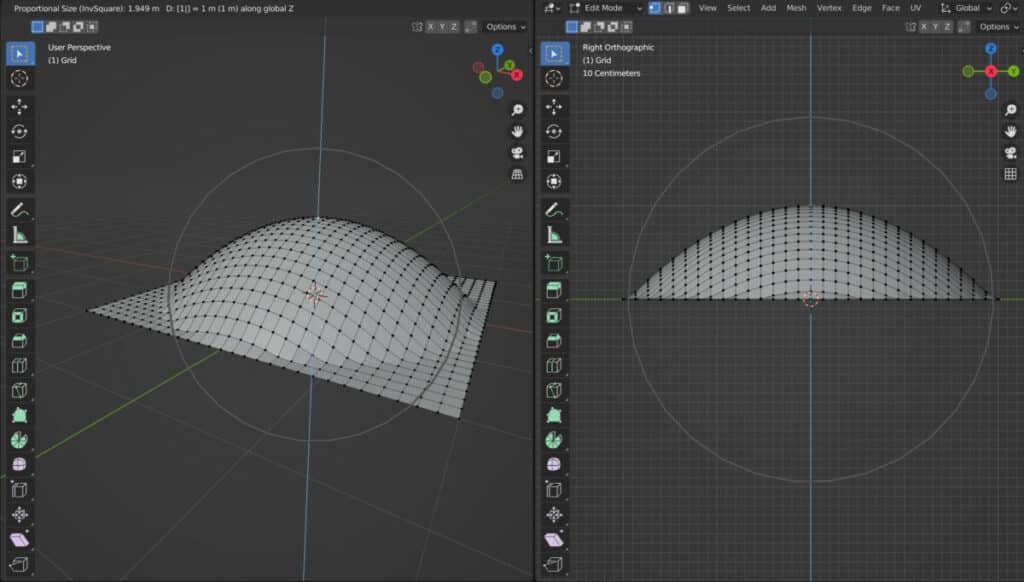
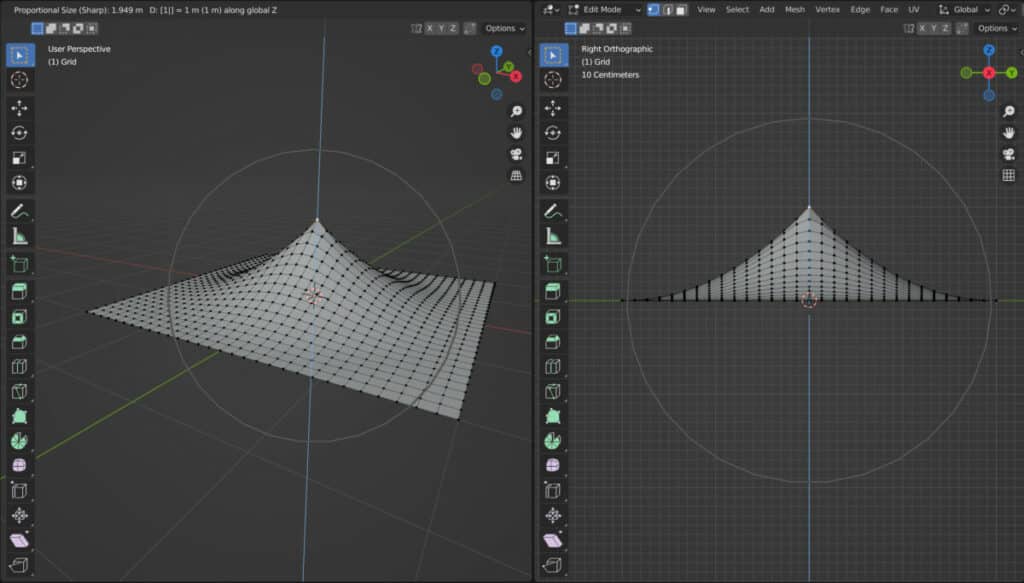
In addition, we are also splitting our viewport into two. One viewport will display the effects of each falloff in a natural perspective view, and the other will use a side orthographic view.
Note that there are two additional options in proportional editing when working in edit mode, but leave them unticked for the example.
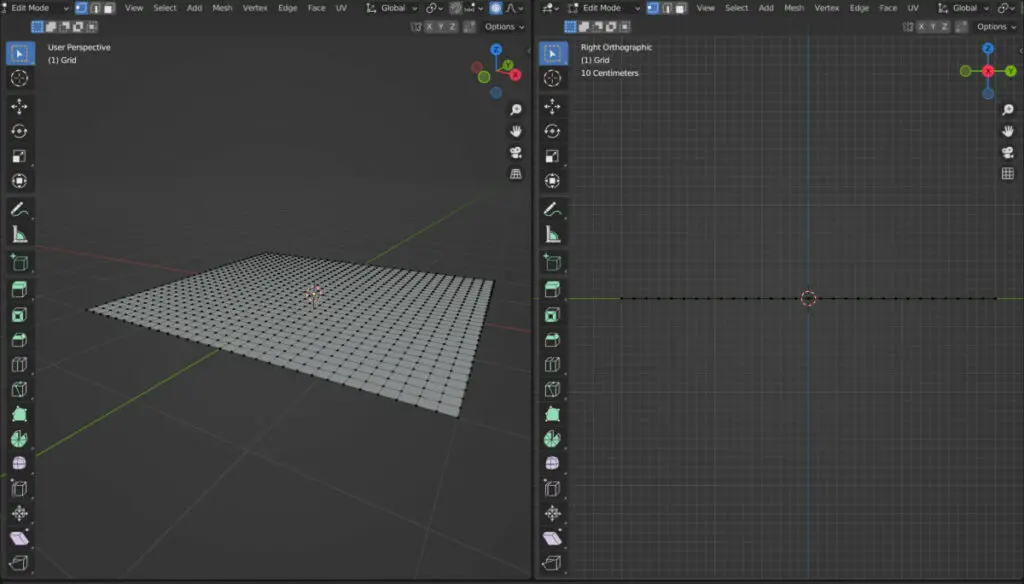
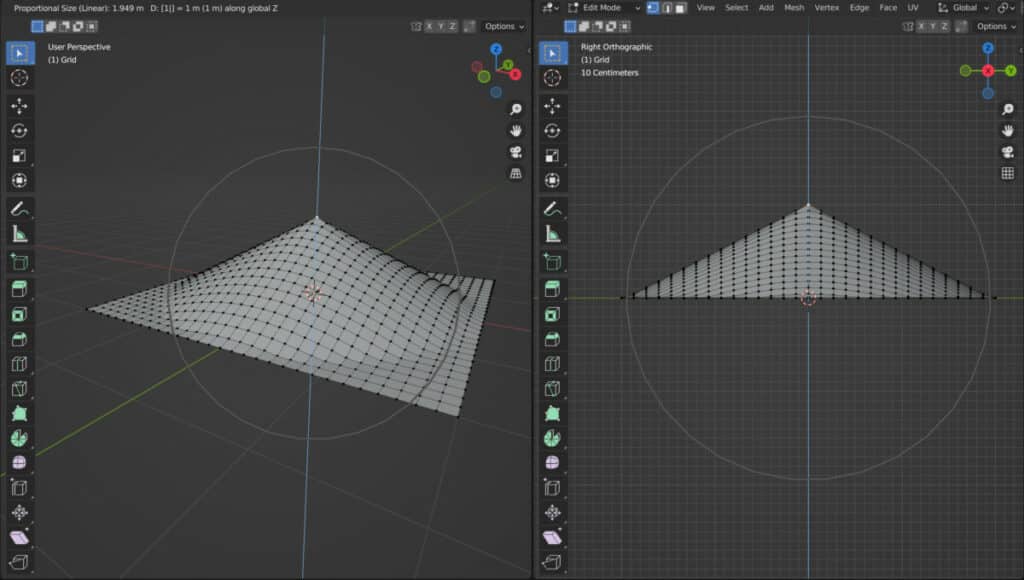
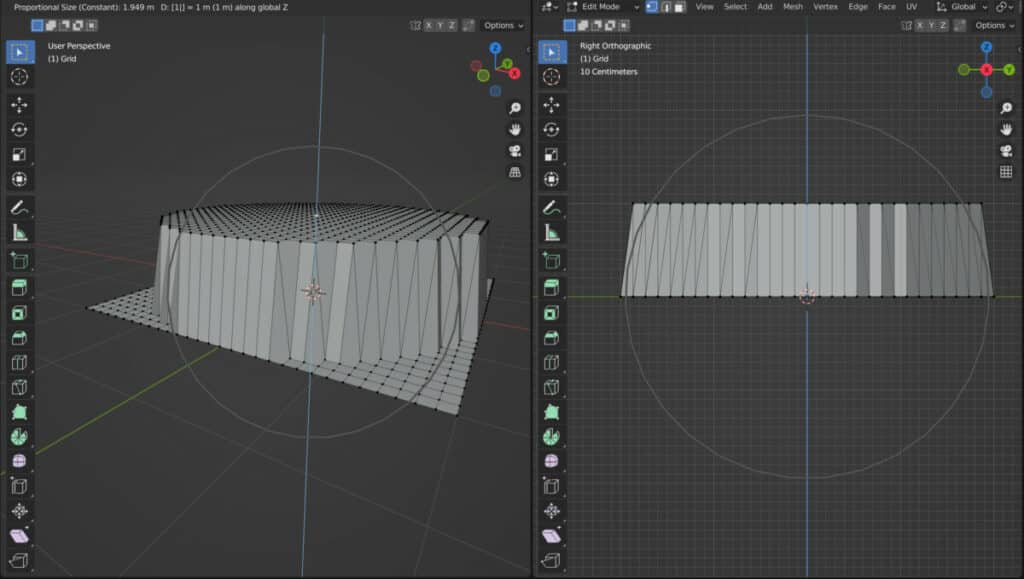
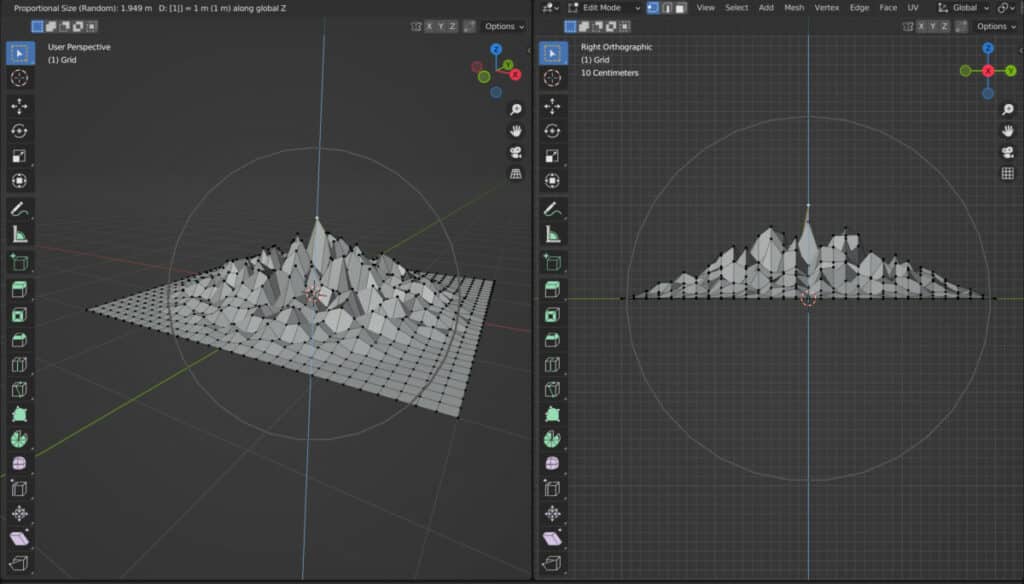
Finally, each of our falloff types will have the same proportional size of around 1.95 (Exactly Value Not Important) and will be grabbed by a value of 1 on the Z axis.
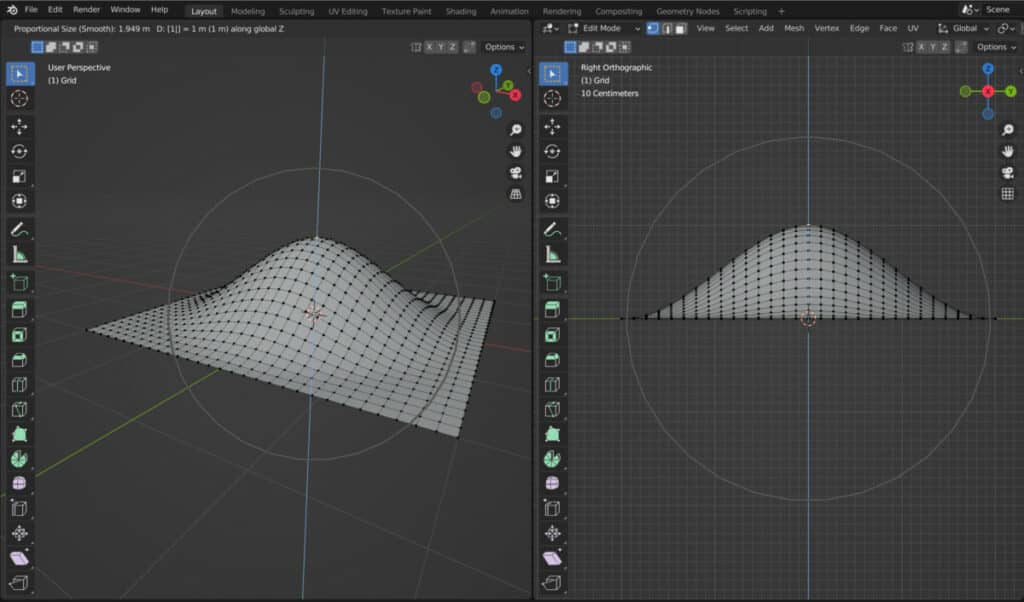
Smooth
The default setting is the smooth falloff, which has a smooth transition in the areas with the most minor and most influence, giving a very natural and curved look to the shape.
Sphere
With the sphere option, a strong influence is maintained for much of the area’s diameter with a much steeper falloff towards the edge.
Root
With root falloff, you have a primarily linear decrease in influence for the middle area with a very sharp finish both in the center and at the edge of the area.
Inverse Square
When using the inverse square falloff, the inner 30% of the circle receives a strong level of influence while we see a constant dropoff towards the outer edge.
Sharp
When you are using the sharp falloff, the initial dropoff in influence is quick, resulting in a pointy appearance towards the center. The influence tapers off quicker than most other types as a result.
Linear
This one is the easiest to understand because there is no curvature here. The further away the geometry is from the center, the less influence the tool has, and the rate drops consistently as we move toward the edge of the area.
Constant
This is the true or false falloff type. All geometry within the area of influence has a theoretical value of one and therefore is 100% influenced by the tool. In contrast, all geometry outside is set to a value of 0 as normal.
Random
Using a linear falloff as the base, the random falloff type assigns semi-random values to each vertex, edge, or face to create a far more variable effect. The geometry in the center still has a theoretical value of 1, while the geometry on the edge has a theoretical value of 0.
Additional Options When Using Proportional Editing In Edit Mode
One key change when using proportional editing in edit mode is the availability of two additional tools, which can further influence how your geometry is manipulated.
Projected From View
The second of the two new options is the 1st that we will cover since we don’t need to introduce anything. When using project from view the angle at which we are viewing our scene from in the viewport becomes an additional stage in calculating how proportional editing works.
Resetting our falloff type to smooth, we can repeat our experiment, moving our geometry up on the Z axis by 1. If we do this in the perspective viewport, we get the following result.
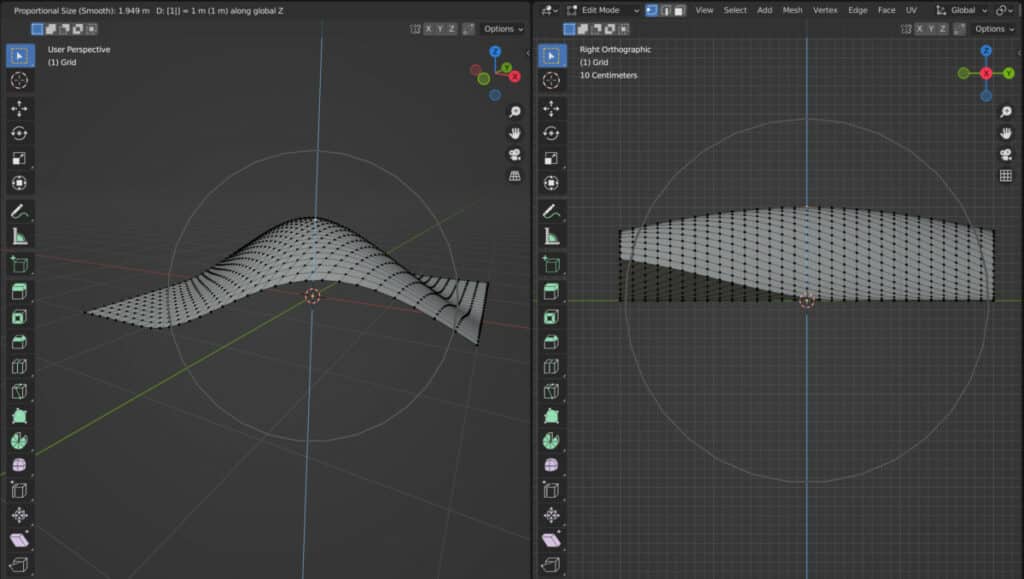
The way in which the falloff is calculated takes into account the angle from which the object is viewed from.
On the other hand, using the same tool in the same way but in our second viewports orthographic view creates a very different result.
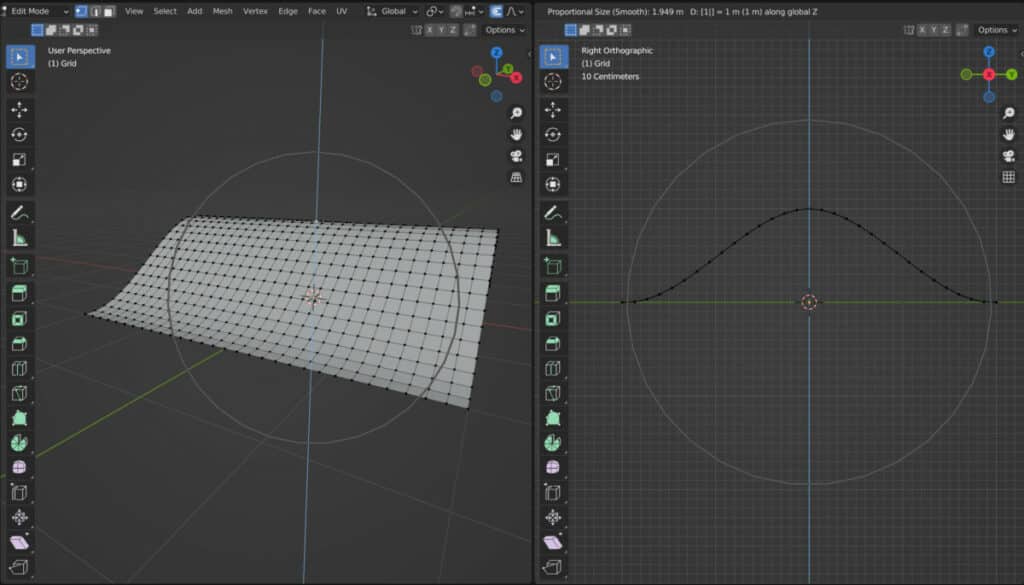
Instead of an angled curved, we have more of a straight slope in the perspective view. The result in the orthographic view shows that the distance on the X-axis is ignored entirely, and we end up with something that looks a lot like the icon of the falloff type.
We can return to many of the other falloff types using project from view to gain an even clearer idea of how proportional editing is designed to work, as we effectively get a line in orthographic view to demonstrate the falloff.
Connected Only
More complex objects are likely to use islands, which are parts of the mesh that are disconnected from the rest of the model.
For our demonstration, we added a UV sphere and positioned it above our plane.
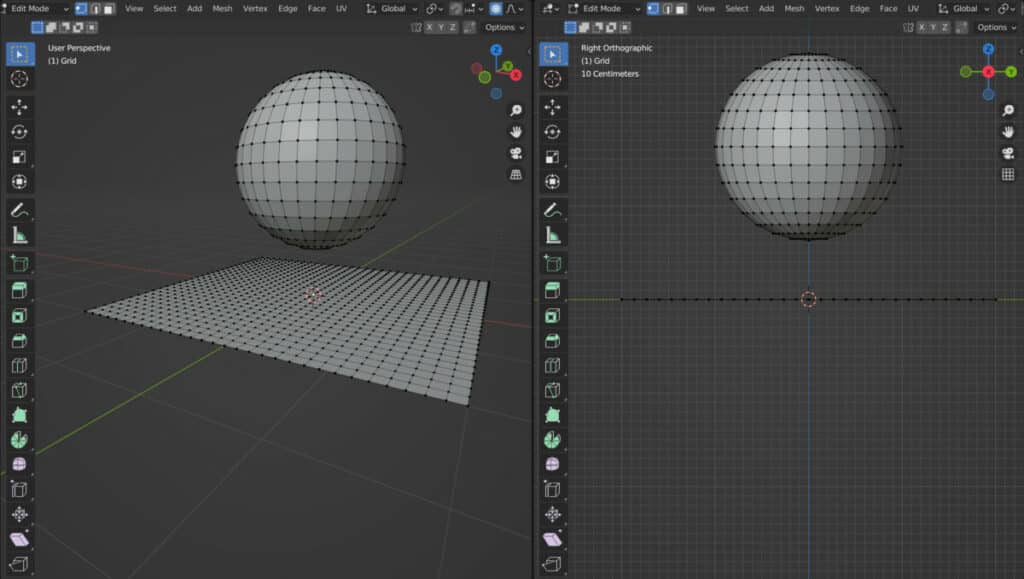
The UV sphere is added as a mesh within edit mode and is not a separate object but an island of the same object.
If we were to use the proportional editing tool on the same vertex of our plane and move it up on the Z axis by 1, the bottom half of the sphere would also be affected.
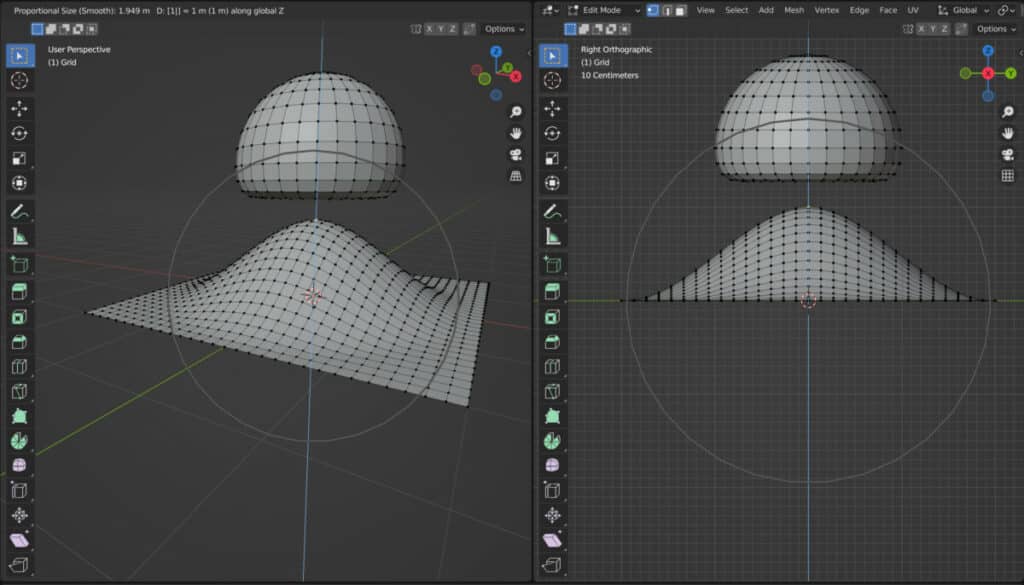
Sometimes we want this behavior, while other times, we only want to manipulate the island we have selected, which in this case is the plane.
If we turn on the connected only option, and then repeat the grab operation once more, then the UV sphere will be unaffected by proportional editing.
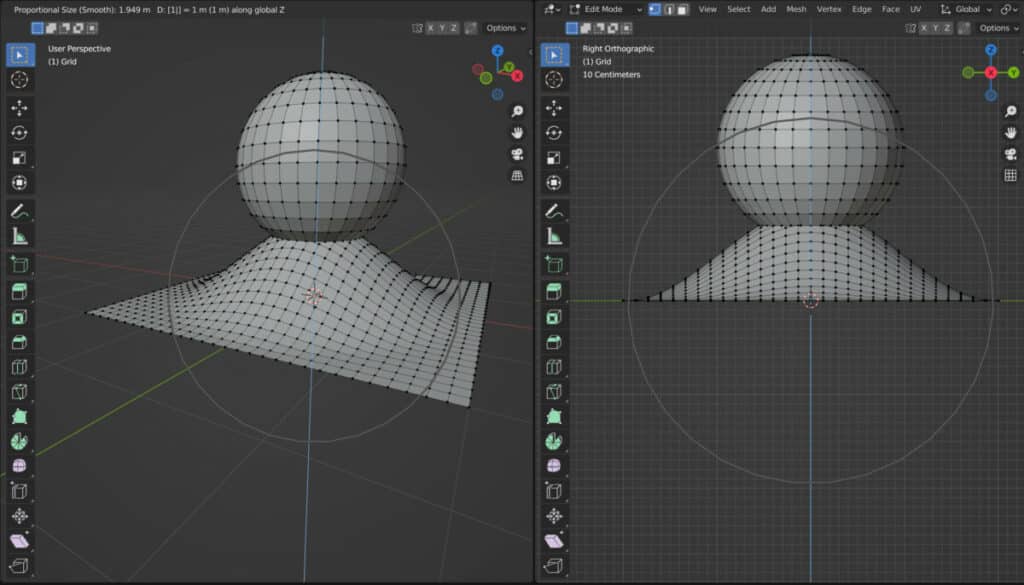
Note that when the connected-only tool is active, the projected from view tool will be disabled even when the box is ticked.
Thanks For Reading
We appreciate you taking the time to read through the article. We hope you found the information you were looking for. If you are interested in learning more about the Blender software, you can check out a few of the articles we have listed below.
- Using The Pivot Point System In Blender
- What Is The Object Origin And How Does It Work
- Using Different Transform Orientations In Blender
- Complete Guide To What Your 3D Cursor Can Do
- What Is An Empty And How To Use Them With Objects
